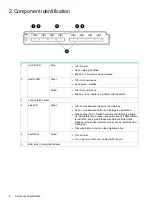
Connecting cables to the switch
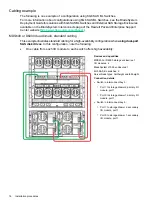
After confirming that the desired firmware is installed on the switch, connect SAS cables between
the switch and the external SAS storage enclosures or external backup devices. Per your
configuration plan, connect the external devices to switch ports that the desired servers will be
able to access. (See
and
“Planning the configuration” (page 9)
.)
The 6Gb SAS BL Switch uses SAS cables with mini-SAS universal connectors. For a list of
supported cables, see the SAS BL switch QuickSpecs.
IMPORTANT:
Confirm that firmware installed on the external SAS devices is supported for
use with the firmware installed on the switch. Consult the QuickSpecs for the switch and all
attached external devices and confirm that compatible, supported versions of firmware are
installed.
Cabling best practices
•
In single-domain configurations (and when using single-port drives), be sure to connect the
cable from the switch to the primary controller or I/O module in the storage enclosure.
•
In MDS600 and D6000 high-performance configurations with two cable connections from
the same MDS600/D6000 I/O module to the same 6Gb BL SAS Switch, ensure that both
cables from storage enclosure connect to one of the following pairs of switch ports: 1/2; 3/4;
5/6; or 7/8.
•
In high-availability, dual-domain configurations with paired switches, redundant controllers
or I/O modules, and dual-ported SAS disk drives, connect cables from the redundant modules
in the storage enclosure to the same switch port on the paired switches. For example, connect
the storage enclosure to port 2 on each switch. This parallel cabling strategy ensures easier
record-keeping, troubleshooting, and support.
•
Ensure that cabling in the back of the rack system does not interfere with system operation
or maintenance. Bind cables loosely with cable ties and route the excess out of the way,
along the side of the rack. When cables are tied together and routed down the side of the
rack, system components and indicators are easily visible and accessible.
•
Attach a label near both ends of each cable to identify the device connected to that cable.
Include the device, device name, port, or other useful information.
•
Use colored markers or labels to color-code both ends of each cable and help you visually
identify a particular cable without having to read or locate the label.
•
Use the shortest possible cable between devices. Shorter cables are easier to manage and
route along the back of the rack. In addition, shorter cables reduce the possibility of signal
attenuation that can occur over longer distances.
IMPORTANT:
External storage enclosures are tested and approved for use with specific
cable lengths. Before purchasing and connecting SAS cables to external storage enclosures,
check the QuickSpecs for the device and make sure that cables do not exceed the maximum
supported length.
Connecting cables to the switch
15

