background image

26

27

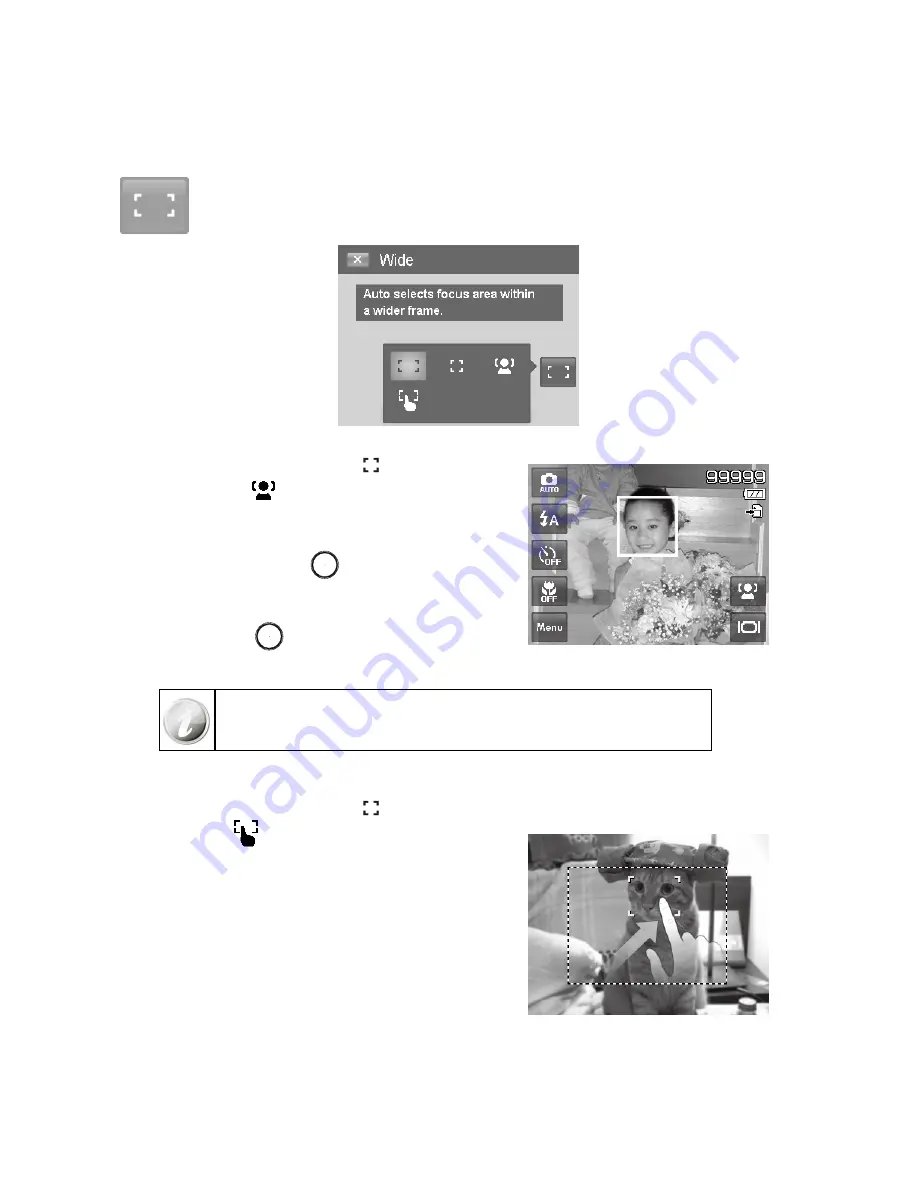
Setting the AF Area/Face tracking/Touch Shot

AF stands for Automatic Focus. This feature determines the area on which the camera focuses.

To set AF Area:

Tap the onscreen AF Area button to display the popup AF Area menu and tap the desired icon.

• 

How to use Face tracking:

Tap the onscreen 

1. 

AF Area


button


 and then choose 

Face Tracking


.

Frame the target(s), when a face is detected, a white focus 

2. 

box appears on the screen and tracks the face continuously.

Press the 

3. 

Shutter button


 halfway, the white box 

turns into green (success focus), or red (focus failed).

If the box of main focus target turns green, press the 

4. 

Shutter button


 (full press) to take the shot.

Or, release the shutter to re-focus target(s).

5. 

Up to 10 faces can be detected in the same time.

How to use Touch shot:

Tap the onscreen

1. 

 AF Area button 

 and then choose 

Touch shot


 .

Frame the subject with the yellow focus frame on the 

2. 

screen.

Tap the yellow focus frame and a dotted line area appears 

3. 

on screen.

Drag the focus frame to desired position 

4. 

within

 the dotted 

line area.

Release your finger from the screen, the camera performs 

5. 

AF and then captures the image.

If your finger left the screen outside the dotted line area 

6. 

and the camera did not perform AF and shooting, please 
repeat step 2 to 5 again.

Summary of Contents for PW460t

Page 1: ...PW460t Digital Camera User Manual ...

Page 2: ......

Page 3: ... 11 Using the Touch Screen 12 Touch screen Layout 12 Changing the LCD Monitor Display 18 Recording Photos Videos and Voices 19 Taking Photos 19 Using Voices Recording 19 Recording Videos 20 Using the Stabilizer Feature 22 Setting the Zoom Control 22 Using Flash Features 24 Setting the Focus Mode 25 Setting the Drive Mode 25 Setting the AF Area Face tracking Touch Shot 27 Using the Record Menu 28 S...

Page 4: ... Movies 53 Playing Voice Recording 53 Playing Voice Memo 53 Volume Control 54 Playback Menu 54 Perspective Control 57 Using the Setup Menu 66 Setting Sounds 66 Setting Power Save 67 Setting LCD Save 67 Setting Date Time 67 Setting Language 67 Setting TV Out 68 Setting LCD Brightness 68 Setting Battery Type 68 Setting Memory Kit 69 Reset All 69 Making Connections 70 Connecting the Camera to a TV 70...

Page 5: ...eption which can be determined by turning the equipment off and on the user is encouraged to try to correct the interference by one or more of the following measures Reorient or relocate the receiving antenna Increase the distance between the equipment and the receiver Connect the equipment to an outlet on a circuit different from that to which the receiver is connected Consult the dealer or an ex...

Page 6: ...eriod of time it is normal for the camera body to feel warm Do not remove the battery while downloading pictures videos or audio content This could result in a complete loss of these items It is recommended to remove the battery if the camera will not be used for a long period of time When inserting the battery in this camera ensure that they are oriented correctly Please see Inserting the Battery...

Page 7: ...nts Please check the contents of your camera package It should contain Digital camera Li ion Battery x 1 pcs Battery charger Camera strap USB cable User Manual and Software installation Quick Start guide Warranty card ...

Page 8: ...rger as shown 1 Connect the power cord to the battery charger 2 Plug the power cord to the main outlet 3 The battery charging time is 2 hours Inserting the Battery Follow these instructions to insert the rechargeable battery into the battery memory card compartment Please read Battery Information on page 2 before inserting removing battery If the battery are already installed make sure to power of...

Page 9: ...ard into the memory slot until it clicks into place 4 If the card does not click into place repeat the previous step to ensure proper orientation Close the Battery memory card compartment 5 To remove the SD SDHC card Make sure to power off the camera before proceeding Removing the 1 memory card while powered on may damage the card and camera Open the battery memory card compartment 2 Gently push t...

Page 10: ...e reseller or manufacturer of the memory card for class rating details If a SD SDHC card is inserted in the memory slot the camera automatically saves all images videos and audio clips to this storage card The LCD memory card icon indicates the camera is using SD card Not all cards may be compatible with your camera When purchasing a card please check the card s specifications and take the camera ...

Page 11: ... View 1 2 3 4 Flash 1 Microphone 2 Self timer LED Assist Lamp 3 Lens 4 Back View 7 5 6 LCD monitor 5 LED indicator 6 Playback Button 7 Top View 10 11 8 9 Stabilizer button 8 Power button 9 Shutter button 10 Zoom Button 11 ...

Page 12: ...8 Bottom View 13 15 12 14 Tripod screw hole 12 Battery Memory compartment 13 Speaker 14 USB TV Out 15 Left Right View 16 Strap ring 16 ...

Page 13: ... in 78 Playback Press to enable Playback mode or return Record mode Onscreen Touch Buttons The control buttons appear on the touch screen and change dynamically depending on the task you re performing Icon Touch Button Description Record mode Tap to launch the scene mode menu Self timer Burst Tap to popup the self timer burst menu Macro Tap to popup the macro menu AF area Face tracking Tap to popu...

Page 14: ...ou will be asked to do the initial settings of your camera First is the setup of language menu Specify in which language menus and messages are to be displayed on the LCD monitor Setting the Language Specify in which language menus and messages are to be displayed on the LCD monitor Tap 1 or to turn pages Tap the desired language button and apply 2 Setting the Date Time Tap the screen to select Ye...

Page 15: ...mera every time You are able to take photos and record videos audio clips in this mode Playback mode Press the Playback button after the camera is turned on to view and edit captured images or playback videos and audio clips The recording of voice memo attached to images is available in this mode ...

Page 16: ...cates current storage media in use Options are Internal memory and SD SDHC memory card 7 Shake warning Indicates that the camera is moving too much that may result in image blur Use of a tripod or steady hand may be required 8 Touch button AF area Face tracking Tap to display the AF area face tracking popup menu 9 Touch button Display Tap to switch the display mode of the LCD monitor 10 Image Stab...

Page 17: ...Displays shutter speed settings Please see page 26 for additional details 21 Aperture value Displays aperture settings Please see page 15 for additional details 22 Touch button Menu Tap to launch record menu 23 Touch button Macro Tap to display the macro popup menu 24 Touch button Self timer Burst Tap to display the self timer burst popup menu 25 AEB Indicates AEB function is enabled 26 Touch butt...

Page 18: ...t storage media in use 6 Touch button Display Tap to switch the display mode of the LCD monitor 7 White balance Displays white balance settings Please see page 40 for additional details 8 Metering Displays metering settings Please see page 41 for additional details 9 Resolution Displays video resolution settings 10 Touch button Menu Tap to launch record menu 11 Touch button Macro Tap to display th...

Page 19: ...speed Displays shutter speed setting of the image 8 Flash Displays flash setting of the image 9 White balance Displays white balance setting of the image 10 ISO Displays ISO setting of the image 11 Exposure Displays exposure setting of the image 12 Folder Filename Indicate the location filename of the image 13 Date Time Displays the recorded date time of the image 14 DPOF Indicates the file is mar...

Page 20: ...te the location filename of the video clip 8 Recording date time Displays the date and time of the video clip at the time is was recorded 9 Video Resolution Indicates the resolution setting of the video clip at the time is was recorded 10 Touch button Menu Tap to launch playback menu 11 Touch button Previous file Tap to view the previous file 12 Protect Indicates file is protected Please see page ...

Page 21: ...dio clip 6 Touch button Display Tap to switch the display mode of the LCD monitor 7 Folder Filename Indicate the location filename of the audio clip 8 Date Time Displays the recorded date time of the audio clip 9 Touch button Menu Tap to launch playback menu 10 Touch button Previous file Tap to view the previous file 11 Protect Indicates file is protected Please see page 62 for additional details ...

Page 22: ...ion The OSD information may vary depending on the record mode type The following icons if enabled are still displayed on the LCD even when OSD off or Guide lines on AEB Face tracking AF lamp Drive mode and Macro Use the Guide lines to properly set image for capture In Playback mode the LCD display can be changed into any of the following Basic Full No icons or information LCD display cannot be cha...

Page 23: ...acket will turn green If the automatic focus and exposure routine is not successful the bracket will turn red If this occurs simply release the shutter and repeat this step until the bracket turns green In some situations lighting and contrast may be insufficient for the camera to successfully complete the auto focus and exposure level routine If this occurs try better lighting Pressing the 4 Shut...

Page 24: ... focus and exposure routine is not successful the bracket will turn red If this occurs simply release the shutter and repeat this step until the bracket turns green In some situations lighting and contrast may be insufficient for the camera to successfully complete the auto focus and exposure level routine If this occurs try better lighting Pressing the 4 Shutter button down fully will begin the v...

Page 25: ...e Internet Mode allows you to record videos with predefined video settings for easy upload to the Internet website The Internet supports two file upload standards Single File Uploader The maximum video file size is up to 100 MB Internet Uploader The maximum video file size is up to 1 GB Most uploaded video length ranges within 5 minutes Therefore when you record using the YouTube mode the followin...

Page 26: ... the stabilizer icon is displayed on the LCD monitor and the ISO setting is automatically set to Auto See Setting ISO on page 41 for more details Setting the Zoom Control Using a combination of 4 times optical zoom and 5 times digital zoom permits zoom photography at up to 20 times magnification While the digital zoom can be a useful feature the more an image is enlarged zoomed the more pixelated ...

Page 27: ...m 1X to 4X Digital zoom 1X to 5X Digital zoom is not available for video recording Slight camera movement in digital zoom will make it more difficult to focus on objects subjects Use of a tripod can reduce this issue ...

Page 28: ...light thus reducing the reflection red eye effect of the Eye retina The second strobe is when the photo is taken Forced on The flash fires whenever you press the Shutter button regardless of lighting conditions This may be useful in some bright backlight situations Slow sync This would be used to capture a dimly lit background while keeping the foreground subject properly lighted This flash mode f...

Page 29: ...us This mode is designed to accurately focus on a desired subject so that closer and further objects are out of focus For example the camera might focus on a nearby tree and the distant trees and mountains are blurry as well as an even closer object such as a flower Infinity When Infinity is set the camera focuses on distant objects This may be good to use when taking landscape photos Setting the ...

Page 30: ...Self timer Performs delay and capture twice Performs a 10 second delay then captures the image Performs another 2 second delay then captures the image again Burst Performs continuous shooting when the Shutter button is pressed Stops shooting when the Shutter button is released Speedy Burst Captures 30 images in a shot when the Shutter button is pressed Auto set Image size to VGA only Off Captures ...

Page 31: ...us or red focus failed If the box of main focus target turns green press the 4 Shutter button full press to take the shot Or release the shutter to re focus target s 5 Up to 10 faces can be detected in the same time How to use Touch shot Tap the onscreen 1 AF Area button and then choose Touch shot Frame the subject with the yellow focus frame on the 2 screen Tap the yellow focus frame and a dotted...

Page 32: ... controlled by finger and performs AF and shooting Using the Record Menu The Record menu allows you to change modes and setup other capture settings Record Menu To go to Record Menu Tap the onscreen 1 MENU button to launch the Record Menu Tap 2 or to turn pages Tap the desired option button to enter submenu 3 Configure the settings in the submenu 4 Press the onscreen 5 button to save and apply cha...

Page 33: ...hoto on the left is a typical auto mode result and the photo on the right illustrates the benefit of selecting that scene mode It is important to note that by selecting a particular scene mode other that Auto will take the camera out of it s normal automatic settings capabilities and therefore optimise various settings that match a specific scene Press the 4 to save and activate the selected scene...

Page 34: ...ntaining the clarity and brightness of the background details Kids This feature forces the camera to select settings that will be optimal for moving kids Red eye reduction and skin tone enhancement are also a benefit of using this mode Night Scene This feature is used to taking photos with night scenery background Camera settings will be adjusted to capture brighter and more vivid night shots For ...

Page 35: ...This feature combines up to 4 shots into a single photo and provides 4 patterns to select for usage of auction It also selects resolution settings that produce detailed but smaller size photos that are ideal for email attachments and online auction postings Smile Capture This feature uses face tracking to auto detect faces to capture Press the Shutter button and with each smile the camera automati...

Page 36: ...ountdown In a few seconds the camera automatically take a picture The camera will continue to snap photos as long as the one or more subjects are in range This feature is great to compose never before possible self portraits HDR This feature applies digital processing only to the necessary portion s of the image and preserves details in highlights and shadows with natural contrast Voice Recording ...

Page 37: ...onditions this icon changes to show the detected scene mode To activate Intelligent Scene Select 1 from the Scene Mode submenu Focus the camera on the subject to capture 2 The camera detects the shooting conditions and 3 switches to an appropriate scene mode Half press the 4 Shutter button to focus the subject The frame turns green to indicate focus is set Press the 5 Shutter button to take the sh...

Page 38: ...it makes wrinkles and lines look less conspicuous while preserving resolution in areas of the picture outside of the skin The camera detects skin color area such as the face and processes the image to make the skin appear smooth Using Food Mode How to share your dining experiences and comments of interesting widgets on your blog by close up images Just get the camera and set the scene with food mo...

Page 39: ...tion button to reset pattern Tap 6 Continue button to proceed the second shot Or tap 7 Cancel button to go back the first shot Repeat step 4 to 6 until the pattern is filled in images 8 Tap 9 Save button to save the composed image Or tap 10 Cancel button to go back last shot The image can be transferred to PC via USB cable Please 11 refer to Connecting the Camera to a PC on page 70 or memory card ...

Page 40: ...camera shutter and take a shot automatically Using Blink Detection Mode Nothing ruins a great picture more than having a subjects eyes closed Blink Detection provides an extra assurance when capturing once in a lifetime moments If closed eyes are detected a saving confirmation menu appears on the screen allowing you to re take the shot before your subject or subjects move on To activate Blink Dete...

Page 41: ... temporarily image and repeat this step until the desired background is achived Tap the button to cancel the semi transparent temporarily image Ask someone else to take the desired picture by using the semi 2 transparent screen image as a guide Move your position until photographer confirm your whole or half 3 body in the frame and in the right place Press the 4 Shutter button Camera stores the im...

Page 42: ...ds the camera to reduce double chin Angle your body and bend your arms to look slimmer Keep your shoulders back Using HDR Mode Active HDR mode preserves details in highlights and shadows creating photos with natural contrast Use for high contrast scenes for example when photographing brightly light outdoor scenery through a door window or taking pictures of shaded subjects on a sunny day With this...

Page 43: ...con Pixel Size Printing Size Suggestion 4000 x 3000 A2 Size 4000 x 2672 A2 Size 3264 x 2448 A3 Size 2592 x 1944 A4 Size Icon Pixel Size Printing Size Suggestion 2048 x 1536 4 x 6 1920 x 1080 HDTV 640 x 480 E mail Setting Quality This allows the quality compression at which the photo is captured to be increased or decreased The quality determines the amount of compression applied to the photos Supe...

Page 44: ...te Balance This sets the white balance for a variety of lighting conditions and permits photos to be captured to the desired level As you tap and turn through the pages you can see the closet 3 adjusting preview on screen synchronously Below is a table with a description of the different settings Icon Item Description Auto The camera automatically adjusts the white balance Daylight Ideally used fo...

Page 45: ... first Setting Metering The Metering function allows adjustment to select the area of the subject or frame by which the camera measures light to record still images or video As adjustments to the settings are made the LCD screen synchronously displays the image applying the metering settings Below is a table with a description of the different settings Icon Item Description Multi The camera measur...

Page 46: ...uses To set AF Area From the Record menu tap 1 AF Area Tap the desired option button to apply 2 For more information please refer to Setting the AF Area Face tracking Touch Shot on page 27 Setting AF Lamp The AF Lamp function allows you to record images even low light conditions If AF Lamp is set to Auto the AF lamp located in the front of the camera see Front View on page 7 emits an red light by ...

Page 47: ...Normal sharpness Low Softens the image Setting Saturation The Saturation function lets you adjust the color saturation in your photos Use a higher saturation setting for rich colors and a lower saturation setting for more natural tones To set Saturation From the Record menu tap Saturation 1 Tap the desired option button to apply 2 The table below shows the available Saturation settings Icon Item D...

Page 48: ... Record menu tap 1 Flash Tap the desired option button to apply 2 For more information please refer to Using Flash Features on page 24 Setting Drive Mode To set Drive mode From the Record menu tap 1 Drive Mode Tap the desired option button to apply 2 For more information please refer to Setting the Drive Mode on page 25 Setting Focus Mode To set Focus mode From the Record menu tap 1 Focus Mode Tap...

Page 49: ... Normal The camera records normally Vivid The camera captures the image with more contrast and saturation emphasizing on the bold colors Sepia Used to add the effect of an aged photo or video B W Images are captured in black and white Vivid Red Images are tinted red Ideally used to record images like flowers and cars to make them more vivid Vivid Green Images are tinted green Ideally used to recor...

Page 50: ...eteriorates Off Uses the optical zoom only Digital Zoom is not available in Face tracking on Video and Voice Recording modes The maximum Intellect zoom scale varies depending on the image type and resolution Setting the Date Stamp The date of recording can be printed directly on the still images This function must be activated before the image is captured Once date and time are stamped on a photo ...

Page 51: ...shooting it If Auto review is On the camera will display the captured image for 1 second on the LCD monitor To set Auto Review From the Record menu tap Auto Review 1 Tap On Off to enable disable Auto review 2 White Balance Metering Color Mode To set above settings please refer to pages 40 41 45 ...

Page 52: ... hit the most recent three seconds of video are added to the beginning of the clip Display the icon in red while turning Pre record on To set Pre Record Tap the onscreen Pre Record button to enable disable the function The icon display in red while turning Pre Record on Pre Record will be canceled in the following situation After recording starts Switch to Photo mode or Playback mode Any kind of m...

Page 53: ... on the LCD monitor To view images videos audio clips follow the steps below Press the 1 Playback button on the camera The LCD monitor displays an image To understand the icons and other information on the screen please see 2 Photo Mode Screen Layout on page 12 Still Image Video Audio Clip Tap the 3 or onscreen buttons to view next previous image video audio To play a video or audio clip tap the o...

Page 54: ...low shows the function of onscreen application buttons in photo stream mode Icon Item Description Delete Tap to popup delete confirmation For more information please refer to Delete on page 60 Search Photos Tap to launch photo search menu For more information please refer to Search Photos on page 54 Favorite Tap to launch add to favorite menu For more information please refer to Favorite on page 5...

Page 55: ...amera to 1 Playback button Move the zoom toggle to the wide position twice 2 to display the calendar mode Move the zoom toggle to the telephoto position twice to exit the calendar mode Tap to select desired date to view the files in single navigation 3 mode In calendar mode The first file Including photo video audio and error file recorded on each date appears on the screen Move the zoom toggle to...

Page 56: ...agnification level The 4 arrows on the LCD monitor indicate that the image is zoomed in You can zoom to view an image up to 12X Drag the enlarged image to desired position Press the Shutter button to close zoom view Draw a circle clockwise counterclockwise in single navigation mode to enlarge the image up to 4X For 320 x 240 resolution images you can only zoom in up to 6X ...

Page 57: ...playing info appears 2 seconds then hide Tap the screen to pop them up Playing Voice Recording Set the camera to 1 Playback button Tap the onscreen 2 Play button to play the voice recording Tap the 3 button to pause playback tap the button to resume Tap the 4 button to stop the playback and return single navigation mode Tap the 5 button to set repeat on off Volume cannot be adjusted when you Pause...

Page 58: ...to control volume 3 Press zoom in out to increase decrease volume Playback Menu The Playback menu allows you to edit images record voice memo and setup playback settings To go to Playback Menu Set the camera to 1 Playback button Tap the onscreen 2 MENU button to launch the Playback Menu Tap 3 and to turn pages Tap the desired option button to enter submenu 4 Configure the settings in the submenu 5...

Page 59: ...by 4 Enter Calendar mode then back single navigation Reboot Search by Favorite Favorite groups list in order of Please refer to Favorite on page 56 to know about how to add files into these groups Tap the group button to display all files of the group in single navigation mode Search by Scene Tap the group button to display all files of the scene in single navigation mode Search by Date All date g...

Page 60: ...0 1 sec Tap to select Transition settings 2 Horizontal Shrink Fade Random Tap to select Repeat setting 3 Available settings are Yes No Favorite Arrange your files by sorting them to the built in 10 favorite groups The feature makes it easier to locate the desired photo video voice recording among numerous files with the function Search Photos To add remove files to Favorite groups Set the camera t...

Page 61: ...Tap the onscreen 2 MENU button to launch playback menu and tap Red Eye Correction Tap the onscreen Start button to popup confirm menu 3 Tap 4 YES to save the corrected image as a new one Cancel to abort Repeat step 2 to 4 to enhance the correction if necessary 5 Perspective Control You may have noticed that buildings look as though they are thinner at the top when you shoot from a low viewpoint al...

Page 62: ... level button to popup confirm menu 4 Tap 5 YES to save blurred image as a new photo Cancel to abort Color Mode The Photo Edit function lets you adjust edit still images to apply different colors or tones for a more artistic effect Edited photos in this function are saved as a new file To set Color Mode for an image Set the camera to Playback mode and locate the desired 1 photo by single navigatio...

Page 63: ...to Playback mode and locate the desired 1 image by single navigation or photo stream mode Tap the onscreen 2 MENU button to launch playback menu and tap Painter Or tap the onscreen 3 button from photo steam mode Use your finger tip and the painter tools to edit the picture 4 Tap the 5 X button to Yes Cancel edited image Or Tap the 6 button to save the image Tap 7 YES to save the image as a new pho...

Page 64: ...ld be replaced by the new one Delete The Delete function allows to remove unwanted files in the internal memory or on the memory card Protected files cannot be erased to delete unprotect the file first See Protect on page 62 To delete a photo video audio clip Set the camera to Playback mode and locate the desired image by single navigation or photo stream mode 1 Tap the onscreen 2 MENU button to l...

Page 65: ...can be selected in one time for Delete To delete multiple files Tap the 1 Multi button in the delete submenu and the images are displayed in thumbnail mode on the LCD monitor Tap all you desired files to highlight a delete mark 2 Tap the 3 button to popup confirm menu Tap 4 YES to delete the marked files Cancel to abort To delete all files Tap the 1 All button in the delete submenu to popup a conf...

Page 66: ...elect Single in the protect submenu 1 Tap 2 or buttons to scroll the display When the desired file is displayed on the LCD monitor tap the 3 onscreen Lock Unlock button to protect unprotect it Tap 4 button anytime to exit the protect screen and return single navigation mode To protect unprotect multiple files Tap 1 Select button in the protect submenu the images are displayed in thumbnail mode on ...

Page 67: ...U button to launch playback menu and tap Trim Press the 3 Wide Tele key on the Zoom button to change trim size Tap the 4 way indicator on the screen to move trim area to 4 your desired position Tap the 5 button to save the trimmed image as a new image and return single navigation mode NO Description 1 Return button 2 Preview screen 3 4 Way indicator 4 Save button and trimmed size 5 Image area 6 Th...

Page 68: ...n rotate a still image 90 180 and 270 degrees To rotate an image Set the camera to Playback mode and locate the desired image by 1 single navigation mode Tap the onscreen 2 MENU button to launch playback menu and tap Rotate Tap the 3 or button to rotate the image Tap the 4 button to save the rotated image as a new one and return to single navigation mode Startup Image You can specify the startup i...

Page 69: ...playback menu Tap to select 2 DPOF Available settings are as follows Single Select a single image to mark All Mark all images in the memory card Reset Reset all DPOF settings to initial settings To set DPOF on a single image all images Tap to select 1 Single or All on the DPOF submenu For single image tap the 2 or button to scroll and select an image to mark for printing Specify the number of copi...

Page 70: ... to save and apply changed settings Tap the 7 or button to exit the menu or return main menu anytime Setting Sounds Use the option buttons to control the sounds produced by the camera From the Setup menu tap to select 1 Sounds Configure settings by tapping the option button 2 Tap the 3 button to apply Icon Item Description Startup Sound 1 Sound 2 Sound 3 Off Selects the startup sound when camera i...

Page 71: ...on during video playback slideshow video recording and Pre Composition scene mode shooting Setting Date Time Use the Date Time function to set the date and time of your camera This function is useful in attaching date stamps on captured images Your camera uses a 12 hour time format Setting Language Specify in which language menus and messages are to be displayed on the LCD monitor Use the navigati...

Page 72: ... TV out is not set correctly the image may not display properly on TV Available settings are NTSC Applicable in Japan USA Canada Taiwan and others PAL Applicable in Europe Asia excluding Taiwan Oceania and others Setting LCD Brightness Select a brightness level for the LCD monitor Available settings are Bright Normal ...

Page 73: ...al memory to the memory card If the photos were saved in the internal memory when inserting memory card into the camera you can use Copy to Card function in order to copy all photos from the internal memory into memory card If there is a memory card inserted in the memory slot the camera automatically saves all files to the memory card If there is no memory card or the internal memory is empty the...

Page 74: ...at See 2 Setting TV Out on page 68 Connect the USB AV 3 in 1 cable not included to the USB 3 port on the bottom of your camera Connect the other end of the cable to the TV s AV input port 4 The LCD monitor turns black and all images and videos are 5 displayed on the TV Connecting the Camera to a PC You can transfer photos videos and audio files to your PC Connect one end of the USB cable to an ava...

Page 75: ...necting the Camera to a Printer You can print your photos directly using a PictBridge compatible printer Turn on your Printer Check that the printer is turned on 1 there is paper in the printer and there are no printer error messages Connect one end of the USB cable to the printer while the 2 other end to USB terminal on the camera The USB mode menu appears on the screen Select 3 Printer by using ...

Page 76: ...ex Prints all images as thumbnails To set Print Select Tap the 1 or button to scroll and select an image for printing Specify the number of copies Tap 2 or to increase decrease the number Tap the 3 button to set date stamp On Off Tap the 4 button to start printing To set Print All and Print Index Repeat the same steps 2 to 4 then start printing After the printer has printed all the images that had...

Page 77: ...equence File numbering starts from 0001 when a new folder is created If the highest folder number is 999 and the highest file number exceeds 9999 the camera will display the warning message Folder cannot be created When this happens try one of the following ways Reset the file number See Setting File Numbering on page 67 Plug in a new memory card Do not change the folder and file names in the memo...

Page 78: ...CD screen displays Memory full Memory card is full Replace the memory card with a new one or delete unnecessary images LCD screen displays File locked This file is locked Unlock the file LCD screen displays Card locked The memory card is protected Remove the card and slide the write protect switch to it s unlock position LCD screen displays CARD HAS WRONG FORMAT The memory card is protected Remove...

Page 79: ...ginal dated sales receipt as proof of purchase and the issued RMA number You will be responsible for shipping charges when shipping the product to the service center The service agent will provide you with an address and you will also be responsible for any shipping charges to the warranty service center Once your product is received by this service center a replacement unit will be shipped back t...

Page 80: ...rench Italian 41 18009686 UK English 44 2073652400 North America United States English 1 866 694 7633 Canada English and French 1 866 694 7633 Country Language City Number México Español Mexico City 52 55 1204 8185 Guadalajara 52 33 1031 3872 Monterrey 52 81 1107 2639 Venezuela Español Caracas 58 212 335 4574 Colombia Español Perú 57 1 508 2325 Perú Español Lima 51 1 705 6232 Chile Español Santiag...

Page 81: ......

Page 82: ...P N 7525C00165A ...

Reviews: