background image

Edit pictures and video and create presentations

Connect external video devices

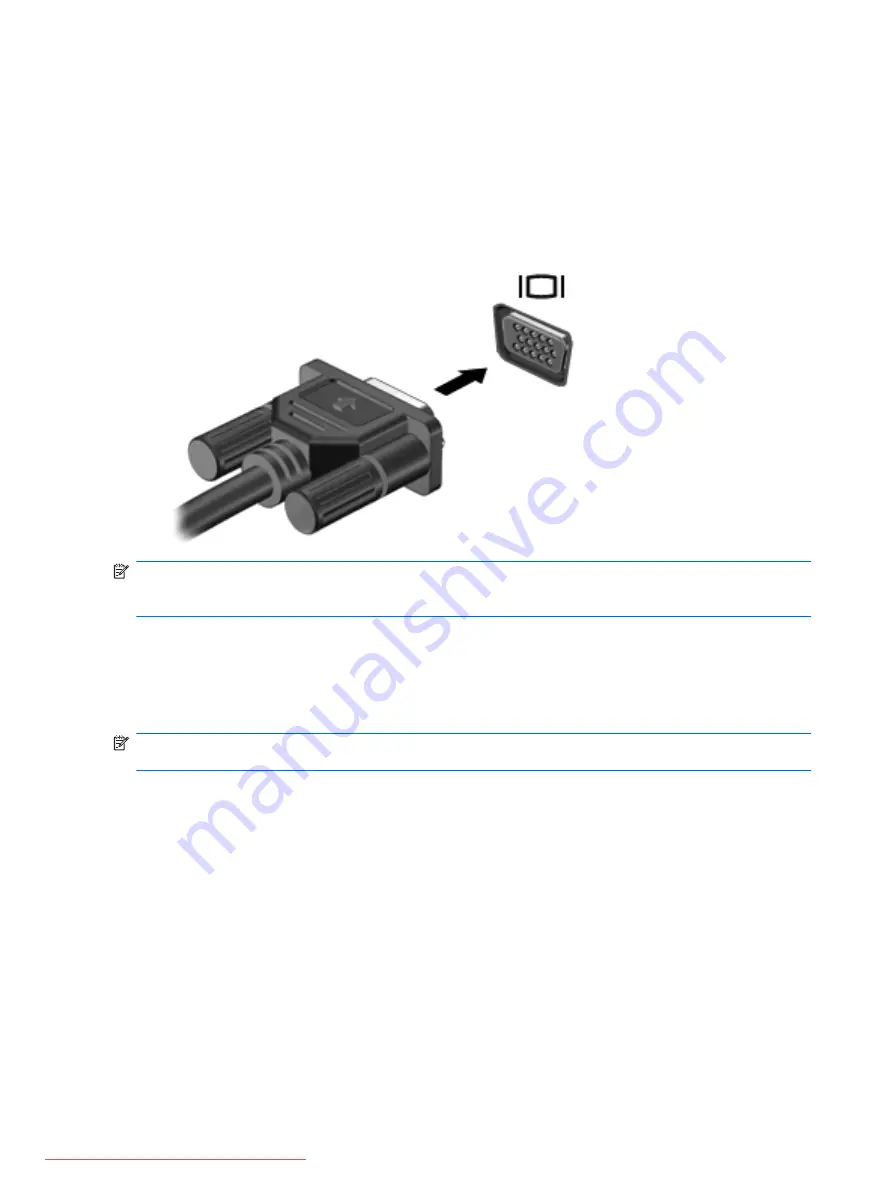
Connecting an external monitor or projector

The external monitor port connects an external display device such as an external monitor or a projector
to the computer.

To connect a display device, connect the device cable to the external monitor port.

NOTE:

If a properly connected external display device does not display an image, press the switch

screen image key to transfer the image to the device. Repeatedly pressing the switch screen image key
alternates the screen image between the computer display and the device.

Connecting an HDMI device

The computer includes an HDMI (High Definition Multimedia Interface) port. The HDMI port connects
the computer to an optional video or audio device, such as a high-definition television, or any compatible
digital or audio component.

NOTE:

To transmit video signals through the HDMI port, you need an HDMI cable (purchased

separately).

The computer can support one HDMI device connected to the HDMI port, while simultaneously
supporting an image on the computer display or any other supported external display.

36

Chapter 5   Multimedia

Downloaded from LpManual.com Manuals

Summary of Contents for PAVILION DM3

Page 1: ...HP Pavilion dm3 Entertainment PC User Guide Downloaded from LpManual com Manuals ...

Page 2: ...ies for HP products and services are set forth in the express warranty statements accompanying such products and services Nothing herein should be construed as constituting an additional warranty HP shall not be liable for technical or editorial errors or omissions contained herein First Edition December 2009 Document Part Number 589236 001 Product notice This user guide describes features that ar...

Page 3: ...surface such as an adjoining optional printer or a soft surface such as pillows or rugs or clothing to block airflow Also do not allow the AC adapter to contact the skin or a soft surface such as pillows or rugs or clothing during operation The computer and the AC adapter comply with the user accessible surface temperature limits defined by the International Standard for Safety of Information Tech...

Page 4: ...iv Safety warning notice Downloaded from LpManual com Manuals ...

Page 5: ...ntifying wireless and network status icons 13 Using the wireless controls 14 Using the wireless button 14 Using Wireless Assistant software 15 Using HP Connection Manager select models only 15 Using operating system controls 15 Using a WLAN 16 Setting up a WLAN 16 Protecting your WLAN 16 Roaming to another network 17 Using HP Mobile Broadband select models only 17 Inserting a SIM 18 Removing a SIM...

Page 6: ...keypad 30 Enabling and disabling the embedded numeric keypad 30 Switching key functions on the embedded numeric keypad 31 Using an optional external numeric keypad 31 Cleaning the TouchPad and keyboard 31 5 Multimedia Multimedia features 32 Adjusting the volume 32 Using the media activity keys 33 Multimedia software 33 Using HP MediaSmart software 34 Using multimedia software 34 Installing multime...

Page 7: ...tery discharge time 46 Managing low battery levels 46 Identifying low battery levels 46 Resolving a low battery level 47 Resolving a low battery level when external power is available 47 Resolving a low battery level when a charged battery is available 47 Resolving a low battery level when no power source is available 47 Resolving a low battery level when the computer cannot exit Hibernation 47 Ca...

Page 8: ...ces 61 Using a USB device 61 Connecting a USB device 61 Removing a USB device 61 Using Digital Media Slot cards 62 Inserting a digital card 62 Removing a digital card 63 9 Security Protecting the computer 64 Using passwords 64 Setting passwords in Windows 65 Setting passwords in Setup Utility 65 Administrator password 66 Managing an administrator password 66 Entering an administrator password 66 P...

Page 9: ...3 Updating the BIOS 73 Determining the BIOS version 73 Downloading a BIOS update 74 Updating programs and drivers 75 Appendix B Backup and recovery Creating recovery discs 76 Backing up your information 77 Using Windows Backup and Restore 78 Using system restore points 78 When to create restore points 78 Create a system restore point 78 Restore to a previous date and time 79 Performing a recovery ...

Page 10: ...x Downloaded from LpManual com Manuals ...

Page 11: ...ating system NOTE To disable or reenable QuickWeb refer to Chapter 10 Changing QuickWeb settings You can access the software Help when you are in QuickWeb by clicking the Help icon in the notification area Using HP QuickWeb select models only To start QuickWeb 1 Turn on your computer The HP QuickWeb screen opens 2 Click an icon on the QuickWeb screen to start a program To start QuickWeb from Micro...

Page 12: ... prompted for your permission or password for tasks such as installing software running utilities or changing Windows settings Refer to Help and Support for more information Components Top components TouchPad Component Description 1 TouchPad light White TouchPad is enabled Amber TouchPad is disabled 2 TouchPad Moves the pointer and selects or activates items on the screen 3 Left TouchPad button Fu...

Page 13: ...ng device preferences select Start Devices and Printers Then right click the device representing your computer and click Mouse settings Lights Component Description 1 Caps lock light On Caps lock is on 2 Mute light On Computer sound is off 3 Num lock light On The embedded numeric keypad is enabled or num lock is on for an optional external numeric keypad Components 3 Downloaded from LpManual com M...

Page 14: ...Displays the Windows Start menu 4 Windows applications key Displays a shortcut menu for items beneath the cursor 5 Embedded numeric keypad keys When the keypad has been enabled the keys can be used like the keys on an external numeric keypad 6 Action keys Execute frequently used system functions 7 num lk key Enables disables the embedded numeric keypad when pressed in combination with the fn key 4...

Page 15: ... external power source the light stays off until the battery reaches a low battery level 3 Drive light White The hard drive is being accessed Blinking The hard drive or an optional external optical drive is being accessed Amber HP ProtectSmart Hard Drive Protection has temporarily parked the hard drive Right side components Component Description 1 Power light On The computer is on Blinking The com...

Page 16: ...ess connection NOTE To establish a wireless connection a wireless network must already be set up 5 USB ports 2 Connect optional USB devices 6 Vent Enables airflow to cool internal components NOTE The computer fan starts up automatically to cool internal components and prevent overheating It is normal for the internal fan to cycle on and off during routine operation 7 Security cable slot Attaches a...

Page 17: ...ats Memory Stick MS Memory Stick Pro MSP MultiMediaCard MMC Secure Digital SD Memory Card Secure Digital High Capacity SDHC Memory Card xD Picture Card XD xD Picture Card XD Type H xD Picture Card XD Type M 8 Audio out headphone jack Produces sound when connected to optional powered stereo speakers headphones ear buds a headset or television audio NOTE When a device is connected to the headphone j...

Page 18: ...Memory module compartment Contains the memory module slot 2 slots on select models and wireless LAN WLAN module CAUTION To prevent an unresponsive system replace the wireless module only with a wireless module authorized for use in the computer by the governmental agency that regulates wireless devices in your country or region If you replace the module and then receive a warning message remove th...

Page 19: ...n your country or region If you replace the module and then receive a warning message remove the module to restore computer functionality and then contact technical support through Help and Support Display components Component Description 1 Internal microphone Records sound 2 Webcam light On The webcam is in use 3 Webcam Records video and captures still photographs Components 9 Downloaded from LpM...

Page 20: ...ireless local area networks WLANs The antennas are not visible from the outside of the device For optimal transmission keep the areas immediately around the antennas free from obstructions To see wireless regulatory notices refer to the section of the Regulatory Safety and Environmental Notices that applies to your country or region These notices are located in Help and Support 10 Chapter 2 Featur...

Page 21: ...u troubleshoot system problems or travel internationally with the computer Service tag Provides important information including the following Product name 1 This is the product name affixed to the front of your notebook Serial number s n 2 This is an alphanumeric identifier that is unique to each product Part number Product number p n 3 This number provides specific information about the hardware ...

Page 22: ...bout optional wireless devices and the approval markings of some of the countries or regions in which the devices have been approved for use An optional device may be a wireless local area network WLAN device an HP Mobile Broadband Module or an optional Bluetooth device If your computer model includes one or more wireless devices one or more certification labels are included with your computer You...

Page 23: ...cates directly with other devices and devices must be relatively close together typically within 10 meters approximately 33 feet of each other Computers with WLAN devices support one or more of the following IEEE industry standards 802 11b the first popular standard supports data rates of up to 11 Mbps and operates at a frequency of 2 4 GHz 802 11g supports data rates of up to 54 Mbps and operates...

Page 24: ...ices are disabled in Windows Control Panel Network disconnected Indicates that the following conditions exist One or more of your network drivers are installed Wireless connections are available Using the wireless controls You can control the wireless devices in your computer using these features Wireless button or wireless switch referred to in this guide as the wireless button Wireless Assistant...

Page 25: ...ows Mobility Center 3 Click Properties 4 Select the check box next to HP Wireless Assistant icon in notification area 5 Click Apply 6 Click Close For more information refer to the Wireless Assistant software Help 1 Open Wireless Assistant by clicking the wireless icon in Windows Mobility Center 2 Click the Help button Using HP Connection Manager select models only You can use HP Connection Manager...

Page 26: ...1 and high speed Internet service purchased from an Internet service provider ISP A wireless router purchased separately 2 The wireless computer 3 The illustration below shows an example of a wireless network installation that is connected to the Internet As your network grows additional wireless and wired computers can be connected to the network to access the Internet For help in setting up your...

Page 27: ...u can set up your own key generate a different key or choose other advanced options Without the correct key others will not be able to use the WLAN WPA Wi Fi Protected Access like WEP uses security settings to encrypt and decrypt data that is transmitted over the network However instead of using one static security key for encryptions as WEP does WPA uses temporal key integrity protocol TKIP to dy...

Page 28: ...computer or the mobile network operator may provide it separately from the computer For information on inserting and removing the SIM refer to the Inserting a SIM and Removing a SIM sections in this chapter For information on HP Mobile Broadband and how to activate service with a preferred mobile network operator refer to the HP Mobile Broadband information included with your computer For addition...

Page 29: ...Shut down the computer If you are not sure whether the computer is off or in Hibernation turn the computer on by sliding the power switch Then shut down the computer through the operating system 2 Close the display 3 Disconnect all external devices connected to the computer 4 Unplug the power cord from the AC outlet 5 Turn the computer upside down on a flat surface with the battery bay toward you ...

Page 30: ...h devices refer to the Bluetooth software Help Bluetooth and Internet Connection Sharing ICS HP does not recommend setting up one computer with Bluetooth as a host and using it as a gateway through which other computers may connect to the Internet When two or more computers are connected using Bluetooth and Internet Connection Sharing ICS is enabled on one of the computers the other computers may ...

Page 31: ...ted for your permission or password for tasks such as installing software running utilities or changing Windows settings Refer to Help and Support for more information 1 Select Start Control Panel System and Security 2 In the System area click Device Manager 3 Click the arrow next to Network adapters to expand the list and show all adapters 4 Identify the WLAN device from the Network adapters list...

Page 32: ...ic codes that you enter into your computer to identify your computer to the network For a network connected to your personal wireless router review the router user guide for instructions on setting up the same codes on both the router and the WLAN device For a private network such as a network in an office or at a public Internet chat room contact the network administrator to obtain the codes and ...

Page 33: ...ds If the computer still cannot make a connection to a WLAN restart the wireless router For details refer to the router manufacturer s instructions Connecting to a local area network LAN Connecting to a local area network LAN requires an 8 pin RJ 45 network cable purchased separately If the network cable contains noise suppression circuitry 1 which prevents interference from TV and radio reception...

Page 34: ...2 Plug the other end of the cable into a network wall jack 2 24 Chapter 3 Wireless and local area networks Downloaded from LpManual com Manuals ...

Page 35: ...wn over the lines NOTE If you are using the TouchPad to move the pointer you must lift your finger off the TouchPad before moving it to the scroll zone Simply sliding your finger from the TouchPad to the scroll zone does not activate the scrolling function NOTE For information on identifying the TouchPad components refer to TouchPad on page 2 The following features are not available in all softwar...

Page 36: ...lect models only NOTE For some computer models pinching is enabled at the factory To disable pinching select Control panel Hardware and Sound Mouse Multitouch Gestures Then clear the check box next to the function you want to disable Pinching allows you to zoom in or out on items such as PDFs images and photos To pinch Zoom in by holding two fingers together on the TouchPad and then pull the finge...

Page 37: ...y press and hold this key to activate the assigned function NOTE Depending on the application you are using pressing the fn key and one of the action keys opens a specific shortcut menu within that application NOTE The action key feature is enabled at the factory You can disable this feature in Setup Utility BIOS and revert back to pressing the fn key and one of the action keys to activate the ass...

Page 38: ...eo standard or HDMI The switch screen image key can also alternate images among other devices receiving video information from the computer QuickLock Initiates the QuickLock security feature Volume mute Mutes or restores speaker sound Volume down Decreases speaker sound incrementally Volume up Increases speaker sound incrementally Previous track Plays the previous track of a CD or the previous sec...

Page 39: ...ware one of the following functions occurs Places the cursor at the end of the line or Scrolls to the end of the document To use a hotkey command follow either of these steps Briefly press the fn key and then briefly press the second key of the hotkey command or Press and hold down the fn key briefly press the second key of the hotkey command and then release both keys at the same time Using keypa...

Page 40: ...umeric keypad can be used like the keys on an external keypad When the embedded numeric keypad is turned on each key on the keypad performs the function indicated by the icon in the upper right corner of the key Enabling and disabling the embedded numeric keypad Press fn num lk to enable the embedded numeric keypad The num lock light is turned on Press fn num lk again to return the keys to their s...

Page 41: ...eys When num lock on an external keypad is turned on the num lock light on the computer is turned on When num lock on an external keypad is turned off the num lock light on the computer is turned off To turn num lock on or off on an external keypad as you work Press the num lk key on the external keypad not on the computer Cleaning the TouchPad and keyboard Dirt and grease on the TouchPad can caus...

Page 42: ...t allows you to capture and share video Preinstalled multimedia software that allows you to play and manage your music movies and pictures Multimedia buttons and hotkeys that provide fast access to multimedia tasks The following sections explain how to use the multimedia components included with your computer Adjusting the volume You can adjust the volume using the computer volume keys To mute or ...

Page 43: ... 1 To pause or resume playing the disc press the play pause key 2 To play the next track of an audio CD or the next chapter of a DVD press the next track key 3 To stop the disc press the stop key 4 Multimedia software The computer includes preinstalled multimedia software If you have an external optical drive select models only the software can help you perform the following multimedia tasks in ad...

Page 44: ... located in subfolders Installing multimedia software from a disc Although your computer does not have an installed optical drive you can easily access software as well as install software and access data from one of the following ways Use an external optical drive select models only NOTE The external optical drive must be connected to the USB port on the computer not to a USB port on another exte...

Page 45: ...hat functions like a translator between the device and the programs that use the device Checking your audio functions To check the system sound on your computer follow these steps 1 Select Start Control Panel 2 Click Hardware and Sound 3 Click Sound 4 When the Sound window opens click the Sounds tab Under Program Events select any sound event such as a beep or alarm and click the Test button You s...

Page 46: ...ressing the switch screen image key alternates the screen image between the computer display and the device Connecting an HDMI device The computer includes an HDMI High Definition Multimedia Interface port The HDMI port connects the computer to an optional video or audio device such as a high definition television or any compatible digital or audio component NOTE To transmit video signals through ...

Page 47: ... taskbar and then click Playback devices 2 On the Playback tab click either Digital Output or Digital Output Device HDMI 3 Click Set Default and then click Ok To return audio to the computer speakers follow these steps 1 Right click the Speakers icon in the notification area at far right of the taskbar and then click Playback devices 2 On the Playback tab click Speakers 3 Click Set Default and the...

Page 48: ...ntrols the amount of light that is incorporated into the image A higher brightness setting creates a brighter image a lower brightness setting creates a darker image Contrast Controls the difference between lighter and darker areas on the image A higher contrast setting intensifies the image a lower contrast setting maintains more of the original information s dynamic range but leads to a flatter ...

Page 49: ...ile the computer is in the Sleep state or in Hibernation Initiating and exiting Sleep The system is set at the factory to initiate Sleep after 15 minutes of inactivity when running on battery power and 30 minutes of inactivity when running on external power Power settings and timeouts can be changed using Power Options in Windows Control Panel With the computer on you can initiate Sleep in any of ...

Page 50: ...play the percentage of remaining battery charge and the current power plan move the pointer over the battery meter icon To access Power Options or to change the power plan click the battery meter icon and select an item from the list Different battery meter icons indicate whether the computer is running on battery or external power The icon also displays a message if the battery has reached a low ...

Page 51: ...ssword recommended NOTE If you need to create a user account password or change your current user account password click Create or change your user account password and then follow the on screen instructions If you do not need to create or change a user account password go to step 5 5 Click Save changes Using external AC power External AC power is supplied through an approved AC adapter WARNING To...

Page 52: ...m the computer If provided with a 3 pin attachment plug on the power cord plug the cord into a grounded earthed 3 pin outlet Do not disable the power cord grounding pin for example by attaching a 2 pin adapter The grounding pin is an important safety feature To connect the computer to external AC power 1 Plug the adapter into the power connector 1 on the computer 2 Plug the power cord into the ada...

Page 53: ... increase display brightness use the increase brightness key or reconnect the AC adapter You can keep a battery in the computer or in storage depending on how you work Keeping the battery in the computer whenever the computer is plugged into AC power charges the battery and also protects your work in case of a power outage However a battery in the computer slowly discharges when the computer is of...

Page 54: ... right of the taskbar Inserting or removing the battery CAUTION Removing a battery that is the sole power source can cause loss of information To prevent loss of information initiate Hibernation or shut down the computer through Windows before removing the battery To insert the battery 1 Turn the computer upside down on a flat surface 2 Insert the battery 1 into the battery bay 2 and pivot the bat...

Page 55: ...ng a new battery charge it fully before turning on the computer Charge the battery until the battery light turns off NOTE If the computer is on while the battery is charging the battery meter in the notification area may show 100 percent charge before the battery is fully charged Allow the battery to discharge below 5 percent of a full charge through normal use before charging it If the battery ha...

Page 56: ... and system responses can be changed using Power Options in Windows Control Panel Preferences set using Power Options do not affect lights Identifying low battery levels When a battery that is the sole power source for the computer reaches a low battery level the battery light blinks If a low battery level is not resolved the computer enters a critical battery level and the battery light begins bl...

Page 57: ... and shut down the computer Resolving a low battery level when the computer cannot exit Hibernation When the computer lacks sufficient power to exit Hibernation follow these steps 1 Insert a charged battery or plug the computer into external power 2 Exit Hibernation by briefly sliding the power switch Calibrating a battery Calibrate a battery under the following conditions When battery charge disp...

Page 58: ... you can reset it after the calibration 8 Change the On battery setting to Never 9 Click OK 10 Click Save changes Step 3 Discharge the battery The computer must remain on while the battery is being discharged The battery can discharge whether or not you are using the computer but the battery discharges faster while you are using it If you plan to leave the computer unattended during the discharge ...

Page 59: ...items in the On battery column 4 Click Change advanced power settings 5 Click the plus sign next to Sleep and then click the plus sign next to Hibernate after 6 Reenter the setting that you recorded for On battery 7 Click OK 8 Click Save changes Conserving battery power Select the Power saver power plan through Power Options under System and Security in Windows Control Panel Turn off wireless and ...

Page 60: ...CAUTION Unsaved information is lost when the computer is shut down The Shut down command closes all open programs including the operating system and then turns off the display and computer Shut down the computer under any of the following conditions When you need to replace the battery or access components inside the computer When you are connecting an external hardware device that does not connec...

Page 61: ...arged of static electricity by touching a grounded metal object To add or replace a memory module 1 Save your work 2 Shut down the computer and close the display If you are not sure whether the computer is off or in Hibernation turn the computer on by sliding the power switch Then shut down the computer through the operating system 3 Disconnect all external devices connected to the computer 4 Unpl...

Page 62: ...memory module slot To protect a memory module after removal place it in an electrostatic safe container 10 Insert a new memory module CAUTION To prevent damage to the memory module hold the memory module by the edges only Do not touch the components on the memory module a Align the notched edge 1 of the memory module with the tab in the memory module slot b With the memory module at a 45 degree an...

Page 63: ... place 11 Align the tabs on the memory module compartment cover with the notches on the computer 1 and close the cover 2 12 Tighten the 2 memory module compartment screws 3 13 Replace the battery 14 Turn the computer right side up and then reconnect external power and external devices 15 Turn on the computer 53 Downloaded from LpManual com Manuals ...

Page 64: ...the User Account Control feature to improve the security of your computer You may be prompted for your permission or password for tasks such as installing software running utilities or changing Windows settings Refer to Help and Support for more information Handling drives Drives are fragile computer components that must be handled with care Refer to the following cautions before handling drives A...

Page 65: ...ive before removing the drive from the drive bay or traveling with shipping or storing a drive If a drive must be mailed place the drive in a bubble pack mailer or other suitable protective packaging and label the package FRAGILE Avoid exposing a drive to magnetic fields Security devices with magnetic fields include airport walk through devices and security wands The airport security devices that ...

Page 66: ...g the power switch Then shut down the computer through the operating system To remove the hard drive 1 Save your work 2 Shut down the computer and close the display 3 Disconnect all external devices connected to the computer 4 Unplug the power cord from the AC outlet 5 Turn the computer upside down on a flat surface 6 Remove the battery from the computer 7 With the hard drive bay toward you loosen...

Page 67: ...hard drive bay 1 2 Pivot the hard drive downward 2 and then slide the hard drive 3 to the right until the hard drive snaps into place 3 Tighten the 2 screws 4 that secure the hard drive to the computer 4 Align the tabs 1 on the hard drive cover with the notches on the computer 5 Close the cover 2 Drives 57 Downloaded from LpManual com Manuals ...

Page 68: ...Smart Hard Drive Protection For more information refer to the HP ProtectSmart Hard Drive Protection software Help Identifying HP ProtectSmart Hard Drive Protection status The drive light on the computer turns amber to show that the drive is parked To determine whether drives are currently protected or whether a drive is parked select Start Control Panel Hardware and Sound Windows Mobility Center I...

Page 69: ...mart Hard Drive Protection software enables you to perform the following tasks Enable and disable HP ProtectSmart Hard Drive Protection NOTE Depending on your user privileges you may not be able to enable or disable HP ProtectSmart Hard Drive Protection Additionally members of an Administrator group can change the privileges for non Administrator users Determine whether a drive in the system is su...

Page 70: ...o reduce the risk of damage to the equipment when connecting a powered drive be sure that the drive is turned off and the AC power cord is unplugged 1 Connect the drive to the computer 2 If you are connecting a powered drive plug the device power cord into a grounded AC outlet 3 Turn on the drive To disconnect an unpowered external drive turn off the drive and then disconnect it from the computer ...

Page 71: ...s additional USB ports that can be used with the computer Connecting a USB device CAUTION To prevent damage to a USB connector use minimal force to connect a USB device To connect a USB device to the computer connect the USB cable for the device to the USB port You will hear a sound when the device has been detected NOTE The first time you connect a USB device the Installing device driver software...

Page 72: ...d with digital media equipped cameras and PDAs as well as with other computers The Digital Media Slot supports the following digital card formats Memory Stick MS Memory Stick Pro MSP MultiMediaCard MMC Secure Digital SD Memory Card Secure Digital High Capacity SDHC Memory Card xD Picture Card XD xD Picture Card XD Type H xD Picture Card XD Type M Inserting a digital card CAUTION To avoid damaging ...

Page 73: ...ard NOTE To stop a data transfer click Cancel in the operating system Copying window 2 To remove the digital card a Click the Safely Remove Hardware and Eject Media icon in the notification area at the far right of the taskbar NOTE To display the Safely Remove Hardware and Eject Media icon click the Show hidden icons icon the arrow at the left of the notification area b Click the name of the digit...

Page 74: ...her system identification information Administrator password Ongoing or future threats to the computer Critical security updates from Microsoft Unauthorized access to a Windows user account User password Unauthorized removal of the computer Security cable slot used with an optional security cable Using passwords A password is a group of characters that you choose to secure your computer informatio...

Page 75: ...ssword Function Administrator password Protects administrator level access to computer contents NOTE This password cannot be used to access Setup Utility contents User password Protects access to a Windows user account It also protects access to the computer contents and must be entered when you exit Sleep or Hibernation Setting passwords in Setup Utility Password Function Administrator password P...

Page 76: ...or Password and then press enter To set an administrator password type your password in the Enter New Password and Confirm New Password fields and then press enter To change an administrator password type your current password in the Enter Current Password field type a new password in the Enter New Password and Confirm New Password fields and then press enter To delete an administrator password ty...

Page 77: ...unsuccessful attempts to enter the password you must restart the computer and try again Using antivirus software When you use the computer to access e mail a network or the Internet you expose it to computer viruses Computer viruses can disable the operating system programs or utilities or cause them to function abnormally Antivirus software can detect most viruses destroy them and in most cases r...

Page 78: ...osoft as soon as you receive an alert Updates to the operating system and other software may have become available after the computer was shipped To be sure that all available updates are installed on the computer observe these guidelines Run Windows Update as soon as possible after you set up your computer Use the update link at Start All Programs Windows Update Run Windows Update monthly thereaf...

Page 79: ... Installer folder opens Click HP QuickWeb Configuration Tool 2 Select the Enable QuickWeb check box 3 Click OK NOTE The HP QuickWeb Configuration Tool can also be accessed by clicking Start Control Panel and then clicking the View by arrow Select Large icons or Small icons to locate the HP QuickWeb Configuration Tool Disabling and enabling QuickWeb 69 Downloaded from LpManual com Manuals ...

Page 80: ...u or a menu item use the arrow keys To choose an item in a list or to toggle a field for example an Enable Disable field use either the arrow keys or f5 or f6 To select an item press enter To close a text box or return to the menu display press esc To display additional navigation and selection information while Setup Utility is open press f1 Changing the language of Setup Utility The following pr...

Page 81: ...it Setup Utility without changing any settings use the arrow keys to select Exit Exit Discarding Changes and then press enter Restoring default settings in Setup Utility The following procedure explains how to restore Setup Utility default settings If Setup Utility is not already running begin at step 1 If Setup Utility is already running begin at step 2 1 Open Setup Utility by turning on or resta...

Page 82: ...lity menu items listed in this chapter may not be supported by your computer Main menu Select To do this System information View and change the system time and date View identification information about the computer View specification information about the processor memory size system BIOS and keyboard controller version select models only Security menu Select To do this Administrator password Ent...

Page 83: ...wer Saving Mode Diagnostics menu Select To do this Primary Hard Disk Self Test Run a comprehensive self test on the hard drive Memory Test Run a diagnostic test on the system memory Updating the BIOS Updated versions of the BIOS may be available on the HP Web site Most BIOS updates on the HP Web site are packaged in compressed files called SoftPaqs Some download packages contain a file named Readm...

Page 84: ...ware for your computer Select Start Help and Support and then click the link for software driver and BIOS updates 2 Follow the instructions on the screen to identify your computer and access the BIOS update you want to download 3 At the download area follow these steps a Identify the BIOS update that is later than the BIOS version currently installed on your computer Make a note of the date name o...

Page 85: ... want to download and follow the instructions on the screen NOTE Make a note of the path to the location on your hard drive where the software will be downloaded You will need to access this path when you are ready to install the software 4 When the download is complete open Windows Explorer by selecting Start Computer 5 Double click your hard drive designation The hard drive designation is typica...

Page 86: ...ommends that you create recovery discs to be sure that you can restore your system to its original factory state if you experience serious system failure or instability Create these discs after setting up the computer for the first time Handle these discs carefully and keep them in a safe place The software allows the creation of only one set of recovery discs NOTE If your computer does not includ...

Page 87: ...d or modify hardware or software Note the following when backing up Create a set of recovery discs using Recovery Manager Create system restore points using the Windows System Restore feature and periodically copy them to disc Store personal files in the Documents library and back up this folder periodically Back up templates stored in their associated programs Save customized settings in a window...

Page 88: ...or changing Windows settings Refer to Help and Support for more information Using system restore points When you back up your system you are creating a system restore point A system restore point allows you to save and name a snapshot of your hard drive at a specific point in time You can then recover back to that point if you want to reverse subsequent changes made to your system NOTE Recovering ...

Page 89: ... NOTE Recovery Manager recovers only software that was preinstalled at the factory Software not provided with this computer must be downloaded from the manufacturer s Web site or reinstalled from the disc provided by the manufacturer Recovering using the recovery discs To restore the system from the recovery discs 1 Back up all personal files 2 Insert the first recovery disc into the optical drive...

Page 90: ...entifying 11 bays battery 12 hard drive 8 BD drive 60 Blu ray Disc ROM with SuperMulti DVD R RW Double Layer 60 Bluetooth device 13 Bluetooth label 12 boot options 73 boot order 73 buttons TouchPad 2 TouchPad on off 2 wireless 6 C cables LAN 23 USB 61 calibrating battery 47 caps lock light identifying 3 CD drive 60 Certificate of Authenticity label 12 charging batteries 45 47 checking audio functi...

Page 91: ...ne identifying 9 Internet connection setup 16 J jacks audio in microphone 7 audio out headphone 7 RJ 45 network 6 K keyboard hotkeys identifying 28 keypad keys identifying 4 keypad embedded enabling and disabling 30 identifying 29 switching key functions 31 using 30 keypad external num lock 31 using 31 keys action 4 esc 4 fn 4 keypad 4 num lk 4 volume mute 32 Windows applications 4 Windows logo 4 ...

Page 92: ...39 recovering a program or driver 76 recovering using the dedicated recovery partition 79 recovering using the recovery discs 79 recovery discs 76 Recovery Manager 76 79 recovery partition 76 recovery system 79 regulatory information regulatory label 12 wireless certification labels 12 restore points 78 RJ 45 network jack identifying 6 rotating TouchPad gesture 26 S screen brightness keys 28 scree...

Page 93: ...key identifying 28 W webcam adjusting properties 38 identifying 9 tips 38 webcam light identifying 9 Windows applications key identifying 4 Windows logo key identifying 4 Windows passwords set in 65 wireless antennas 10 Wireless Assistant software 14 15 wireless button 14 wireless button identifying 6 wireless certification label 12 wireless controls button 14 HP Connection Manager 14 operating sy...

Page 94: ...Downloaded from LpManual com Manuals ...

Reviews: