background image


2 Million Imp - Preventive Maintenance Guide - HP Indigo press 5000 

CA294-00570 

rev 01 

page 15 of 18 

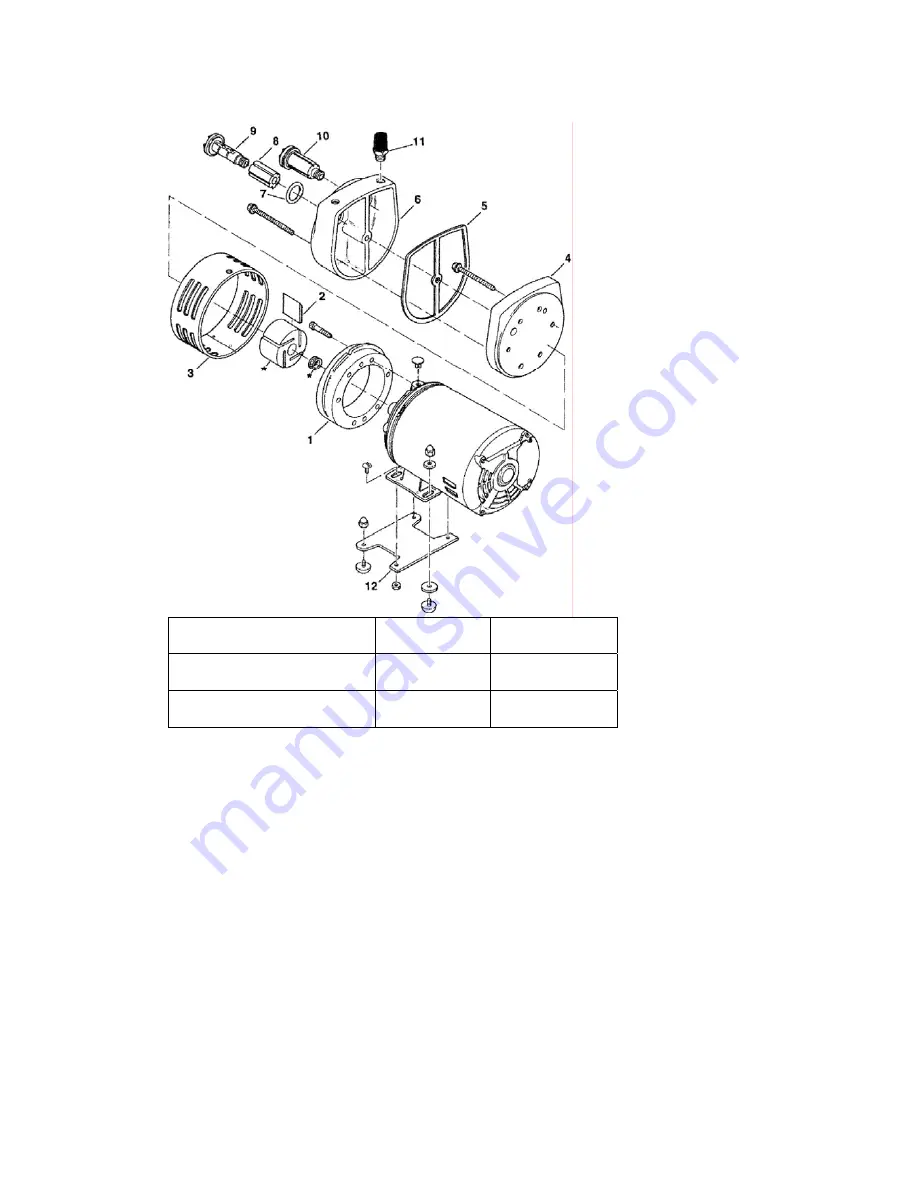
Figure 5  Vacuum pump assembly 


(8-10) - Vacuum pump filters 

6 - Muffler box 

11 - Muffler filter 

2 - Vane 

4 - End plate 

5 - Gasket 

7 - Vacuum pump filter O-ring 


5. 

Remove the muffler box with its five retaining screws. See Figure 5. 

For 2 million preventive maintenance  

 
1. 

Clean the vacuum pump filters using pressurized air. See Figure 5. 

2. 

Clean the muffler box with a clean, dry cloth. See Figure 5. 

3. 

Clean the muffler filter. See Figure 5. 

For 8 million preventive maintenance  

 
1. 

Remove the end plate with its five retaining screws. See Figure 5.  

2. 

Remove the four old vanes. See Figure 5 and Figure 6. 

Summary of Contents for Indigo 5000

Page 1: ...nance procedure 2 2 million impressions maintenance procedure 2 Monthly maintenance 3 Monthly maintenance continued 4 Monthly maintenance continued 5 2 million imp maintenance 6 2 million imp maintenance continued 7 Quick check maintenance table 8 Special tools and jigs 12 Monthly routine parts 12 Upon reaching 1 million impressions 12 2 million imp routine parts 12 Mandatory replacement 12 Condit...

Page 2: ...printed 2 million or more impressions since the last 2 million impression procedure was performed The 2 million impression procedure is performed in addition to the monthly impression procedure These maintenance routines are complementary to the operator routines and do not replace them The operator will continue the press maintenance on a daily and weekly basis Check that the press is properly ma...

Page 3: ...t all lubrication points have been oiled and greased properly See the latest User Guide Inform your regional manager if the press is not properly maintained Config save Perform Config save to update the customer diskette Ink unit Calibrate the density sensors Calibrate the ink conductivity sensors Calibrate the ink flow rate ITM Drum Clean ITM slip ring the bias contacts path using IPA Clean the I...

Page 4: ...nspect the inside housing sides for the formation of insulating layer Clean with IPA soaked cloth Use an abrasive cleaning pad if required Inspect each corona unit for loose or broken grid rails Glue or replace if necessary If 1 million impressions have been reached replace the four carbon filters PTE air knife Perform a general inspection and check for paper chips Clean the PTE shield Clean and c...

Page 5: ...corotron suction and blower ITM input fan Air knife suction and blower Bottom cooling Print quality Perform the following Print Fine_Tune job adjust if necessary Print a gray_20 job and verify the quality of the print Check writing head deskew and adjust if necessary Use the gray_20 job to observe banding of 3 5 mm along the format that appears due to an incorrect deskew adjustment Print the CATP ...

Page 6: ...rushes on the front wall and replace if required Make sure that the housing did not come loose from the press wall Note See Conditional replacement on page 12 PIP drum Check the grounding brush and replace if required Check the condition of the SofSub PIP underlayer IMP drum Replace the gripper clamps Check the grippers magnet gap and adjust as required Cleaning station Replace the sponge roller C...

Page 7: ...lean vacuum pump filters See Appendix B Vacuum pump maintenance on page 14 Drain water separator open service valve for 30 seconds Chiller unit Check water level Clean the water filter and replace if needed See the chiller manual Inline densitometer Print a new reference densitometer full calibration strip if one is not available and perform the validation procedure See the HP Indigo service instr...

Page 8: ...ate the density sensors Calibrate the ink conductivity sensors Calibrate the ink flow rate ITM drum 9 9 9 9 9 9 9 9 Clean ITM slip ring the bias contacts path using IPA Clean the ITM thermostat slip ring Verify the temperature sensor reading and calibrate if required Make sure that the surface facing the IR sensor is clean Inspect and thoroughly clean the ITM hood wire mesh filter on the rear wall...

Page 9: ...erform a general inspection Inspect the inside housing sides for the formation of insulating layer Clean with IPA soaked cloth Use an abrasive cleaning pad if required Inspect each corona unit for loose or broken grid rails Glue or replace if necessary If 1 million impressions have been reached replace the four carbon filters PTE air knife 9 9 9 Perform a general inspection and check for paper chi...

Page 10: ...ector suction cups Clean Stacker paper path with IPA Check Stacker flipping wheels Check that the paper buckle is correct Adjust if necessary Perform the suction cup margin adjustment wizard Perform the full placement adjustment wizard Utility cabinet 9 9 9 9 9 9 Perform general inspection Externally clean the heat exchanger if necessary Drain water separator open service valve for 30 seconds Chec...

Page 11: ... oil types on page 17 For a complete list check the User Guide or view the press On line documentation videos OPD BID engage 9 Verify that the BID fans are working properly Ventilation system 9 9 9 9 Make sure that all the Amateks are working properly Scorotron suction and blower ITM input fan Air knife suction and blower Bottom cooling Print quality 9 9 9 9 9 Perform the following Print Fine_Tune...

Page 12: ...078 51 Gray sponge roller 1 MKT 1060 01 Suction cups kit 1 2 million imp routine parts Mandatory replacement Part number Description Quantity MFL 0013 01 Carbon filter 4 CA244 11150 Gripper clamp 6 MPT 1078 51 Gray sponge roller 1 CA245 04160 Exit roller 1 MPT 4737 01 Exit roller springs 2 Conditional replacement Part number Description Quantity EZO 2111 02 EZO 2113 01 CA244 09380 Carbon brush rea...

Page 13: ...ance Figure 1 Imaging oil system Printing engine frame Ink cabinet Imaging oil refill funnel assembly Heat exchanger Imaging agent refill funnel assembly Cleaning station Imaging oil filter assembly Imaging oil tank Imaging oil tank gauge Tank level tube Imaging oil pump Figure 2 Oiling points for the imaging oil pump Oiling points ...

Page 14: ...oily waste bottles from their positions behind the lower service door at the press rear See Figure 3 Figure 3 Press rear 1 2 3 1 2 3 1 Waste bottles 2 Vacuum pump 3 Removable door 2 Lift up the lower door and remove it See Figure 3 3 Disconnect the fast on tube See Figure 4 Figure 4 Vacuum pump location 1 3 2 1 3 2 1 Fast on tube 2 Vacuum pump filters 3 Muffler filter 4 Remove the vacuum pump filt...

Page 15: ... ring 5 Remove the muffler box with its five retaining screws See Figure 5 For 2 million preventive maintenance 1 Clean the vacuum pump filters using pressurized air See Figure 5 2 Clean the muffler box with a clean dry cloth See Figure 5 3 Clean the muffler filter See Figure 5 For 8 million preventive maintenance 1 Remove the end plate with its five retaining screws See Figure 5 2 Remove the four...

Page 16: ...6 Vacuum pump vanes 1 1 3 Clean the inside of the pump See Figure 6 4 Install new vanes See Figure 6 5 Reinstall the end plate and its five retaining screws with a new gasket from the maintenance kit 6 Install new O rings and clean filters See Figure 5 7 Reinstall muffler box 8 Reconnect the fast on tube ...

Page 17: ...ent Purchase locally Gear oil sep 32 General oiling points ISO VG100 Sell GC SE100 Mobil DTE Heavy Esso Spartan EP 100 Or equivalent Purchase locally Grease BG 87 Molykote For main drum PIP ITM and impression gear lubrication only Molykote BG 87 Or equivalent Purchase locally Oil compressor ISO VG32 or VG46 Shell Tellus 32 or 46 Mobil DTE 24 or 46 Or equivalent Purchase locally Note For further in...

Page 18: ...m Easley Isaac Diwan Confidentiality Notice This document contains valuable trade secrets and confidential information of Hewlett Packard Company Nothing herein may be copied reproduced or distributed in any form or medium or disclosed to any third party in any manner without prior written authorization of Hewlett Packard Company The copyright notice which appears in this document is purely precau...

Reviews: