background image

Hardware Upgrades


Installing an Optional Optical Drive


To install an optional optical drive: 

1.  Remove the optical drive if present. 

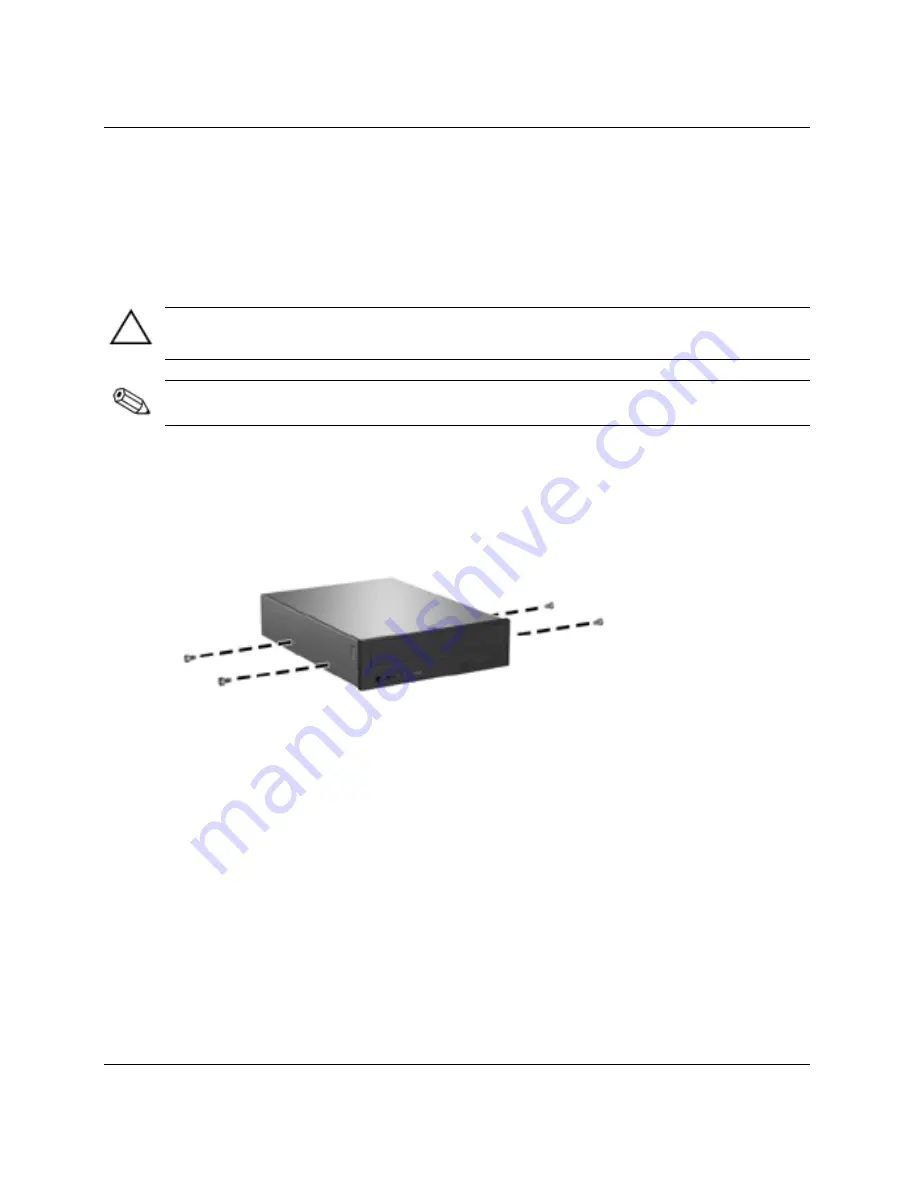
2.  Install two guide screws in the lower holes on each side of the drive. 

CAUTION: 

Use only 3/16-inch or 5-mm long screws as guide screws. Longer screws can 

damage the internal components of the drive. 


When replacing the drive, transfer the four screws from the old drive to the new one. 
The screws take the place of drive rails. 


Installing Guide Screws in the Optical Drive


Hardware Reference Guide 

2-23 

Summary of Contents for d325 Series

Page 1: ...Tower Model Document Part Number 338159 002 November 2003 This guide provides detailed information on the features and use of the HP d325 Slim Tower Desktop and includes instructions for removing and replacing internal components Enhanced for accessibility ...

Page 2: ... errors or omissions contained herein This document contains proprietary information that is protected by copyright No part of this document may be photocopied reproduced or translated to another language without the prior written consent of Hewlett Packard Company WARNING Text set off in this manner indicates that failure to follow directions could result in bodily harm or loss of life CAUTION Te...

Page 3: ...bility Features 2 1 Warnings and Cautions 2 1 Attaching and Removing the Tower Stand 2 2 Unlocking the Smart Cover Lock 2 3 Using the Smart Cover FailSafe Key 2 4 Removing the Computer Access Panel and Front Bezel 2 6 Cable Routing 2 9 Installing Additional Memory 2 10 DIMMs 2 10 DDR SDRAM DIMMs 2 11 Removing or Installing an Expansion Card 2 15 Installing Additional Drives 2 19 Locating Drive Pos...

Page 4: ...ines for Installing Ultra ATA Devices B 1 C Battery Replacement D Security Provisions Cable Lock D 1 Padlock D 2 Universal Chassis Clamp Lock D 3 Without Security Cable D 3 With Security Cable D 5 Port Security Bracket D 7 Installing the Port Security Bracket D 7 Removing the Port Security Bracket D 10 E Electrostatic Discharge Preventing Electrostatic Damage E 1 Grounding Methods E 1 F Routine Co...

Page 5: ...g on the model For a complete listing of the hardware and software installed in the computer run the Diagnostics for Windows utility Instructions for using this utility are provided in the Troubleshooting Guide on the Documentation Library CD d325 Slim Tower Configuration Hardware Reference Guide 1 1 ...

Page 6: ... R RW DVD ROM or CD RW DVD Combo Drive 7 Power On Light 2 Diskette Eject Button optional 8 Hard Drive Activity Light 3 Diskette Drive optional 9 USB Universal Serial Bus Ports 4 Diskette Drive Activity Light optional Headphone Jack 5 Optical Drive Eject Button q Microphone Connector 6 Power Button 1 2 Hardware Reference Guide ...

Page 7: ... 45 Network Connector 2 Voltage Select Switch 8 Parallel Connector 3 PS 2 Mouse Connector 9 Monitor Connector 2 4 PS 2 Keyboard Connector Headphone Line Out Connector 5 Universal Serial Bus USB q Line In Audio Connector 6 Serial Connector w Microphone Connector Hardware Reference Guide 1 3 ...

Page 8: ...e These keys allow you to move left right up and down using the keyboard instead of the mouse 6 Ctrl Keys Used in combination with another key its effect depends on the application software you are using 7 Application Key Used like the right mouse button to open pop up menus in a Microsoft Office application May perform other functions in other software applications 8 Windows Logo Keys Used to ope...

Page 9: ...cument or Web site These keys allow you to move left right up and down using the keyboard instead of the mouse 7 Ctrl Keys Used in combination with another key its effect depends on the application software you are using 8 Application Key Used like the right mouse button to open pop up menus in a Microsoft Office application May perform other functions in other software applications 9 Windows Logo...

Page 10: ...r to the Easy Access Keyboard Components section to identify the Windows Logo key Windows Logo Key Functions Windows Logo Key Displays or hides the Start menu Windows Logo Key d Displays the Desktop Windows Logo Key m Minimizes all open applications Shift Windows Logo Key m Undoes Minimize All Windows Logo Key e Launches My Computer Windows Logo Key f Launches Find Document Windows Logo Key Ctrl f...

Page 11: ...n either a tower or desktop configuration To use it in a tower configuration refer to Attaching and Removing the Tower Stand for more information To use the computer in the desktop configuration make sure the side with rubber pads is down CAUTION To ensure adequate airflow help prevent overheating and ensure warranty protection the d325 Slim Tower must be used with a Tower Stand in a tower configu...

Page 12: ...Product Features 1 8 Hardware Reference Guide ...

Page 13: ...l before touching WARNING To reduce the risk of electrical shock fire or damage to the equipment do not plug telecommunic ations telephone connectors into the network interface controller NIC receptacles CAUTION Static electricity can damage the electronic components of the computer or optional equipment Before beginning these procedures ensure that you are discharged of static electricity by brie...

Page 14: ...ree of objects To install the Tower Stand 1 Align the opening at the base of the computer with the posts and thumbscrew in the stand 12 and lower the computer into the stand 2 Tighten the thumbscrew to secure the computer to the stand 3 Attaching the Tower Stand to the Computer CAUTION To prevent the overheating of internal components when the computer is used in a desktop configuration ensure tha...

Page 15: ...er Unlocking the Smart Cover Lock The Smart Cover Lock is an optional feature and is available on select models only The Smart Cover Lock is a software controllable cover lock controlled by the setup password This lock prevents unauthorized access to the internal components The computer ships with the Smart Cover Lock in the unlocked position For more information about locking the Smart Cover Lock...

Page 16: ...ent for example processor or power supply failure Forgotten password CAUTION The Smart Cover FailSafe Key is a specialized tool available from HP Be prepared order this key before you need one To obtain a FailSafe Key Contact an authorized HP reseller or service provider Order PN 166527 001 for the wrench style key or PN 166527 001 for the screwdriver bit key Refer to the HP Web site http www hp c...

Page 17: ...rn off the computer and any external devices 2 Use the FailSafe Key to remove the Smart Cover Lock Removing the Smart Cover Lock Screws To reattach the Smart Cover Lock secure the lock in place with the tamper proof screws using the FailSafe Key Hardware Reference Guide 2 5 ...

Page 18: ... off any external devices 3 Disconnect the power cord from the power outlet and the computer and disconnect any external devices CAUTION Before removing the computer access panel ensure that the computer is turned off and that the power cord is disconnected from the electrical outlet 4 If the computer is being used in the tower configuration remove the stand refer to Attaching and Removing the Tow...

Page 19: ...mputer access panel and installing hardware 5 Locate the cover latch Pull up and hold the latch 1 to release the computer access panel 6 Slide the computer access panel back 2 about 0 5 inch 1 25 cm then lift the access panel up and off the chassis Removing the Computer Access Panel Hardware Reference Guide 2 7 ...

Page 20: ...en pull the bezel 2 away from the chassis Removing the Front Bezel To reassemble the computer reverse the above procedure To re install the front bezel insert the two bezel bottom tabs then rotate the front bezel forward to snap the three tabs on the top of the bezel in place 2 8 Hardware Reference Guide ...

Page 21: ...ower supply fan 2 Route the optical drive power cable 2 down alongside of the drive cage to the floor of the chassis Keep the cable clear of the power supply fan 3 Fold the diskette drive flat ribbon data cable 3 near the connector on the drive Route the cable up high on the drive cage near the cable connectors then folding again to lay beneath the optical drive data cable Be sure the diskette dri...

Page 22: ...support you may be required to replace the preinstalled DIMM with a higher capacity DIMM If you are adding a second DIMM or replacing a single smaller DIMM with two larger DIMMs both DIMMs should be of the same speed and capacity in order to achieve a higher performing dual channel mode The system will automatically operate in single channel mode or a higher performing dual channel mode depending ...

Page 23: ...ted with x4 SDRAM are not supported the system may not start using unsupported DIMMs The computer memory will run at its rated frequency unless that is faster than the processor frequency If the module frequency is faster then the computer will run at the processor frequency Processor Front Side Bus FSB Frequency Memory Module Type Actual Memory Frequency 200 MHz PC2100 266 MHz 200 200 MHz PC2700 ...

Page 24: ...hat you are discharged of static electricity by briefly touching a grounded metal object Refer to Appendix E Electrostatic Discharge for more information CAUTION When handling a memory module be careful not to touch any of the contacts Doing so may damage the module Preparing the Computer 1 If you have locked the Smart Cover Lock use Computer Setup to unlock the lock 2 Exit all software applicatio...

Page 25: ...nal injury from hot surfaces allow the internal system components to cool before touching Removing a DDR SDRAM DIMM 1 Press out on both latches of the DIMM socket at the same time This releases the module and partially pushes it out of the socket 2 Lift the module from the socket Hardware Reference Guide 2 13 ...

Page 26: ... the same capacity in order to achieve a higher performing dual channel mode 1 Open both latches of the memory module socket 1 then insert the memory module into the socket 2 Installing a DIMM A memory module can be installed in only one way Match the notch on the module with the tab on the memory socket 2 Push the module down into the socket ensuring that the module is fully inserted and properly...

Page 27: ...n Card No tools are needed to remove replace or add an expansion card 1 If you have locked the Smart Cover Lock use Computer Setup to unlock the lock 2 Exit all software applications turn off the computer properly through the operating system then turn off any external devices 3 Disconnect the power cord from the power outlet and disconnect any external devices 4 Remove the access panel and lay th...

Page 28: ...omputer away from the expansion card brackets and expansion slot covers 12 so that they are no longer secured by the lock Releasing the Slot Cover Lock 6 Locate the vacant expansion slot on the system board and remove the corresponding slot cover 2 16 Hardware Reference Guide ...

Page 29: ...rd line the card up with the expansion card slot and press firmly on the card so that the whole connector seats properly Slide the slot cover lock down to secure it in place Store the old card in the anti static packaging that contained the new card 9 If not replacing the old expansion card with a new card insert the metal slot cover in the opened slot and slide the slot cover lock down to secure ...

Page 30: ...ee from the socket c Pull the expansion card straight up from the socket then away from the inside of the chassis to maneuver the card out of the computer Be sure not to scrape the card against the other components Removing an AGP Card from a Socket with a Retention Mechanism If replacing or adding a new AGP card reverse steps b and c The retention arm will secure itself automatically 2 18 Hardwar...

Page 31: ... screws are black and the HP supplied standard screws are silver CAUTION To prevent loss of work and damage to the computer or drive If you are inserting or removing a hard drive shut down the operating system properly then turn off the computer Do not remove a hard drive while the computer is on or in standby mode Before handling a drive ensure that you are discharged of static electricity While ...

Page 32: ...n empty 3 5 inch drive bay then a bezel blank will be installed on the computer instead If you do not have a drive in this slot you may choose to install a 3 5 inch device such as a diskette drive hard drive or Zip drive later on However to install a 3 5 inch device other than a diskette drive or hard drive you must order the 3 5 inch device bezel PN 316008 001 To verify the type size and capacity...

Page 33: ...rating system software turn off the computer and any external devices then disconnect the power cord from the power outlet 3 Remove the computer access panel and front bezel Refer to Removing the Computer Access Panel and Front Bezel for more information 4 Raise the Easy Access drive bay to the upright position 5 Disconnect the audio signal and drive power cables The other end of the audio cable s...

Page 34: ...the front of the drive cage then lift the drive out of the computer Removing the Optical Drive or Diskette Drive To replace the drive reverse the removal procedures When replacing the drive transfer the four screws from the old drive to the new one The screws take the place of drive rails 2 22 Hardware Reference Guide ...

Page 35: ...e lower holes on each side of the drive CAUTION Use only 3 16 inch or 5 mm long screws as guide screws Longer screws can damage the internal components of the drive When replacing the drive transfer the four screws from the old drive to the new one The screws take the place of drive rails Installing Guide Screws in the Optical Drive Hardware Reference Guide 2 23 ...

Page 36: ...ews on the drive into the J slots in the drive bay 1 Then slide the drive toward the rear of the computer 2 Installing the Optical Drive The drive release latch automatically locks in place when installing a drive 2 24 Hardware Reference Guide ...

Page 37: ...al drive 6 Return the Easy Access drive bay to the down position Be sure not to pinch the cables in the chassis when lowering the Easy Access drive bay 7 Replace the front bezel and computer access panel The system automatically recognizes the drive and reconfigures the computer CAUTION When servicing the computer ensure that cables are placed in their proper locations during the reassembly proces...

Page 38: ...u have locked the Smart Cover Lock use Computer Setup to unlock the lock 2 Exit all software applications shut down the operating system software turn off the computer and any external devices then disconnect the power cord from the power outlet 3 Remove the computer access panel and front bezel Refer to Removing the Computer Access Panel and Front Bezel for more information 4 Raise the Easy Acces...

Page 39: ...ss and hold the drive release latch 1 7 Slide the drive to the right of the bay 2 then pull the drive from the bay 3 Removing the Hard Drive 8 To install a hard drive reverse the above procedure Hardware Reference Guide 2 27 ...

Page 40: ...Hardware Upgrades 9 Connect the power cable 1 and data cable 2 to the hard drive Connecting the Data Cable and Power Cable 2 28 Hardware Reference Guide ...

Page 41: ...drive connector locations If you have installed a hard drive that is not automatically recognized by the computer see Appendix B Hard Drive Installation Guidelines If you replaced the primary hard drive insert the Restore Plus CD to restore the operating system software drivers and any software applications that were preinstalled on the computer Follow the instructions in the guide included with t...

Page 42: ... bay at any time The type of bezel you need will depend on the type of device you plan to install If you are installing a diskette drive you must install a diskette drive bezel PN 316002 001 If you are installing a hard drive you must install a bezel blank PN 316006 001 If you are installing a 3 5 inch device other than a diskette drive or hard drive you must install the 3 5 inch device bezel PN 3...

Page 43: ... the Smart Cover Lock use Computer Setup to unlock the lock 2 Exit all software applications shut down the operating system software turn off the computer and any external devices then disconnect the power cord from the power outlet 3 Remove the computer access panel and front bezel Refer to Removing the Computer Access Panel and Front Bezel for more information Hardware Reference Guide 2 31 ...

Page 44: ...te drive bezel by pushing the tab inward 1 and pulling the diskette drive bezel 2 away from the front bezel The type of bezel will vary depending on the computer configuration Removing the Diskette Drive Bezel 2 32 Hardware Reference Guide ...

Page 45: ...the front of the drive Continue to slide the drive all the way back until it locks into place If replacing a diskette drive the guide screws front and rear will line up on the J slots Insert the guide screws into the J slots then slide the drive toward the back of the drive cage until it locks into place Installing a Hard Drive into the 3 5 inch Drive Bay connectors may vary Hardware Reference Gui...

Page 46: ...the illustration below If you are installing a 3 5 inch device other than a diskette drive or hard drive you must install the 3 5 inch device bezel PN 316008 001 Contact an authorized HP reseller or service provider to order the appropriate bezel when reconfiguring the computer Installing a Bezel 7 Connect the power and data cables 8 Replace the front bezel and computer access panel If you have in...

Page 47: ...essive force when inserting a drive Avoid exposing a hard drive to liquids temperatures extremes or products that have magnetic fields such as monitors or speakers If a drive must be mailed place the drive in a bubble pack mailer or other suitable protective packaging and label the package Fragile Handle with Care Hot Plugging or Hot Swapping MultiBay Drives CAUTION To prevent damage to the comput...

Page 48: ...he computer Follow directions for your operating system below Windows 2000 Professional Windows XP Professional or Windows XP Home 1 Right click the My Computer icon then click Manage Disk Management 2 Select the MultiBay hard drive 3 On the Partition menu click Create Carefully read and respond to any prompts that appear on the screen Refer to the Microsoft Management Console online Help click Ac...

Page 49: ...oved To remove a drive installed in the MultiBay you must first remove the security screw if installed using the FailSafe Key If a FailSafe Key was not provided with the computer contact an authorized HP reseller or service provider Order PN 166527 001 for the wrench style key or PN 166527 002 for the screwdriver bit key Uninstalling the MultiBay Security Screw Hardware Reference Guide 2 37 ...

Page 50: ... 3 With the top of the drive facing up and the drive connector facing the computer slide the drive into the MultiBay and push firmly to ensure that the electrical connector is properly seated Inserting a Drive into the MultiBay If the device does not start ensure that the necessary device drivers are installed on the system If they are not available they may be downloaded at no cost from the HP We...

Page 51: ...n turn off any external devices 2 Remove the MultiBay security screw if it has been installed Refer to the Uninstalling the MultiBay Security Screw section for instructions on removing the MultiBay security screw 3 Slide the eject lever to the left to eject the drive from the MultiBay Removing a Drive from the MultiBay Hardware Reference Guide 2 39 ...

Page 52: ...Hardware Upgrades 2 40 Hardware Reference Guide ...

Page 53: ...ating 50º to 95º F 10º to 35º C Nonoperating 22º to 140º F 30º to 60º C This system utilizes a passive power factor corrected power supply when used in the 230V mode This allows the system to pass the CE mark requirements for use in the countries of the European Union Relative Humidity noncondensing Operating 1090 1090 Nonoperating 38 7 C max wet bulb 595 595 Maximum Altitude unpressurized Operati...

Page 54: ...VAC Rated Voltage Range 100127 VAC 200240 VAC Rated Line Frequency 5060 Hz 5060 Hz This system utilizes a passive power factor corrected power supply when used in the 230V mode This allows the system to pass the CE mark requirements for use in the countries of the European Union Power Output 185 W 185 W Rated Input Current maximum 5 A 100 VAC 2 5 A 200 VAC Heat Dissipation Maximum 971 BTU hr 245 k...

Page 55: ...select mode therefore no jumper setting changes on the existing or optional drives are required If you purchase a third party hard drive refer to the documentation included with the kit to ensure proper installation and configuration of cables If installing a second device on the primary controller you must use an 80 conductor Ultra ATA cable for optimal performance This cable is standard on selec...

Page 56: ...r a half height drive into a half height bay Install guide screws to ensure that the drive lines up correctly in the drive cage HP has provided extra guide screws installed in the front of the computer chassis behind the front bezel Some options use M3 metric hardware HP supplied metric screws are black HP supplied standard screws are silver If only one device is connected to a cable that device m...

Page 57: ...ury Do not attempt to recharge the battery Do not expose to temperatures higher than 60 C 140 F Do not disassemble crush puncture short external contacts or dispose of in fire or water Replace the battery only with the HP spare designated for this product CAUTION Before replacing the battery it is important to back up the computer CMOS settings When the battery is removed or replaced the CMOS sett...

Page 58: ...y external devices Disconnect the power cord from the power outlet and disconnect any external devices Then remove the computer access panel It may be necessary to remove an expansion card to gain access to the battery 3 Locate the battery and battery holder on the system board 4 Depending on the type of battery holder on the system board complete the following instructions to replace the battery ...

Page 59: ...t Type 2 a To release the battery from its holder squeeze the metal clamp that extends above one edge of the battery b When the battery pops up lift it out Removing a Coin Cell Battery Type 2 Hardware Reference Guide C 3 ...

Page 60: ...fter the battery has been replaced use the following steps to complete this procedure 5 Replace the computer access panel 6 Plug in the computer and turn on power to the computer 7 Reset the date and time your passwords and any special system setups using Computer Setup Refer to the Computer Setup F10 Utility Guide 8 If you normally lock the Smart Cover Lock use Computer Setup to relock the lock a...

Page 61: ...D Security Provisions The security locks displayed below and on the following pages can be used to secure the computer Cable Lock Installing a Cable Lock Hardware Reference Guide D 1 ...

Page 62: ...Security Provisions Padlock Installing a Padlock D 2 Hardware Reference Guide ...

Page 63: ...Security Provisions Universal Chassis Clamp Lock Without Security Cable 1 Thread the keyboard and mouse cables through the lock Hardware Reference Guide D 3 ...

Page 64: ...visions 2 Screw the lock to the chassis using the screw provided 3 Insert the plug into the lock 1 and push the button in 2 to engage the lock Use the key provided to disengage the lock D 4 Hardware Reference Guide ...

Page 65: ...Security Provisions With Security Cable 1 Fasten the security cable by looping it around a stationary object 2 Thread the keyboard and mouse cables through the lock Hardware Reference Guide D 5 ...

Page 66: ...ew the lock to the chassis using the screw provided 4 Insert the plug end of the security cable into the lock 1 and push the button in 2 to engage the lock Use the key provided to disengage the lock D 6 Hardware Reference Guide ...

Page 67: ...ttach the bottom section of the bracket to the rear of the computer a Hook the tabs on the lower edge of the bottom section of the bracket into the slots on the rear of the computer 1 b Insert the tabs on the upper edge of the bottom section of the bracket into the slots on the rear of the computer Push in 2 until the bottom section of the bracket locks in place Hardware Reference Guide D 7 ...

Page 68: ...ttach all required cables to the rear of the computer 3 Pull up and hold the latch 1 slide the computer access panel back 2 about 0 5 inch 1 25 cm then lift the access panel up and off the chassis D 8 Hardware Reference Guide ...

Page 69: ...he outer portion of the top section of the bracket so that all cables fit through the slots provided 1 then lower the inner portion so that the bracket hooks onto the computer 2 5 Reattach the access panel Hardware Reference Guide D 9 ...

Page 70: ...Security Provisions Removing the Port Security Bracket To remove the Port Security Bracket reverse the steps for attaching the bracket D 10 Hardware Reference Guide ...

Page 71: ...til they arrive at static free workstations Place parts on a grounded surface before removing them from their containers Avoid touching pins leads or circuitry Always be properly grounded when touching a static sensitive component or assembly Grounding Methods There are several methods for grounding Use one or more of the following methods when handling or installing electrostatic sensitive parts ...

Page 72: ...s Use conductive field service tools Use a portable field service kit with a folding static dissipating work mat If you do not have any of the suggested equipment for proper grounding contact an HP authorized dealer reseller or service provider For more information on static electricity contact an HP authorized dealer reseller or service provider E 2 Hardware Reference Guide ...

Page 73: ...unit as this also restrics airflow Keep the computer away from excessive moisture direct sunlight and extremes of heat and cold For information about the recommended temperature and humididty ranges for the computer refer to Appendix A Specifications in this guide Keep liquids away from the computer and keyboard Never cover the ventilation slots on the monitor with any type of material Turn off th...

Page 74: ...re you turn off the power If you operate the unit immediately it may malfunction while reading Avoid placeing the drive in a location that is subject to high humidity extreme tempatures mechanical vibration or direct sunlight Cleaning Clean the panel and controls with a soft dry cloth or a soft cloth lightly moistened with a mild solution Never spray cleaning fluids directly on the unit Avoid usin...

Page 75: ... to protect the drive while in transit Do not use a diskette on which you have stored or plan to store data 4 Turn off the computer and external devices 5 Disconnect the power cord from the electrical outlet then from the computer 6 Disconnect the system components and external devices from their power sources then from the computer Ensure that all boards are seated properly and secured in the boa...

Page 76: ... configuration desktop 1 7 2 2 tower 2 2 configuration tower or desktop 1 7 CTRL keys 1 4 1 5 D desktop configuration 1 7 2 2 DIMMs dual inline memory modules guidelines 2 10 installing 2 12 2 13 2 14 diskette drive activity light 1 2 eject button 1 2 removing 2 21 drive installation guidelines 2 19 drive positions 2 20 E Easy Access buttons 1 5 easy access keyboard customizing 1 6 editing keys 1 ...

Page 77: ... coin cell battery type 1 C 2 coin cell battery type 2 C 4 DIMMs 2 14 expansion card 2 15 hard drive 2 33 memory 2 10 MultiBay drive 2 38 optical drive 2 23 padlock D 2 K keyboard port 1 3 L lock D 1 D 2 M memory identifying 2 14 installing 2 10 installing additional memory 2 10 microphone connector 1 2 1 3 module sockets 2 10 monitor connector 1 3 mouse connector 1 3 MultiBay formatting 2 36 hot ...

Page 78: ... 2 21 Smart Cover lock 2 5 RJ 45 connector 1 3 routine computer care F 1 S SDRAM synchronous dynamic random access memory 2 10 security lock provisions D 1 security screw MultiBay 2 37 serial connector 1 3 serial number locations 1 7 serviceability features 2 1 Smart Cover FailSafe key 2 4 lock 2 4 removing 2 5 specifications A 1 status lights 1 4 1 5 T tower configuration 1 7 2 2 U Universal Seri...

Reviews: