


27
Figure 34
Installing the PSR750-A power supply
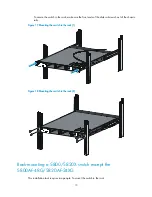
Figure 35
Installing other power supply models
Removing a power supply
1.
Wear an ESD wrist strap and make sure it makes good skin contact and is correctly grounded.
2.
Switch off the power supply and disconnect the power cord.
3.
Loosen the captive screws of the power supply with a Phillips screwdriver until they are completely
disengaged.
4.
Grasp the handle of the power supply with one hand and pull it out a little, support the bottom with
the other hand, and pull the power supply slowly along the guide rails out of the slot.
5.
Put away the removed power supply in an antistatic bag for future use.
NOTE:
The PSR150-A, PSR150-A1, PSR150-D, and PSR150-D1 power supplies do not have a power switch. You
do not need to switch on or switch off the power supply as described in the installation and removal
procedures in
Figure 27
and
Figure 28
.


