Cisco Catalyst Blade Switch 3020 for HP Getting Started Guide [Cisco Catalyst Blade Switch 3000 Series] - Cisco Systems
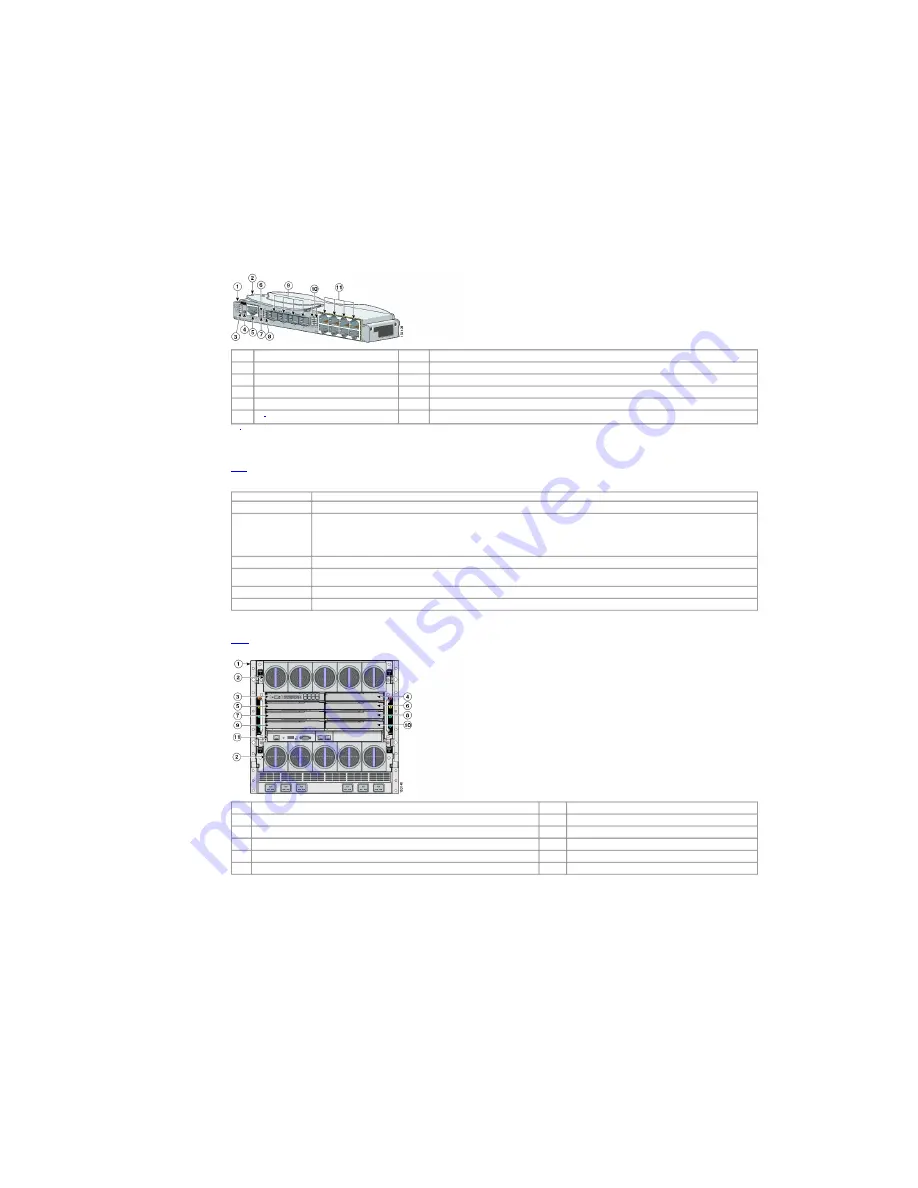
Figure 1 The Catalyst Blade Switch 3020 for HP
1
Switch module
7
Health LED
2
Release latch
8
SFP module port LEDs for ports 17 to 20
3
System status LEDs
9
SFP module ports 17 to 20
4
Mode button
10
Gigabit Ethernet ports LEDs for ports 17x to 24x
5
Console port
11
Gigabit Ethernet ports 17x to 24x
6
UID
1
LED
1
UID: unit
identifier
The switch module is managed through the RS-232 console port that uses an RJ-45 connector in the switch module front-panel.
The blade server includes a chassis management module, the Onboard Administrator. Each switch module connects internally to the Onboard Administrator through 100BASE-T Ethernet links. You can manage the switch modules through the Onboard Administrator on a management network that is
isolated from other switch traffic. You can also manage the switch module through any of the external uplink ports.
Table 1
describes the switch module ports. Each external port has an associated LED.
Table 1 Cisco Catalyst Blade Switch 3020 for HP Port Descriptions
Port
Description
Ports 1 to 16
Internal Gigabit Ethernet 1000BASE-X downlink ports.
Ports 17 to 20 and Ports 17x to
20x
Dual-purpose SFP module/RJ-45 copper Ethernet uplink ports. The SFP module ports support only Cisco 1000BASE-SX fiber-optic modules.
By default, the switch module dynamically selects the interface type that first links up. SFP modules have precedence if both SFP module and copper Ethernet interface types are in link-up state. You can
also specifically configure each port for either copper Ethernet or SFP modules if you do not want to use autodetection.
The copper Ethernet ports support automatic medium-dependent interface crossover (auto-MDIX) and autonegotiation.
For information about configuring speed and duplex settings for a dual-purpose uplink port, see the switch module software configuration guide.
Ports 21x to 22x
External 10/100/1000BASE-T copper Gigabit Ethernet uplink ports that support auto-MDIX, and autonegotiation.
Ports 23x to 24x
Dual-purpose external/internal 10/100/1000BASE-T copper Gigabit Ethernet uplink ports. These ports can be configured for internal 1000BASE-X cross-connection with a corresponding switch module.
When ports 23x and 24x are in external operation mode, they support auto-MDIX and autonegotiation. The default is external operation mode.
Internal 100BASE-T Ethernet port
This port (fa0) is used only for switch module management traffic, not for data traffic. It is connected to the Onboard Administrator through the blade server backplane connector.
Console port
RJ-45 switch module management port.
The switch module is powered from the blade server backplane, and temperature management is provided by the blade server. There is no fan on the switch module.
3 HP c-Class BladeSystem Architecture
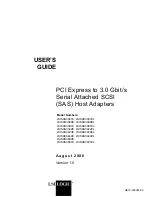
Figure 2
shows the rear view of the blade server, in which you install the switch module.
Figure 2 Rear View of the Blade Server
1
Blade server rear view
7
Interconnect module bay 5
2
Blade server fans
8
Interconnect module bay 6
3
Interconnect bay 1 with switch module installed
9
Interconnect module bay 7
4
Interconnect module bay 2
10
Interconnect module bay 8
5
Interconnect module bay 3
11
Onboard Administrator module
6
Interconnect module bay 4
Consider these prerequisites before installing your switch module:
•
Fill any unoccupied interconnect bays or any unoccupied power module bays in the blade server with blanks.
•
Identify the bays in which you will insert the switch modules. Plan to install the first switch module in bay 1, the second in bay 2, and so on up to bay 8, if possible. The bay in which you choose to install each switch module depends on whether mezzanine or Ethernet cards are installed in the
blade server and how they are configured. See the blade server documentation for more information about installing and configuring the mezzanine or Ethernet cards.
The interconnect module bays are physically interconnected in pairs through the blade server backplane. That is, each of these pairs—bays 1 and 2, bays 3 and 4, bays 5 and 6, and bays 7 and 8—are interconnected. If you install two switch modules in one of the paired bays, they are internally
interconnected. You must configure the switch modules to logically enable the interconnect ports, Gigabit Ethernet ports 23 and 24. See the switch module software configuration guide for information on configuring these ports.
http://www.cisco.com/en/US/products/ps6748/products_getting_started_guide09186a00806c38a8.html (2 of 11)4/19/2007 10:27:48 AM


