background image

restart (Fig 8-S).

Warning! Ensure that the quartz tube
is not damaged before refitting.

Lamp Replacement

Follow the below procedure if the
lamp needs replacing or does not
illuminate:

Change the lamp at the start of the
new season. Even though the lamp still
glows it may not be giving out any
useful UV radiation.  How well the
EasyClear™ performs is related to the
strength of the UV radiation produced.
This will slowly decline from the day
your lamp is switched on. The UVC
lamp has an effective life of 12 months.
You need to change the lamp when
there is a significant reduction in water
clarity. Make sure this is due to an
expired lamp and not a badly
maintained filter or a dirty/limescaled
quartz sleeve. Both can greatly reduce
UV transmission into the water.

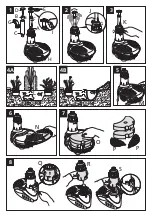
1 - Remove the bayonet locking screw
(Fig 8-Q), twist and lift the bayonet
tube (Fig 8-R).

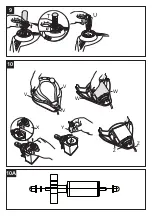
2 - Remove the quartz tube, rotating
the plastic moulding anticlockwise and
lifting up and away (Fig 9-T).

3 - With the lamp now accessible pull it
out of the holder (Fig 9-U) and push in
a new lamp.

4 - Reassemble the bayonet tube and
restart (Fig 8-S).

Warning! Ensure that the quartz tube
is assembled correctly so that it
provides a completely watertight seal.

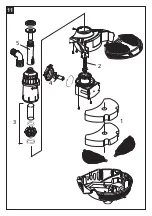
Check the condition of the two o-rings
on the Quartz Tube Assembly (Fig 11-
3).  If these are damaged in any way or
you can not guarantee a water tight
seal, contact Hozelock Consumer
Services.


Biological Filter

Normally, there is no need to remove
the biomedia as any cleaning may kill
the colonies of bacteria that make toxic
waste harmless.

1 - Remove the foam.

2 - The bag of Kaldnes Biomedia (Fig 7-
P) can be removed for cleaning.

3 - Wash in pond water.

4 - Reassemble the filter and restart.

Rotor Cleaning/Replacement

Follow the below procedure if the no
water is being pumped or flow is
reduced:

1 - Release the Foam Cover by pushing
the two buttons (Fig 5-M) and lift the
cover (Fig 6-N).

2 - Remove the foam (Fig 7-O),
biomedia (Fig 7-P) and stone bag.

3 – Turn the unit over and remove the
4 fixing screws (Fig 10-V) and lift the
base clear.

4- Remove the 2 fixing screws (Fig 10-
W) and lift the Pump Assembly clear. 

5 - Twist the Pump Chamber anti-
clockwise (Fig 10-X) and lift clear. The
rotor can now be pulled out for
cleaning or replacement ( Fig 10-Y).

Important!  Take extra care so as to
not drop any of the small components.
See Fig 10A for assembly of the rotor.

6 - Reassemble the pump and 2 off
fixing screws (Fig 10-W).

7 - Reroute the cable (Fig 10-Z).

8 - Reassemble the filter, and restart.

A quick daily check should be carried
out to ensure that the pump is
performing satisfactorily.

Once a week- Remove the outer casing
and Fountain Head in accordance with

All Year Pump Care

Summary of Contents for EASYCLEAR 3000

Page 1: ...2823 3003 EASYCLEAR 3000 Hozelock Ltd Midpoint Park Birmingham B76 1AB England Tel 44 0 121 313 1122 info hozelock com www hozelock com 33854 002 ...

Page 2: ...1 4A 3 5 6 7 4B 8 2 P P O N L M Q R S J K G C E D B A I F H ...

Page 3: ...V X Y V V Z Z W W 10 9 U T 10A ...

Page 4: ...11 5 3 2 4 1 ...

Page 5: ... the ball joint Fig 4A L DO NOT OPERATE THIS UNIT WITHOUT THE OUTER CAGE ATTACHED USING THE UNIT WITHOUT THE OUTER CAGE MAY INVALIDATE YOUR WARRANTY The clear tube inside the unit is made from quartz glass and care should be taken during installation and maintenance We recommend the use of eye protection and suitable gloves The EasyClear 3000 is fitted with a 5W UVC lamp Exposure to Ultra Violet U...

Page 6: ...UPPLY BEFORE PUTTING YOUR HANDS IN THE WATER WHILST EQUIPMENT IS BEING INSTALLED REPAIRED MAINTAINED OR HANDLED Do not use the supply cable to lift the unit as this may cause damage We recommend fitting a lifting cord to the hook feature on the base when the filter is installed in deep water Fig 1 H Check that the voltage marked on the unit corresponds to the mains supply A 10mA OR 30mA RESIDUAL C...

Page 7: ...en using the EasyClear for a waterfall the entire unit should be submersed Connection Place the unit next to the pond and route the cable back to the mains supply Ensure that you allow for enough cable for positioning the product in the desired location in the pond Bell Fountain Fig 1 Locate the Bell Support B to the Bell Main Body C and push fully home Position the Bell D to the Body Assembly and...

Page 8: ...casionally it will become necessary to clean or replace parts Refer to the safety sections before attempting any maintenance Fountain Head Fig 1 I Follow the below procedure if the fountain head is blocked 1 Place a coin or similar in the slot and gently lever off the fountain head 2 Rinse in clean water and reassemble Foam Follow the below procedure if flow appears reduced 1 Release the Foam Cove...

Page 9: ...f the two o rings on the Quartz Tube Assembly Fig 11 3 If these are damaged in any way or you can not guarantee a water tight seal contact Hozelock Consumer Services Biological Filter Normally there is no need to remove the biomedia as any cleaning may kill the colonies of bacteria that make toxic waste harmless 1 Remove the foam 2 The bag of Kaldnes Biomedia Fig 7 P can be removed for cleaning 3 ...

Page 10: ...uns for 12 months after purchase provided that You have followed the installation and operating instructions You are using equipment of the correct size and stocking level for your pond You consult our Helpline 44 0 121 313 1122 early enough for any problems to be put right The product has been returned undamaged A refund can only be authorised by Hozelock Cyprio and is made at the place of purcha...

Page 11: ... white flap inside pump chamber moves freely e Ensure rotor is clean and moves freely POOR FOUNTAIN DISPLAY a As above b Clean the Fountain Head UV LAMP NOT WORKING a Check power supply is on b Check fuse RCD and wiring c Replace the lamp d The Overload Protection may have operated see Overload Protection section PUMP NOT WORKING a Check power supply is on b Check fuse RCD and wiring c Check the r...

Page 12: ...Hozelock Ltd Midpoint Park Birmingham B76 1AB England Tel 44 0 121 313 1122 info hozelock com www hozelock com 33854 002 PLEASE NOTE Do not dispose of in household waste ...

Reviews: