background image

Document 2.4.128, Revision 3

October, 2017

25

Network Transformer Instruction Manual

water and other possible contaminants before 

proceeding with the filling process

2.    Pump from the bottom of the storage container. 

To prevent bubbles in the fluid, do not allow air to 

enter the pump intake. 

3.    Place the discharge hose at the bottom of the 

transformer tank below the fluid surface to 

prevent aeration and the introduction of bubbles. 

4.    Pump and fill the transformer tank slowly. Fill 

the tank to fill line marked on inside of the 

transformer tank. If the fill line mark cannot 

be viewed, use the indication on the fluid level 

gauge (if supplied) or fill to the bottom of the fill 

plug on the other side of the transformer tank.

Opening the Transformer Tank 

Transformer tanks are shipped sealed and should 

not be opened unless necessary. If it is necessary 

to open the tank, follow the instructions below and 

observe all safety warnings.

Transformer tanks should not remain open for more 

than two hours. If work is interrupted, the tank 

should be resealed, evacuated, and filled with dry air 

or nitrogen.  
To prevent contamination of the transformer, do 

not open the transformer tank in an unprotected 

area during inclement weather or where the air may 

contain dirt or other particles. Either of the above 

could contaminate the insulating fluid and cause 

a transformer failure. The tank opening should be 

protected against entry of foreign matter.  

If it is necessary to remove some fluid from the 

tank to allow for inspection or other work, the 

transformer must be re-filled with fluid after work is 

completed.  Personnel should not be permitted on 

top or inside the transformer while it is open unless 

they have emptied all pockets and checked for 

loose objects that might fall into the tank. All tools 

should be accounted for after work is completed.  It 

is recommended that any tools used on top of the 

transformer or inside the tank be attached with 

safety cords to prevent them from being lost inside 

the transformer. 
Personnel must not stand directly on any electrical 

insulation. Clean drop cloths should be used under 

working areas in the transformer to prevent objects 

from dropping into the core/coil assembly. 

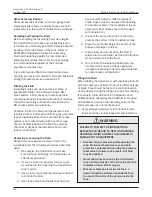
The following procedure should be used to remove 

the bolted hand-hole cover. 

     1.    Thoroughly clean the hand hole cover. 

Remove all moisture, dirt, and grease to avoid 

contaminating the transformer tank. 

     2.    Relieve internal tank pressure by manually 

operating the pressure relief valve, being 

careful to avoid hot fluid that could be 

expelled from the valve. 

     3.    Remove cover fasteners. 
     4.    Gently pry the cover upward, making sure that 

the cover gasket does not fall into the tank. 

Lift the cover vertically to prevent damage to 

cover, bolts, and gasket.  

The following procedure should be used to reinstall 

the hand-hole cover. 
     1.    Replace the gasket, if damaged. 
     2.    Re-install the hand-hole cover. Re-

install fasteners according to the torque 

recommendations in Table 3.  After tightening 

all fasteners, re-torque each one to ensure 

proper torque. 

     3.    Pressurize the headspace to 3-4 PSIG and 

check for fluid leaks. This pressure should be 

maintained for at least four hours.

When the internal inspection is complete, reseal the 

tank and re-fill with fluid (if any was removed prior 

to inspection). The gas space should be filled with 

dry air or dry nitrogen to 2 PSIG. Contact the Howard 

Industries Transformer Division, if any internal 

damage is found during the internal inspection.

Torque Guidelines

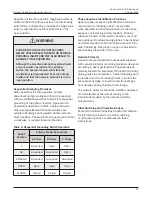
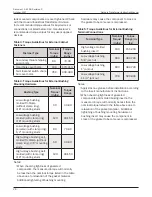
Tables 3 through 6 below contain recommended 

torque values for tightening various connections 

on the transformer. Connections with gaskets or 

those involving rubber components (such as high-

voltage busing inserts) will normally relax after initial 

tightening.  Nominal torque values listed below 

include an allowance for normal relaxation. 

Do not over-tighten any connection; otherwise, 

gaskets may split due to over-compression, and 

components may break. Fluid leaks may result if 

Summary of Contents for HI-110

Page 1: ... 128 Revision 3 October 2017 1 Network Transformer Instruction Manual Howard Industries Distribution Transformer Division Instructions HI 110 Installation Operation and Maintenance of Secondary Network Transformers ...

Page 2: ...and operate this equipment Qualified personnel are those who are trained in the installation maintenance and operation of high voltage equipment trained in the proper use of personal protective equipment such as rubber gloves safety glasses protective clothing hard hats etc and trained in appropriate first aid procedures The instructions contained herein are intended to be a general guide for the ...

Page 3: ...Secondary Connections 10 Primary Connections 10 Secondary Connections 10 SECTION 4 INSPECTION AND TESTING 11 Pre Energization Inspection and Tests 11 Continuity and Winding Resistance Test 11 Ratio Test 11 Insulation Resistance Test 11 Tap Changer Setting 12 Series Multiple and Delta Wye Switch Settings 12 Grounding 12 Bolted Connections 12 Fluid Levels 12 Fluid Temperature 12 Current Transformers...

Page 4: ... 19 Automatic Pressure Relief Valve and Pressure Relief Device 19 Primary Entrance 19 High Voltage Bushings 19 Secondary Bushings 20 Current Transformers 20 Other Accessory Devices 20 SECTION 7 MAINTENANCE 21 Periodic Inspection 21 Inspection and Maintenance Checklist 21 Electrical Testing 22 Exterior Paint Finish 23 Fluid Leaks 23 Audible Sound Level 23 Other Accessory Devices 24 Sampling and Tes...

Page 5: ...re designed in accordance with IEEE Standard C57 12 40 Secondary Network Transformers Subway and Vault Types Liquid Immersed Requirements The instructions contained herein are applicable to transformers operated in normal conditions as specified in the Usual Service Conditions section of IEEE Standard C57 12 00 Questions regarding installation operation and maintenance particularly when encounteri...

Page 6: ... when the ambient temperature is below minus 20 C minus 4 F otherwise permanent damage to the transformer may result Initial Inspection Although all transformers components and accessories are carefully inspected and tested prior to shipment from the factory a thorough receiving inspection should be conducted to detect any damage or loss that might have occurred after shipment The receiving inspec...

Page 7: ...l gauge pointer should be between the High and Low mark and point approximately at the 25 C mark A transformer found to have a low fluid level should be checked for potential leaks repaired as necessary and filled to the proper level with the same type of liquid as specified on the transformer nameplate If fluid must be added refer to Filling with Fluid for instructions Internal Inspection An inte...

Page 8: ...ized with dry nitrogen to a pressure of 2 3 PSIG This will prevent a negative internal pressure that might draw moisture into the main tank switch chamber or terminal chamber Prior to storage be sure that the primary bushings or bushing wells are fitted with their protective dust covers and the secondary throat shipping guard is installed The transformer should be inspected periodically while it i...

Page 9: ... designed for jacking Do not use radiator fins bushings valves gauges or sheet metal surfaces for jacking Jacking must be done using the proper jacking provisions from two adjacent corners simultaneously to prevent warping of the tank bottom Do not allow the jack to come into contact with panel radiators Refer to the transformer outline drawing for the total weight of the assembled transformer Loc...

Page 10: ...tely to prevent overheating and possible subsequent failure of the connection Refer to Table 5 for torque recommendations Connections should be made with care to avoid placing undue stress on the bushings Primary Connections Network transformers are supplied with a high voltage entrance as specified by the user usually consisting of dead front bushings or wiping sleeves for connection to the high ...

Page 11: ...l to remove any moisture or contaminants that could influence the test results Insulation resistance should measure at least 1 0 GΩ An insulation resistance test must not be performed on a wye wye connected transformer with an Ho Xo bushing without first disconnecting the internal connection between the primary and secondary neutrals This connection can be found on a terminal FAILURE TO FOLLOW THE...

Page 12: ...r main tank and primary switch chamber are shipped from the factory with insulating fluid filled to the proper level indicated by the 25 C mark on the fluid level gauge Before energizing the transformer verify proper fluid levels by observing the gauges Be aware that fluid levels vary with fluid temperature A transformer found to have a low fluid level should be checked for potential leaks repaire...

Page 13: ...rity load conditions and acoustic conditions at the installation site Refer to NEMA Standards Publication TR 1 Transformers Regulators and Reactors and IEEE Standard C57 12 90 IEEE Standard Test Code for Liquid Immersed Distribution Power and Regulating Transformers for more information about design sound levels and factory sound testing Unusual sounds should be investigated as this might indicate...

Page 14: ...f a fault condition is suspected Do not operate a no load tap changer series multiple switch or delta wye switch while a transformer is energized Use a live line tool hot stick or shotgun stick to operate transformer load break equipment After operating transformer loadbreak equipment check that voltages at transformer terminals are the expected values Checking voltages verifies that loadbreak equ...

Page 15: ...l the tap changer is firmly locked into a tap position The wrench is keyed so that it can be removed only when the tap changer is properly placed into one of the tap positions Unless otherwise specified transformers supplied with tap changers will be shipped from the factory with the switch set to the nominal position Series Multiple or Delta Wye Switch Transformers designed with series multiple w...

Page 16: ... verify that the transformer is not energized from either the high voltage or low voltage side Use the following procedure to move the switch from the OPEN to the CLOSED position 1 Operate the blocking toggle pin 2 Pull the mechanical locking pin on the handle 3 Rotate the handle until the mechanical locking pin engages in the CLOSED position Use the following procedure to move the switch from the...

Page 17: ...primary feeders Phasing tubes are located on the switch chamber cover and are positioned to allow phasing probes to be inserted and make electrical contact with live portions of the switch bushings Pipe plugs or caps are provided to seal phasing tubes when not in use Network Protector Howard network transformers are usually supplied with network protector mounting provisions designed according to ...

Page 18: ...rgized Fluid Temperature Gauge The fluid temperature gauge is a dial type bi metal device that indicates the fluid temperature at the top of the fluid column in the main tank The temperature gauge is mounted above the primary terminal chamber in a dry leak proof well permitting removal of the gauge without exposure to the tank fluid The gauge is furnished with a red drag hand pointer that indicate...

Page 19: ...ts Primary Entrance The primary entrance is located on the top of the terminal chamber and is provided for connection to the primary feeders The primary entrance typically consists of separable insulated connectors wiping sleeves or potheads as specified by the user When separable insulated connectors are provided they may consist of universal bushing wells only universal busing wells with factory...

Page 20: ...lating fluid CT leads are brought out to an external junction box mounted on the main tank Transformers are shipped from the factory with CT leads shorted together and grounded If the CT s are not connected to a metering load by the user they must remain shorted and grounded to avoid hazardous voltage at the CT secondary terminations WARNING FAILURE TO FOLLOW THE INSTRUCTIONS BELOW COULD RESULT IN...

Page 21: ...hering that exposes the primer coat or bare metal Repair any paint damage that might be found Refer to Exterior Paint Finish for instructions 3 Inspect thoroughly for evidence of fluid leaks including main tank switch chamber terminal chamber radiators bushings gauges switches valves and all other accessories Check fluid level gauges or sight glasses to determine fluid levels in all compartments I...

Page 22: ...es Transformer Division for testing recommendations 13 Lubricate external parts of the primary disconnect and grounding switch at least annually 14 Exercise the primary disconnect and grounding switch at least annually Electrical Testing The following electrical tests should be used to determine the condition of the transformer Follow the instructions and precautions provided by the test equipment...

Page 23: ...stigate thoroughly to determine if an actual leak does exist on the transformer False indications of a leak can occur as a result of residual fluid that was not sufficiently cleaned during the oil filling process In some cases silicone lubricant used to install high voltage bushing inserts can spread to the tank surface giving a false indication of a fluid leak To verify that a fluid leak exists c...

Page 24: ...s outlined in the Opening the Transformer Tank section 3 Use a clean dry temporary storage container to contain the fluid 4 Use clean pumps and hoses that have not been contaminated by different types of fluids Hoses must be designed for handling the particular fluid in the transformer As an example rubber hoses should not be used with mineral oil 5 Connect the pump intake line to the drain valve ...

Page 25: ... on top of the transformer or inside the tank be attached with safety cords to prevent them from being lost inside the transformer Personnel must not stand directly on any electrical insulation Clean drop cloths should be used under working areas in the transformer to prevent objects from dropping into the core coil assembly The following procedure should be used to remove the bolted hand hole cov...

Page 26: ...lamp ring 3 8 mounting studs 60 40 80 High voltage bushing well molded with clamp ring 3 8 mounting studs 120 90 150 Notes When checking tightness of gasketed components the measured torque will normally be less than the nominal torque listed in the table above due to relaxation of the gasket material Additional tightening of bushing mounting hardware may cause the component to crack or the gasket...

Page 27: ...ward Industries Transformer Division A description of the part and the transformer serial number will be required to ensure that the correct part has been ordered Warranty Claims The Howard Industries Transformer Division should be notified immediately when problems are discovered during the warranty period All warranty repairs must be made or approved by the Howard Industries Transformer Division...

Page 28: ...l HI 110 Instructions for Installation Operation and Maintenance of Secondary Network Transformers Document 2 4 128 Revision 3 October 2017 Copyright 2017 Howard Industries Inc Laurel Mississippi Telephone 601 425 3151 Fax 601 649 8090 Email mkt howard com Web howardtransformers com ...

Reviews: