


8
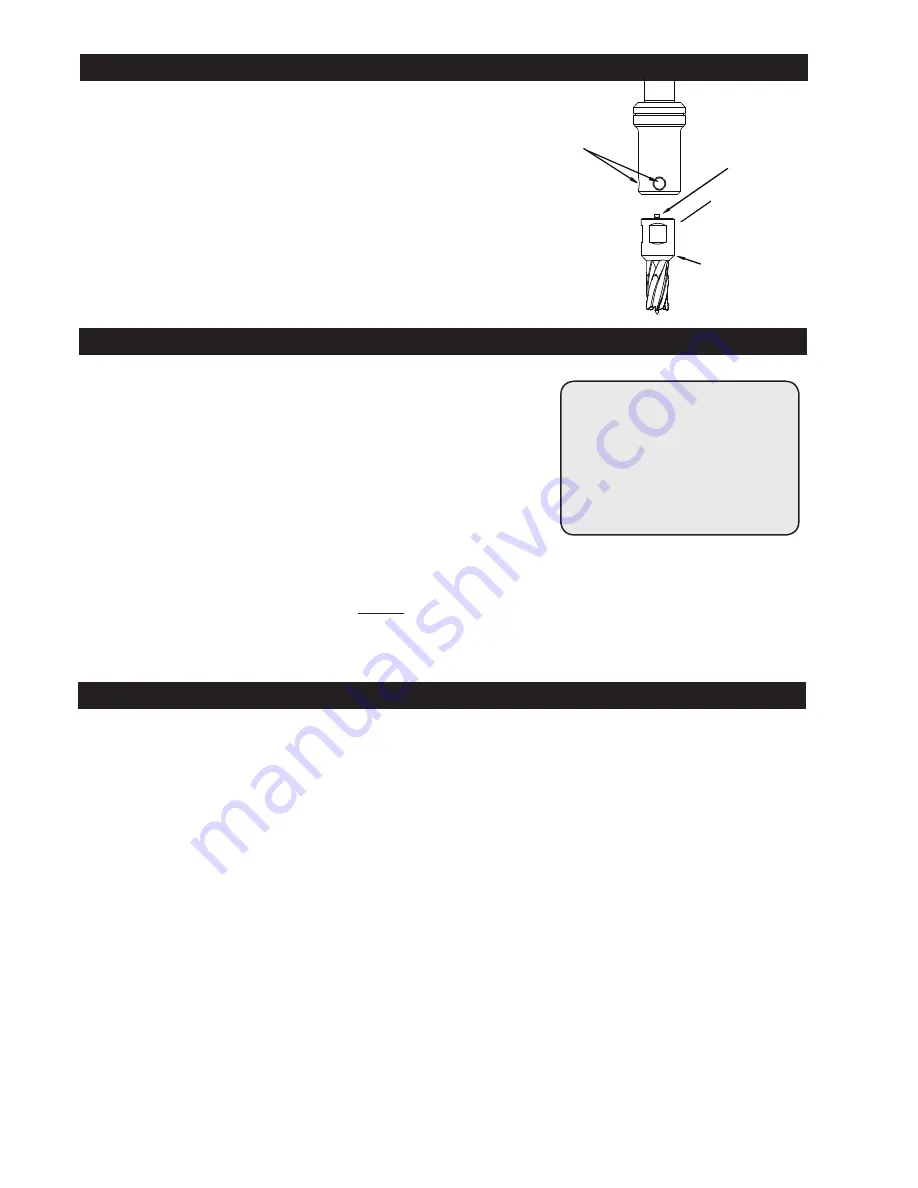
INSTALLING HOUGEN CUTTER IN ARBOR
1. Disconnect from power source and remove 1/4" Allen Wrench.
2. Lay drill on its side with feed handles up or be sure Arbor clears table if unit
is in normal operating position.
3. Turn Feed Handles until cutter mounting set screws are exposed and
completely remove the set screws.
4. Insert Hougen Cutter on ejector rod.
5. Insert Hougen Cutter until flat on cutter shank is aligned with set screw holes
and is exactly perpendicular to axis of set screw holes.
6. Insert set screws and tighten. Check to be certain that cutter is secure.
1. Keep the inside of Hougen Cutter clear of chips. Chips will interfere with cutting
to maximum depth, maybe impede the free oil flow and can cause cutter breakage.
2. Keep work, machine, arbor and Hougen Cutter free of chips and dirt.
3. Tighten all bolts and fasteners regularly.
4. We highly recommend using a light viscosity cutting fluid (preferably
Hougen Cutting Fluid.
5. Occasionally check metering of cutting fluid flow. Lack of cutting fluid may
cause Hougen Cutter to freeze in cut, slug to stick and may result in poor
cutter life.
6. Always start cut with light feed pressure and then increase sufficiently to
achieve maximum cutting rate.
7. Ease off on pressure as cutter begins to break through at the end of the cut.
8. Keep slide dovetails, brass gibs and feed rack lubricated and free of chips and dirt.
9. When slug hangs up in cutter, turn off motor and bring cutter down on a flat surface. This will normally straighten a cocked slug,
allowing it to be ejected.
10. When cutting large diameter or deep holes it may be necessary to stop in the middle of the cut to add cutting fluid and remove the
chips from around the arbor. (When doing this
DO NOT
raise the cutter out of the hole. Doing so can allow chips to get under the
teeth of the cutter. This will make it difficult to restart the cut.)
"Babying" the cutter through the cut will only decrease tool life.
#1 cause of cutter
breakage and
prematurely dull
teeth is too little
feed pressure
HINTS FOR SMOOTHER OPERATION
REMEDIES FOR HOLEMAKING PROBLEMS
1.
Trouble: Magnetic base won’t hold effectively to work
.
a. Cause:
Chips or dirt under magnet.
Remedy
:
Clear area of chips and dirt.
b. Cause:
Irregular surface on bottom of magnet
or on workpiece.
Remedy:
Lightly surface grind the bottom of the magnet flat
and/or file imperfections flat on the work surface
as needed.
2. Trouble: Cutter tends to move across surface of work.
a. Cause:
Magnetic base not holding effectively.
Remedy:
See causes and remedies under No. 1 above.
b. Cause:
Too much feed pressure at start of cut.
Remedy:
Use light pressure until a groove is cut.
The groove then serves as a stabilizer.
c. Cause:
Worn cutter.
Remedy:
Replace or have cutter resharpened.
3. Trouble: Out of round holes.
a. Cause:
Worn arbor support bracket bearing
and or ejector collar.
Remedy:
Replace: (only a few thousandths wear permissible.)
b. Cause:
Misaligned support bracket
Remedy:
Realign support bracket
c. Cause:
Misaligned or loose arbor set screw.
Remedy:
Tighten set screw.
4. Trouble: Motor and slide won’t stay in set position
a. Cause:
Drag Screw is loose
Remedy
: Adjust Drag Screw
5. Trouble: Erratic or intermittent feed.
a. Cause:
Worn or pinion and/or rack.
Remedy:
Replace worn parts.
6. Trouble: Motor doesn’t run when motor START
button is pushed.
a. Cause:
Magnet is not turned on
Remedy
:
Push magnet ON button.
b. Cause:
Magnet on rough or dirty work surface
and safety switch not fully depressed.
Remedy:
File work surface flat and clean all
chips and oil from under magnet.
c. Cause:
No power
Remedy:
Check power source and extension cords.
e. Cause:
Worn motor brushes
Remedy:
Replace brushes
f. Cause:
Faulty motor START switch
Remedy:
Return unit to an authorized repair
center to have switch replaced.
NOTE: If you are unable to correct any malfunction after trying
the above, do not attempt to operate the drill. Return the unit to
the factory or authorized repair center for service.
Set Screws
go here
"12000-Series"
Hougen Cutter
Pilot
Set Screws
go here
"12000-Series"
Hougen Cutter
Pilot


