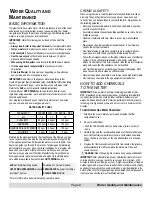
background image

Page 6

Getting Started

DO:

•  Know which water treatment system you will be using and make sure 

you have necessary chemicals available. Read all of the instructions 

that come with the system.

•  Have 

FRESHWATER


 5-way Test Strips Available.

•  Have pH/Alkalinity Up & Down available.
•  Know the "Hardness" of your water, contact your dealer to help you 

with this information. See Water Quality and Maintenance for more 

information.  

IMPORTANT:

 Watkins Manufacturing Corporation does not 

recommend that the spa be filled with “softened” water, as this may 

damage the spa’s equipment.

•  Purchase the Clean Screen

 pre-filter to remove unwanted 

contaminants from the tap water. This is recommended, not required.

DON'T:

•  Power up the spa until it has been filled with water!


Power to the 

spa automatically activates critical components within the spa, such 

as controls, heater, circulation pump, and other systems. If power 

is supplied to these components prior to the spa being filled, the 

components will be damaged, and this may result in a non-warranty 

component failure.

•  Fill the spa with hot water or cold water with cold water temperature 

below 10º C (50º F)! Tripping of the high-limit thermostat may result 

causing your spa to stop functioning.

DON'T:

•  Use your spa after filling until all of the steps listed below START-UP  

are completed!

•  Add chlorine if treating your spa with polyhexamethylene biguanide 

(Biguanide, PHMB, eg. BaquaSpa

®

) sanitizer.

START-UP

Your 

HOT SPRING

 spa has been thoroughly tested during the 

manufacturing process to ensure reliability and long-term customer 

satisfaction. A small amount of water may have remained in the 

plumbing after testing and, as a result, may have spotted the spa shell 

or the spa siding prior to delivery. Before filling the spa, wipe the spa 

shell clean with a soft rag.
The following instructions must be read and followed exactly to ensure 

a successful start-up or refill.

1.  CLOSE DRAIN AND FILL THE SPA

 with water through the 

filter compartment. Your 

HOT SPRING

 spa water level should be 

maintained just below the bottom of the pillow.

2.  AFTER THE SPA HAS BEEN FILLED

 with water and the 

equipment compartment door is secured, power must be applied to 

the spa.

3.  TO CHECK THE OPERATION OF THE JET SYSTEM

 and to 

purge any remaining air from the heating system: 

PULSE/

DL

, FLAIR

 & 

GLOW


Models:

•  Push the JETS hard button.
•  Push the JET MAX soft button to run pumps on high speed, run for 

one minute. Press JETS OFF soft button to shut all the jets off.
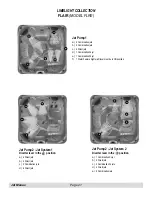
BOLT


Model:

•  Push the JETS Hard button to run the jet pump on high speed, run 

for one minute. Press JETS OFF soft button to shut the JETS off.
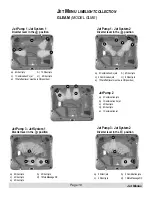
GLEAM 

Model:

•  Push the JETS hard button.
•  Push the JETS MAX soft button to turn on all the jets and run for 

one minute. Press the soft button next to each Jet # to shut off the 

jets.

Weak or surging jets are an indication of a low water level condition or 

clogged filter cartridges

.

IMPORTANT:

 Be sure the air Lever (see illustration in Spa Features 

section) is open by turning clockwise until it stops. Combination jet 

faces can be turned to completely shut off jet flow, these jets should 

be open as well.

4.  USING A TEST STRIP AND APPLICABLE CHEMICALS

,


adjust Total Alkalinity (TA) to 80 ppm, Calcium Hardness (CH) to 

100 ppm (if using ACE system 50 ppm),  then spa water pH to 

between 7.2 and 7.8. These procedures are listed in the “Water 

Quality and Maintenance” section.  

IMPORTANT: 

Always add spa water chemicals directly into the 

filter compartment with the jet pump on high speed for at least 

ten minutes. Adjusting the Total Alkalinity (TA) as the first step is 

important, as out-of-balance TA will affect your ability to adjust the 

pH correctly and will prevent the sanitizer from operating effectively.

SUPERCHLORINATE THE SPA WATER

 by adding 1½ 

teaspoons of chlorine (sodium dichlor) per 950 liters (250 gallons) of 

spa water with the spa in the Cleaning mode.  

All 

HOT SPRING

 spas are equipped with a Cleaning mode. When 

the mode is activated, the jet pump in the first jet system will turn on 

and run for ten minutes (used for water maintenance). To activate 

the Cleaning mode, press the CLEAN soft button (on home screen) 

to turn on the jet pump.

5.  DURING THE SUPER-CHLORINATION PERIOD

, rotate the 

DIVERTER

 lever(s) through both operating positions, letting the 

spa water circulate (with jets on) for equal periods of time. The 

HOT 

SPRING

 spa's diverter levers are designed to operate different jets 

in two different positions. 

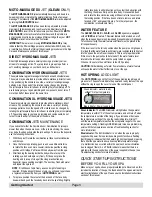
6.  SET THE TEMPERATURE CONTROL

, the spa is  

pre-programmed to reach 38° C (100°F), and will normally do 

so within 18 to 24 hours. You may raise or lower the water 

temperature by:
•  Pressing the OPTIONS hard button on the control panel.
•  Pressing the soft button next to 

Temperature

.

• 

Pressing the soft button next to TEMP ▲ button on the control 

panel to raise the temperature.

• 

Pressing the soft button next to TEMP ▼ button on the control 

panel to lower the temperature.

Place the vinyl cover on the spa and allow the water temperature 

to stabilize. Make sure you secure the cover in place using the 

cover locks. Periodically check the spa water temperature. When 

the water temperature climbs above 32°C (90°F), proceed to the 

next step. 

To prevent tampering, you can lock your desired temperature 

setting. Refer to the Operating section for details.

7.  ACTIVATE THE CLEAN CYCLE

 as described in step 5 to turn on 

the CLEAN cycle to circulate the spa water. After the clean cycle 

is complete, test the spa water for Free Available Chlorine (FAC) 

residual. If the residual is between 3 and 5 ppm on the test strips 

(found in the test kit) go on to the next step. If the residual is less 

than 3 ppm, superchlorinate the spa water by adding 1½ teaspoons 

of chlorine (sodium dichlor) per 950 liters (250 gallons) of spa water. 

Summary of Contents for LimeLight BOLT

Page 1: ......

Page 2: ...the right to change specifications or design without notification and without incurring any obligation Important In most cities and counties permits will be required for the installation of electrical...

Page 3: ...DRAIN REFILL INSTRUCTIONS 24 PREVENTION OF FREEZING 24 FILTER SYSTEM 25 FILTER CARTRIDGES REMOVAL CLEANING 25 CARE OF THE SPAPILLOWS 25 CARE OF THE EXTERIOR 26 CARE OF THE SPACOVER 26 COVER LIFTER SY...

Page 4: ...Corporation Do not self service audio component by opening spa door as this may expose dangerous voltage or other risk of injury Refer all servicing to qualified service personnel Do not attach an ext...

Page 5: ...ical history of heart disease low or high blood pressure circulatory system problems or diabetes should consult a physician before using spa UNCLEAN WATER Keep the water clean and sanitized with corre...

Page 6: ...o through the steps outlined in the Troubleshooting section If you are not able to resolve the problem contact your authorized HOT SPRING dealer Many problems can easily be diagnosed over the telephon...

Page 7: ...back and can be adjusted to provide a direct stream or rotating massage 7 The Directional Hydromassage jet delivers a therapeutic massage 8 The MOTO MASSAGE DX is a moving jet It has two warm streams...

Page 8: ...required If the bearing still does not spin you will need to purchase a replacement assembly from your HOT SPRING dealer 4 To replace position the cutout at the back end of the face body downward and...

Page 9: ...Jet to shut off the jets Weak or surging jets are an indication of a low water level condition or clogged filter cartridges IMPORTANT Be sure the air Lever see illustration in Spa Features section is...

Page 10: ...the ACE system go on to the next step If the residual is less than 3 ppm superchlorinate the spa water by adding 1 teaspoons of chlorine sodium dichlor per 950 liters 250 gallons of spa water Then Ac...

Page 11: ...hemicals read the labels carefully and follow directions precisely Though chemicals protect you and your spa when used correctly they can be hazardous in concentrated form Always observe the following...

Page 12: ...lower the pH level use FRESHWATER pH Alkalinity Down sodium bisulfate To raise the pH level use FRESHWATER pH Alkalinity Up sodium carbonate Water Conditioners Spa fill water varies from location to l...

Page 13: ...ldren present ACE SALT WATER SANITIZING SYSTEM OPTIONAL The ACE Salt Water Sanitizing System converts water and sodium chloride salt into chlorine sanitizer The ACE is compatible with chlorine based s...

Page 14: ...n the ACE Owner s Manual LONG TIME PERIODS 5 14 DAYS Prior to leaving 1 At least one day before you leave set the temperature to its lowest level This setting should represent an approximate water tem...

Page 15: ...nopersulfate is the non chlorine oxidizer used with the FRESHWATERAg silver ion purification system Not a sanitizer Nitric Acid The formulation of nitric acid a highly corrosive chemical is a byproduc...

Page 16: ...ure and will turn off when the temperature is outside of that range If you increase or decrease the temperature setting of the spa the READY indicator icon will turn off until the water temperature re...

Page 17: ...ge the screen to Temp Lock Off to turn the Temp Lock and icon off HOME SCREEN The temperature displayed in the center of the Home screen is the actual temperature of the spa water If the READY icon is...

Page 18: ...w 2nd Press Jet pump 1 on High 3rd Press Both jet pumps on high speed 4th Press Jet pump 1 on Low Jet pump 2 on high 5th Press Jet pump 2 on High 6th Press All pumps off BOLT 1st press jet pump on Hig...

Page 19: ...like to change the brightness of the Control panel screen Press the OPTIONS hard button on the Control panel Press the soft button next to Set up Press the soft button next to Brightness to lower the...

Page 20: ...the spa TO ADJUST TREBLE Press SETUP SOURCE soft button to advance to the SETUP Tone Treble screen Press the soft button next to or to change the Treble between 5 and 5 Press SETUP Tone Treble soft b...

Page 21: ...ts d 1 MotoMassage DX Jet Pump 2 a 4 Combination jets b 1 Combination XL jet c 4 Direct jets d 6 Direct jets e 1 Combination jet Jet Pump 1 Jet System 2 Diverter lever in the position a 2 Combination...

Page 22: ...er Feature left wall lever must be in ON position Jet Pump 2 Jet System 1 Diverter lever in the position a 6 Direct jets b 8 Direct jets c 1 Combination XL jets d 4 Direct jets Jet Pump 2 Jet System 2...

Page 23: ...b 4 Direct Hydromassage jets in right lounge c 1 Combination XL jets in right lounge footwell d 1 Combination XL jets on front lounge wall e 2 Combination jets on front lounge wall f 4 Direct Hydroma...

Page 24: ...Jet Pump 1 a 2 Combination jets b 2 Combination jets c 4 Direct jets d 1 Combination XL jet e 1 Combination XL jet f 1 Water Feature right wall lever must be in ON position Jet Pump 2 Jet System 2 Di...

Page 25: ...Page 22 LIMELIGHT COLLECTION BOLT MODEL BLTE Jet Pump a 8 Direct jets b 4 Direct jets c 2 Combination jets d 2 Combination jets e 1 Combination XL jet A C B D E Jet Menus...

Page 26: ...Jet Pump 2 a 4 Direct jets b 1 Combination XL jet c 1 Combination XL jet d 2 Direct jets e 2 Combination jets Jet Pump 1 a 10 Direct jets b 6 Direct jets jets c 2 Combination jets d 1 Water Feature ri...

Page 27: ...s as the heater will cycle more frequently As an additional precaution against partial freezing of some of the components the equipment compartment can be insulated with an insulating kit available fr...

Page 28: ...warranty WARNING To reduce the risk of injury to persons using the spa DO NOT remove the suction fittings filter standpipes located in the filter compartment and do not sit on the filter lid in extrem...

Page 29: ...cover that meets or exceeds all prevailing requirements of ASTM 1346 91 for spa safety covers when installed and used correctly as of the date of manufacture Non secured or improperly secured covers a...

Page 30: ...of the cover just above the skirt Gently push do not lift with both hands towards the opposite rear corner of the cover diagonally As the cover opens the gas springs will allow the cover to come to a...

Page 31: ...tional 16 amp breaker in order to operate the heater and jet pump 3 at the same time Without the additional 16 amp breaker the heater will NOT operate while jet pump 3 is on Mount the subpanel accordi...

Page 32: ...iring information Mount the subpanel according to local codes but not closer than 1 5 meters 5 feet away CONDUIT INSTALLATION INSTRUCTIONS 1 To connect the electrical service first remove the screws f...

Page 33: ...Just make sure you check the following Always put your spa on a structurally sound level surface A filled spa can weigh a great deal Make certain that the location you choose can support the weight Do...

Page 34: ...Use the level to check the level of the spa Make any necessary adjustments 9 Refer to the spa pedestal support diagram for your spa to locate the remaining leveling points each of which must now also...

Page 35: ...g electric meters Gas meters A C units Is the path clear Move away branches dog houses firewood etc If there is a 90 turn can we clear it The spa will not bend No more than 6 consecutive stairs withou...

Page 36: ...cation chart WARNING The GLEAM must not be shimmed in any manner GLEAM MODEL GLME Dimensions NOTE All dimensions are approximate measure your spa before making critical design or pathway decisions GLE...

Page 37: ...tion chart WARNING The PULSE DL must not be shimmed in any manner PULSE 89 226cm 89 226cm 3 5 9 cm 34 5 87 5 cm 38 96 5 cm 18 5 47 cm 74 5 189 cm 40 5 103 cm Bottom view Front view Upside Down View of...

Page 38: ...t found in the spa specification chart WARNING The FLAIR must not be shimmed in any manner FLAIR 84 213 5cm 84 213 5cm 3 5 9 cm 32 5 82 5 cm 36 91 5 cm 19 48 5 cm 69 5 176 5 cm 31 78 5 cm Bottom view...

Page 39: ...weight found in the spa specification chart WARNING The BOLT must not be shimmed in any manner BOLT 80 203 cm 80 203 cm 3 5 9 cm 29 5 75 cm 33 84 cm 18 5 47 cm 65 165 cm 34 86 5 cm Bottom view Upside...

Page 40: ...installed on a minimum 10 cm thick reinforced concrete pad or structurally sound deck able to support the dead weight found in the spa specification chart WARNING The GLOW must not be shimmed in any m...

Page 41: ...ply to the NO FAULT heater It is important to note that the NO FAULT heater is protected by both the heater high limit thermostat circuit and the integrated pressure switch The causes of heater high l...

Page 42: ...y maintenance and damage to the spa surface caused by leaving the spa uncovered while empty of water and in direct exposure to sunlight this may cause solar heating distress in warm weather regions Th...

Page 43: ...ative or erratic AIR CONTROL valves closed Filters clogged Open AIR CONTROL lever Clean filters Blue Logo Power indicator blinking Heater high limit thermostat tripped Disconnect power for at least th...

Page 44: ...20 kg 2 075 kg 550 kg m 2 220 240 volt 20 amp Single phase GFCI protected circuit BOLT Model BLTE Seats 4 Adults 2 03 m x 2 03 m 84 cm 6 m 2 1 500 1 100 liters 320 kg 1 740 kg 490 kg m 2 220 240 volt...

Page 45: ......

Page 46: ......

Page 47: ......

Page 48: ...LEAM MODEL GLME 12 16 PULSE DL MODEL PLSE PLSDE 12 16 FLAIR MODEL FLRE 12 16 BOLT MODEL BLTE 12 16 GLOW MODEL GLWE 12 16 2016 Watkins Manufacturing Corporation All Rights Reserved Hot Spring Limelight...

Reviews: