


# = Set Clock E = OK
1 2 3
4 5 6
7 8 9
C 0 E #
0
F
0
C
1 2 3
4 5 6
7 8 9
C 0 E #
0
F
0
C
1 2 3
4 5 6
7 8 9
C 0 E #
0
F
0
C
1 2 3
4 5 6
7 8 9
C 0 E #
0
F
0
C
S E R V I C E H O T L I N E : 8 0 0 . 7 2 7 . 8 5 2 0 H O T R O N I X . C O M
HOTRONIX
®
AIR SWINGER
PAGE 14
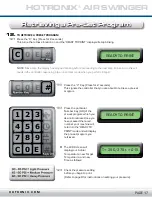
Repeat the previous step until all seven days are entered. This message will be displayed:
NOTE:
You must continue through all seven days in this
manner for the Automatic ON/OFF Function to work.
If you make an error in entering the times, do not panic. Finish the settings for the remaining days, then return
to the error by repeating the Time Set and Automatic ON/OFF programming steps. (Refer to Step 10.6)
If you press the “E” Key during the programming of any of the seven
days, the memory will be erased and the procedure for Time Set and
Automatic ON/OFF will have to be repeated.
Press the “E” Key to exit the automatic ON/OFF programming mode
and to save your settings into memory or press “#” to reset the time
and then correct errors for the Automatic ON/OFF.
When resetting Automatic ON/OFF times, it is not necessary to reset
each day. Pressing the “C” Key instead of the “#” Key will retain the
displayed information and advance to the next day’s settings.
Pressing the “#” Key will allow you to change the time for the desired
day. (Refer to step 10.2).
Now your Hotronix
®
press will automatically turn on each morning and turn off each evening at your designated
time.
IMPORTANT:
When using the Automatic ON/OFF function, you must leave the press plugged in and have the
power switch in the “ON” position. The press will automatically heat itself to the previous day’s final temperature
setting.
If the press should turn itself off while you are working, simply press the “#” Key to override the Automatic
ON/OFF function. Once your work is completed, press the “#” Key again to return your press to the Automatic
ON/OFF Mode.
Setting the Auto ON/OFF - Cont.