background image

S E R V I C E   H O T L I N E :   8 0 0 . 7 2 7 . 8 5 2 0                        H O T R O N I X . C  O M          

HOTRONIX

®

 AIR SWINGER

Connecting the System

H O T R O N I X 

® 

  A I R   S W I N G E R


To avoid burns, do not touch the heated platen 
during use. 

Keep hands clear of the upper platen of the press 
during platen lock down as the pressure may 
cause injury. 

Press should be placed on a sturdy, suitable stand 
at least 36”L x 24”W x 29”H. 

Work area must be kept clean, tidy and free of
obstructions. 

Power supply cord must be disconnected before 
cleaning or servicing press.

CONNECT THE POWER CORD

Connect the power cord into a properly grounded electrical outlet with a sufficient amperage rating.

VOLTAGE


120 Volt - The Hotronix

®

 Air Swinger requires a full 20 amp grounded circuit for 120 volt operation.

220 Volt - The Hotronix

®

 Air Swinger requires a full 10 amp grounded circuit for 220 volt operation.

EXTENSION CORDS

 If used, should be as short as possible and not less than 12 gauge. 

Heavy duty cords are recommended. 

CIRCUITS

 that have less than 15 amps or that have other high demand equipment or appliances (especially 

more than one heat seal machine) plugged in, should not be used.

NOTE:

 If the supply cord is damaged, it must be replaced by the manufacturer, its service agent or a similarly 

qualified person in order to avoid hazard. Use SJT type rated 300 V cord for replacement.

CAUTION:

 Failure to follow these instructions will cause:

1.

 Erratic controller functions.       

2.

 Inaccurate displays and slow heat-up.       

3.

 The circuit breaker to disengage.

1.

PAGE 6

O p e r a t i n g   I n s t r u c t i o n s               

The Hotronix

®

 Air Swinger Operating Instructions are designed with the user in mind. Carefully read and follow the 

step-by-step instructions for best results.

 CONNECT AIRLINE 

Connect the air line from your Hotronix

®

 Air Swinger to the standard port on your air compressor.

The Air Swinger requires 1CFM of air at 90 PSI to print continuously. A 1/2 hp compressor with a 1 gallon 
tank or larger is recommended. The motor should be rated for continuous operation.

2.

1.1

2.1

Summary of Contents for Air Swinger

Page 1: ...A I R S W I N G E R O P E R A T O R S M A N U A L ...

Page 2: ...e is not intended for use by persons including children with reduced physical sensory or mental capabilities or lack of experience and knowledge unless they have been given supervision or instruction concerning use of the appliance by a person responsible for their safety Close supervision is necessary for any heat press being used by or near children Do not leave equipment unattended while connec...

Page 3: ...e System Turning the System On Adjusting the Pressure Adjusting Dual Time Adjusting the Temperature Printing and Pressing Setting the System Stored Settings Retrieving Settings Parts List and Location Guide Electrical Schematic Accessories Contact 4 5 6 17 6 7 8 9 10 11 12 14 15 16 17 18 20 21 22 23 Table of Contents ...

Page 4: ...ck Release Button When pressed this button activates a quick release of the heat platen when in the print position and automatically returns the platen to the UP position Once activated the button can be reset by pushing it in The press will then return to the previous mode Normal Operation Mode Light On Normal Operation Mode Light Off Quick Release Mode ...

Page 5: ...IX AIR SWINGER Machine View PAGE 5 Pressure Regulator Knob LCD Display Pressure Gauge Tack Button ON OFF Switch Circuit Breaker Right Print Button Keypad Quick Release Button Left Print Button Swing Arm Air Filter Located in Back ...

Page 6: ...e and not less than 12 gauge Heavy duty cords are recommended CIRCUITS that have less than 15 amps or that have other high demand equipment or appliances especially more than one heat seal machine plugged in should not be used NOTE If the supply cord is damaged it must be replaced by the manufacturer its service agent or a similarly qualified person in order to avoid hazard Use SJT type rated 300 ...

Page 7: ...r ON OFF Switch is located on the top of the control housing Flip the Switch to the ON position The machine will display HELLO for 3 seconds The Date Day and Time message will automatically appear The Temperature message will automatically appear NOTE 180 F 82 2C is the lowest number the temperature sensor will read Once the actual platen temperature reaches a temperature of 180 F 82 2C degrees th...

Page 8: ...d turn back up Failure to follow this procedure will result in poor print quality Optional If you desire to store a Reference Pressure press the Pressure Key Press for two seconds Press the Pressure Key again Press for two seconds The C signals that a pressure may be entered Enter your reference pressure from 01 to 99 PSI Press the E Enter Key when completed Press for two seconds NOTE Press the Pr...

Page 9: ... 2 seconds Your time has now been programmed and will appear in the display The Air Swinger will automatically return to the READY TO PRINT cycle REMEMBER If a beep is heard at anytime during programming you have made an error Please re read the instructions and try again Key in second desired time i e 010 seconds To accept time withought changing it Press the E Key The Machine will turn to normal...

Page 10: ... enter a temperature in centigrade key in 4 numbers NOTE The press will not accept temperatures below 205 F 096 C or above 430 F 221 6 C If you mistakenly attempt to key in a temperature beyond the allowable range the press will beep to alert you of your error Press E Enter Key to enter the temperature Press for 2 seconds Your temperature has now been programmed and the heat platen will begin to h...

Page 11: ...O PRINT When the targeted press temperature is reached the display will prompt you with the message READY TO PRINT This display will flash alternately with the Temperature Time display Position garment and application Gently swing the top platen in a smooth continuous motion until it lines up with the lower platen With both hands press the Print Buttons located on the side of the press The heat pl...

Page 12: ...e date DD 01 31 When the final number is keyed in the LCD screen will display this message NOTE If too much time is taken the controller will return to the original display and you will need to start the sequence again Turn machine off and begin with Step 9 1 Key in four digit hours HH and minutes MM using the 24 hour clock Example 08 00 8 am 16 49 4 49 pm When the final number is keyed in the LCD...

Page 13: ...ly turn itself off each evening at any time you desire Press the Key Press for 2 seconds The LCD screen will go blank as displayed Key in the desired settings Using the 24 hour clock key in Four digit hours HH and minutes MM This example shows the press automatically turning on at 8 AM and automatically turning off at 4PM NOTE If you do not want to have your machine turn on and off for a particula...

Page 14: ...it the automatic ON OFF programming mode and to save your settings into memory or press to reset the time and then correct errors for the Automatic ON OFF When resetting Automatic ON OFF times it is not necessary to reset each day Pressing the C Key instead of the Key will retain the displayed information and advance to the next day s settings Pressing the Key will allow you to change the time for...

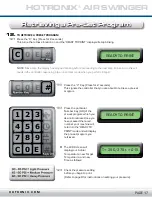
Page 15: ...he numbers 0 through 9 are pre set programs For example Program Number 9 is the only pre set program for 15 seconds at 375 F 190 C A pre set program sticker has been enclosed for your convenience To store the setting you are currently using as a pre set program follow the instructions below Set the Temperature Refer to page 10 Set the Time Refer to page 9 Set the Pressure Press the pressure key Re...

Page 16: ...erature Key a second time Press for 2 seconds This signals the controller that you are about to store the settings that you are currently using The controller is now ready to accept the next command Press the C Key Press for two seconds Press the Number Key 0 9 that you desire to assign your new stored program Once the new program is stored into memory your press will return to the READY TO PRINT ...

Page 17: ...ailure to do this will result in the controller advancing into an incorrect mode when you perform Step 2 Press the Key Press for 2 seconds This signals the controller that you are about to retrieve a pre set program Press the particular Number Key 0 9 of the pre set program which you desire to retrieve Once you have pressed the recall number your machine will return to the READY TO PRINT mode and ...

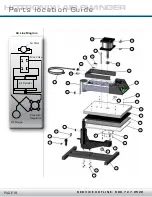
Page 18: ... 24 25 26 27 28 29 30 18 19 20 21 22 30 3 49 47 1 2 4 5 6 S E R V I C E H O T L I N E 8 0 0 7 2 7 8 5 2 0 HOTRONIX AIR SWINGER PAGE 18 Parts locati on Guide Air Line Diagram Air Filter Mac Valve Pressure Regulator Air Gauge Air Cylinder ...

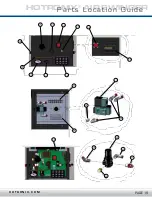
Page 19: ...31 32 33 34 35 36 37 38 39 40 39 31 42 41 43 44 45 46 47 48 30 30 H O T R O N I X C O M HOTRONIX AIR SWINGER Parts Location Guide PAGE 19 ...

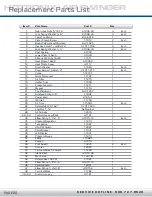
Page 20: ... 2 1 1 1 1 7 1 1 1 1 1 1 1 1 2 1 1 1 1 1 1 1 2 1 1 Part Name Nylon Lock Nuts 5 16 18 Lock Spring Washer 3 8 Table Top Stand Platen Thumb Screw Base Weldment with Spindle Hex Soc Screw 1 4 20x3 4 Lock Spring Washer 1 4 Post Casting Lower Platen 16x20 Silicone Pad Grey 16x20 Heat Platen 16x20 Heat Platen Cover Finish Washer Cover Screw 10 24x1 2 Probe Quick Disconnect Air Filter Heater Triac Proximi...

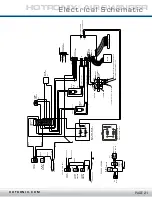
Page 21: ... 3 CONDUCTOR CABLE BROWN BLACK BROWN JUMPER RED TRIAC HEATER BLACK WHITE RED BLACK TRIAC WHITE TS1 STRIP TERMINAL S2 SWITCH 4 2 1 STOP KEYPAD LCD DISPLAY J4 J5 J8 RED RED BROWN BLACK RED BROWN ORANGE BLACK J1 J10 J2 BLACK BROWN J7 TO COUNTDOWN PROXIMITY SWITCH S6 CONNECTIONS 220 VOLT GREEN JUMPER WHITE BLACK J9 WHITE BLACK BLACK GREEN WHITE CONNECTIONS 120 VOLT V1 AIR VALVE PLATEN 1 2 3 4 5 6 7 8 ...

Page 22: ...HOTRONIX AIR SWINGER PAGE 14 This fitted non stick cover slips snugly over the bottom platen PAGE 22 Models Accessories ...

Page 23: ...tomer Service 800 727 8520 Monday Friday 8am 5pm EST Replacement Parts 800 727 8520 8am 7pm EST Web Hotronix com Contact us This document includes multiple trademarks and describes equipment covered by many patents that are owned by GroupeSTAHL and or its subsidiaries GroupeSTAHL enforces its rights to protect these intellectual properties 2012 ...

Page 24: ...One Paisley Park Carmichaels PA 15320 U S A Tech Support Customer Service Replacement Parts 800 727 8520 Web Hotronix com Proudly made in the U S A ...

Reviews: