16
EN
Tray
*
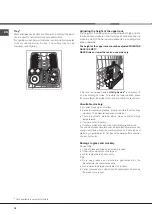
Some dishwasher models are fitted with a sliding tray which
can be used to hold small crockery and cutlery.
For optimum washing performance, avoid positioning bulky
crockery directly below the tray. The cutlery tray can be
removed.
(see Figure.)
Adjusting the height of the upper rack
The height of the upper rack can be adjusted: high position
to place bulky crockery in the lower rack and low position to
make the most of the tip-up compartments by creating more
space upwards.
The height of the upper rack should be adjusted WHEN THE
RACK IS EMPTY.
NEVER raise or lower the rack on one side only.
If the rack is equipped with a
Lift-Up
device
*
(see figure)
, lift
it up by holding its sides. To restore the lower position, press
the levers (
A
) at the sides of the rack and follow the rack down.
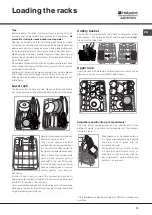
Unsuitable crockery
• Wooden crockery and cutlery.
• Delicate decorated glasses, artistic handicraft and antique
crockery. Their decorations are not resistant.
• Parts in synthetic material which do not withstand high
temperatures.
• Copper and tin crockery.
• Crockery soiled with ash, wax, lubricating grease or ink.
The colours of glass decorations and aluminium/silver pieces can
change and fade during the washing process. Some types of
glass (e.g. crystal objects) can become opaque after a number
of wash cycles too.
Damage to glass and crockery
Caused by:
• Type of glass and glass production process.
• Chemical composition of detergent.
• Water temperature of rinse cycle.
Tips:
• Only use glasses and porcelain guaranteed by the
manufacturer as dishwasher safe.
• Use a delicate detergent suitable for crockery.
• Collect glasses and cutlery from the dishwasher as soon as
the wash cycle is over.
*
Only available in selected models.
Summary of Contents for LSTF 9H114
Page 5: ...5 UA i i i i 2012 19 RAEE ...
Page 6: ...6 i i i 8 i i i i i i i i i i i i i i i i i 2012 19 EU WEEE i i i i i i i i i i i i i i c i ...
Page 7: ...7 i i i i i KZ 8 ...
Page 8: ...8 WEEE 2012 19 EU ...
Page 33: ...RU 33 3 4 60 C 2 A 40 80 NewAcquaStop 1 2 MIN 40 cm MAX 80 cm ...
Page 34: ...RU 34 1 3 4 8 ...
Page 36: ...RU 36 1 2 3 4 5 6 7 8 9 10 11 12 bs ...
Page 38: ...RU 38 ...
Page 39: ...RU 39 Lift Up ...
Page 43: ...RU 43 1 1 2 2 3 3 4 4 C 1 A 3 ...
Page 44: ...RU 44 ...
Page 48: ...48 UA 1 2 i 3 i i 4 5 6 i 7 i 8 i 9 i 10 i 11 i 12 i On Off Reset i Tabs ...
Page 50: ...50 UA i i i i i i i i i Vertical Zone i i i i ...
Page 51: ...UA 51 i 45 i i I Lift Up A ...
Page 56: ...56 UA o i i i i i i i i i i i i i i i i i i i i i è i i i i i i i i i ...
Page 57: ...KZ 57 3 4 60 2 40 80 New Acqua Stop 1 2 3 4 8 MIN 40 cm MAX 80 cm ...
Page 58: ...58 KZ 1 ...
Page 60: ...60 KZ 1 2 3 4 5 6 7 8 9 10 11 12 Tabs ...
Page 62: ...62 KZ ...
Page 63: ...KZ 63 A ...
Page 64: ...64 KZ 1 2 3 4 5 P 6 7 8 9 25 25 D A B 1 2 TABS ...


