4
INSTALLATION OF WALL MODEL
HEATER
1. Remove heater from carton and attach
hater to wall with supplied screws.
Use 2”x4” backing behind heater.
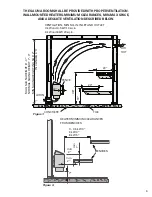
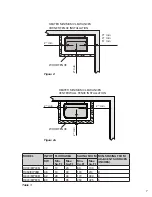
Observe proper clearances as per
page 6, 7, and table 1.
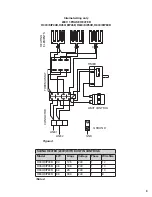
2. See applicable wiring diagram figure
4 for heater model. Heater must be
permanently installed (no pigtails or
plug allowed) and wiring must be
done by a licensed electrician, who
must follow wiring diagram provided
and adhere to local codes. Use proper
A.W.G. rated wire size and use copper
wire suitable for 194°F (90°C) within
sauna walls. Use grounding terminals
provided in sauna heater, control
system, and contactor to properly
ground the equipment as per NEC and
local codes.
3. Inside the heater box there are
two signs. Please place the metal
“CAUTION” sign on the interior wall
of the sauna room directly above
the heater in a visible place. Place
the metal “WARNING” sign outside,
on the door of the sauna room.
“MAINTENANCE INSTRUCTIONS”
are at the end of this manual.
SAUNA HEATER WIRING AND
HOOKUP
Important! Before hooking up electrical
wires to junction box of heater, remove
capillary tubing and bulb from junction
box and bring up wall to left or right side
of heater. Cover tubing with wooden
molding provided, coil up excess tubing,
and place under heater close to floor.
Refer to chart page 8 for proper wire size
and amperage. See page 6, 7, and 9 for
required clearances. Any wiring within
internal sauna walls must be rated 194°F
(90°C) and copper wire must be used. Run
wire through seal tight flex conduit from
wall to heater and connect to junction
box at back of heater with 194°F (90°C)
connector. Connect to terminals 1 and 2
and connect ground wire to lug marked
ground. (Cover plate under heater must
be removed first.)
Note! If connection to heater will be made
at a later time, bring flex into sauna room
4 - 6” from floor, and leave 3’ of flex for
hookup (can be cut to right length later).
SAUNA ROCK PLACEMENT
Before testing heater, fill rock cavity with
igneous stones provided with heater
and fasten metal rock guard at the top
of heater. (See general info concerning
washing and placing of stones.)
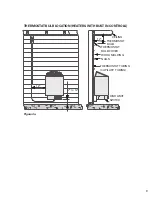
Be sure to cover thermostat bulb with
protective metal cover by threading bulb
through holes in cover, and fasten bulb
cover to wall with screws provided. Also,
take care when nailing protective wood
strips over capillary tubing, so that nails
do not puncture tubing. If punctured,
entire thermostat must be replaced.
Note! - do not operate heater without
stones!
Use only the stones which are supplied
with the sauna heater. Wash stones with
water hose and place inside of heater box
so that rocks are between and around
heating elements. However, do not force
rocks between elements.Use smaller
stones first, and continue to fill heater
with large stones until they are about 2”
below rock guard. You may not need all of
the stones.
Stones should be placed loosely within
heater so that there is good heat circulation
around and through them. Stones should
completely cover the heating elements,
however! Pouring water over exposed
elements could cause heater damage!


