


23
3) The "OUTPUT TEST" button provides a relay sequence test. Make sure the control
switch is in the "ICE" position, then press the "OUTPUT TEST" button. The correct
lighting sequence should be 1, 4, 3, 2. Some components (e.g., the compressor) will
cycle during the test. Note that the order of the relays from the outer edge of the board
is 1, 4, 3, 2. After checking the sequence, the unit automatically starts at the 1 minute
fill cycle. If the LEDs light in a different sequence, the control board is bad and should
be replaced.
5. Control Board Replacement
The application switch located between relay X3 & X4 must be set to match the original
board application. Place this switch in the "ALP" position. The dip switches should be
adjusted to the factory default settings. See "II.C.3.a) Default Dip Switch Settings." S4
dip switch #8 must remain off.
D. Harvest Control – Thermistor
A thermistor (semiconductor) is used for a harvest control sensor. The resistance varies
depending on the suction line temperatures. The thermistor detects the temperature of
the evaporator outlet to start the harvest timer. No adjustment is required. If necessary,
check for resistance between thermistor leads, and visually check the thermistor
mounting, located on the suction line next to the evaporator outlet.
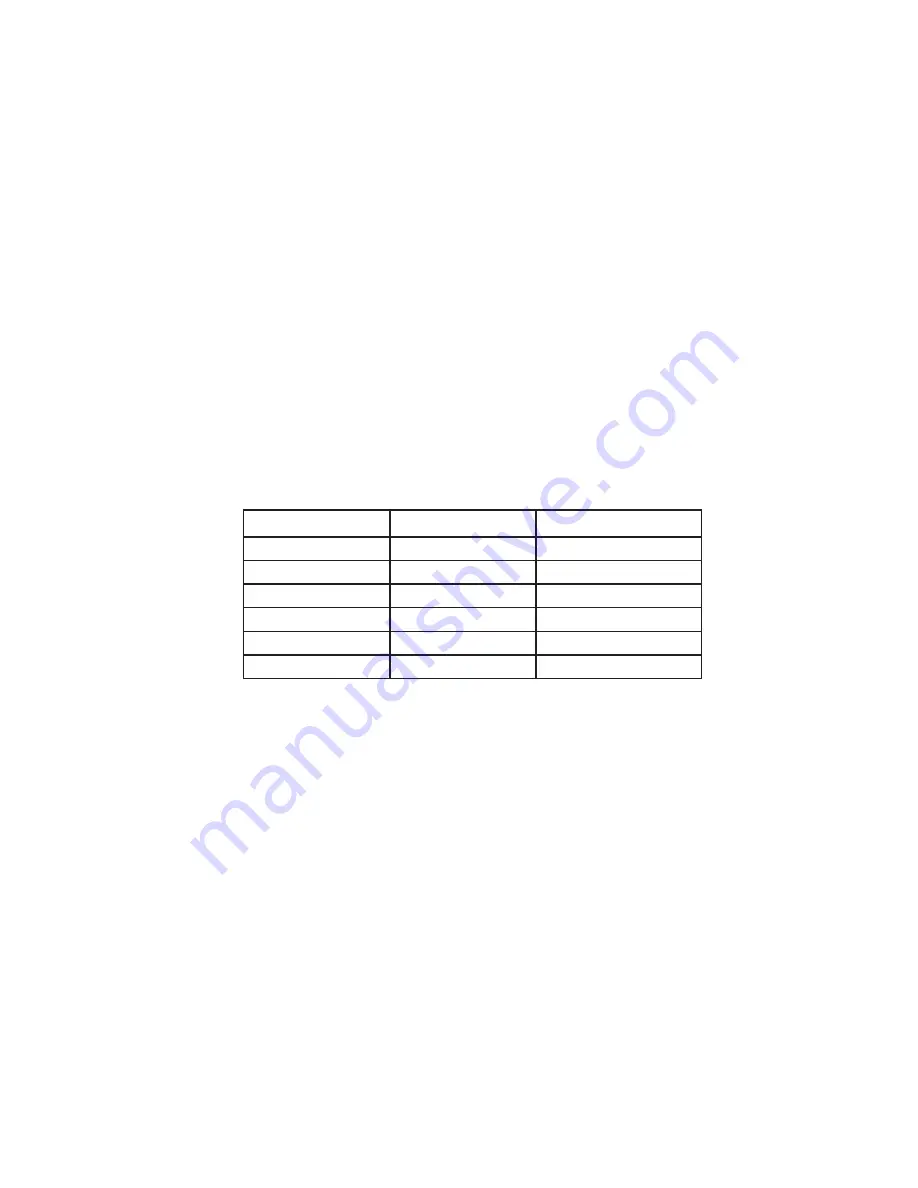
Temperature (°F)
Temperature (°C)
Resistance (kΩ)
0
-18
14.401
10
-12
10.613
32
0
6.000
50
10
3.871
70
21
2.474
90
32
1.633
Check a thermistor for resistance by using the following procedure:
1) Disconnect the connector K3 on the board.
2) Remove the thermistor. See "V.I. Removal and Replacement of Thermistor."
3) Immerse the thermistor sensor portion in a glass containing ice and water for
2 or 3 minutes.
4) Check for a resistance between thermistor leads. Normal reading is within 3.5 to 7 kΩ.
Replace the thermistor if it exceeds the normal reading.


