EN
10
Flying Your Aircraft
Consult local laws and ordinances before choosing a fl ying location.
Range Check your Radio System
Before you fl y, range check the radio system. Refer to your specifi c transmitter
instruction manual for range test information.
Just Before Flight
Once the fl ight control system is active, you will normally see the control
surfaces react to aircraft movement.
For your fi rst fl ights with the recommended battery pack (EFLB22003S30), set
your transmitter timer or a stopwatch to 6 minutes.
NOTICE:
Never fl y the aircraft without fi rst setting and activating a timer.
After 6 minutes, land the aircraft. Adjust your timer for longer or shorter fl ights
depending on your preference and battery usage.
Takeoff
NOTICE:
All takeoffs and landings must be done in multirotor fl ight.
Attempting to land in airplane fl ight will damage the motors and nacelles
possibly causing a crash. Crash damage is not covered under warranty.
Place the aircraft on a fl at, level surface with the tail facing you. Set your
transmitter to multirotor fl ight and stability mode.
Tip:
Stability mode is highly recommended for the fi rst few takeoffs and landings,
until you become familiar with how the aircraft reacts to control inputs.
Check that the motor nacelles are in the fully upright position before applying
throttle. Gradually increase the throttle until the model is approximately 2 ft.
(600mm) off the ground. Avoid forcing the aircraft into the air.
Hovering and Multirotor Flight
Making small corrections on the transmitter, try to hold the aircraft in one spot.
If fl ying in calm winds, the model should require almost no corrective inputs.
After moving the aileron/elevator stick and returning it to center the model
should level itself. The model may continue to move due to inertia. Move the
stick in the opposite direction to stop the movement.
After you become comfortable hovering, you can progress into fl ying the model
to different locations, keeping the tail pointed towards you at all times. You can
also ascend and descend using the throttle stick.
Once you are comfortable with these maneuvers, you can attempt fl ying with
the tail in different orientations. It is important to keep in mind that the fl ight
control inputs will rotate with the aircraft, so always try to picture the control
inputs relative to the nose of the aircraft. For example, forward will always drop
the nose of the aircraft, causing the aircraft to move forward.
NOTICE:
Do not
attempt to fl y backwards at a high rate of speed. While the
aircraft is capable of fl ying backwards while in multirotor mode, the aircraft
becomes more unstable as backward speed increases due to airfl ow over
the fi xed wings.
Transitioning In Flight
To transition to airplane fl ight from multirotor fl ight,
change the fl ight
attitude switch on your transmitter to the airplane fl ight position. The throttle
will increase slightly and the motor nacelles will rotate forward in three stages
to the airplane fl ight position. The elevons become active. It is normal to have
some slight oscillations in pitch as the aircraft transitions into airplane fl ight.
While in airplane fl ight mode the main motors use differential thrust to provide
yaw control and the tail motor does not run.
To transition to multirotor fl ight from airplane fl ight,
reduce the airspeed,
change the fl ight attitude switch on your transmitter to the multirotor fl ight
position and stability mode for landing. The throttle will increase slightly and
the motor nacelles will rotate to the vertical position. The tail motor will power
on and the elevons will go to neutral. While in multirotor fl ight the elevons do
not move. All pitch, roll and yaw control is accomplished by differential thrust
and angling of the motors.
NOTICE:
Do not transition to multirotor fl ight at low throttle or lower the
throttle immediately after transitioning to multirotor fl ight. Doing so will
cause a rapid loss of altitude and possibly a crash.
Airplane Flight
Fly the aircraft and trim it for level fl ight per the
Trimming Your Aircraft
section.
The Convergence fl ys in a very similar manner to any other fi xed-wing aircraft.
It is capable of a wide range of aerobatic maneuvers including loops, rolls
and spins. Additionally, the differential thrust of the motors allows for unique
spinning and tumbling maneuvers.
Landing
NOTICE:
All takeoffs and landings must be done in multirotor mode.
Attempting to land in airplane mode will damage the motors and rotation
mechanisms possibly causing a crash. Crash damage is not covered under
warranty.
Transition the aircraft into multirotor fl ight and bring it into a low hover. Slowly
lower the throttle to descend to a soft landing.
NOTICE:
If a crash is imminent, reduce the throttle and trim fully. Failure to
do so could result in extra damage to the airframe, as well as damage to the
ESCs, motors and motor nacelles.
NOTICE:
Crash damage is not covered under warranty.
NOTICE:
When you are fi nished fl ying, never leave the aircraft in direct
sunlight or in a hot, enclosed area such as a car. Doing so can damage the
aircraft.
Low Voltage Cutoff (LVC)
The average fl ight time with a mixture of multirotor and airplane fl ight using
the recommended fl ight battery is approximately 6 minutes.
The fl ight controller protects the fl ight battery from over-discharge using
Low Voltage Cutoff (LVC). When the fl ight battery is drained to LVC the fl ight
controller will automatically transition the motors into stability mode, multirotor
fl ight. The remaining battery will last less than a minute, so land the aircraft as
soon as possible.
There will be no visual indication if you are fl ying in stability mode, multirotor
fl ight when the battery reaches LVC. In this fl ight condition the motors will
slowly lose power until the ESCs cutoff. If you begin to notice the motors
dropping in power, land immediately and re-charge the fl ight battery.
After landing disconnect and remove the Li-Po battery from the aircraft to
prevent trickle discharge. Charge your Li-Po battery to about half capacity
before storage. During storage, make sure the battery charge does not fall
below 3V per cell. LVC does not prevent the battery from over-discharge during
storage.
NOTICE:
Repeated fl ying to LVC may damage the battery.
Tip:
Monitor your aircraft battery’s voltage before and after fl ying by using a
Li-Po Cell Voltage Checker (EFLA111, sold separately).
Repairs
Thanks to the Z-Foam
™
material in this aircraft, repairs to the foam can be
made using virtually any adhesive (hot glue, regular CA, epoxy, etc). When
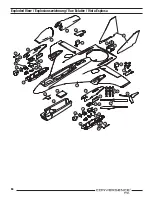
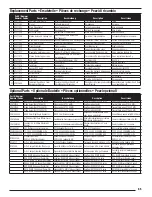
parts are not repairable, see the Replacement Parts List for ordering by item
number. For a listing of all replacement and optional parts, refer to the list at
the end of this manual.
NOTICE:
Use of CA accelerant on your aircraft can damage paint. DO NOT
handle the aircraft until accelerant fully dries.


