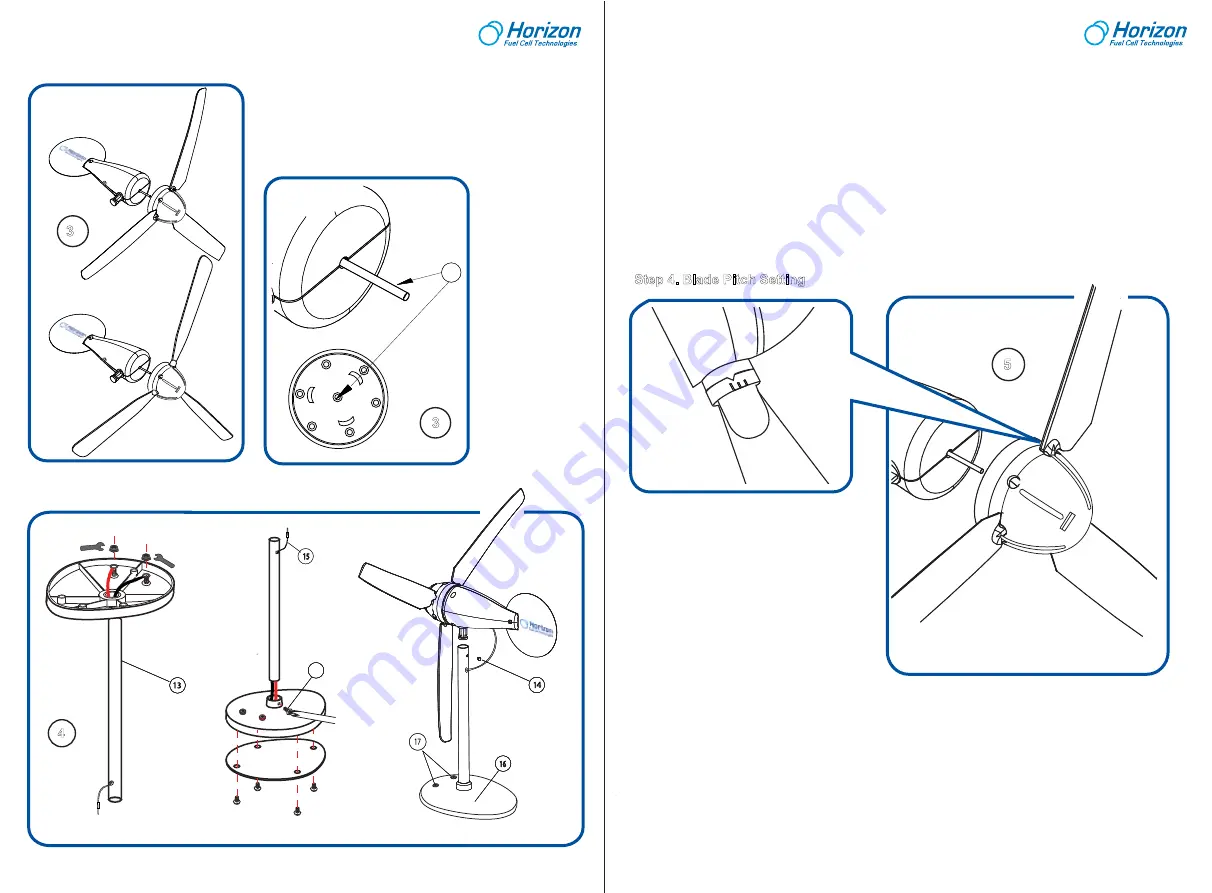
Step 2. Blade Unit Installation
Step 3. Post and Support Base Assembly
Push the rotor shaft to the rotor base to ensure the main body
and rotor head are properly connected. Make sure you press
the Blade Unit all the way onto the shaft. Check that the Blade
Unit is securely connected onto the shaft of the turbine. If not
properly installed, the rotor may not effectively turn the rotor
shaft and will not generate electricity.
Enable Yawing:
Disable Yawing (Not shown in the Assembly Drawing):
Yaw- To turn about on vertical axis.To move unsteadily or weave.
The wire connector hole should be located on the
same
side of the tube (13) with two vertically aligned holes. Insert
the Aluminium Tube into the Support Base. Install the Body Assembly onto the top of the Aluminium Tube and secure it with
the screw (14). The screw should be secured from the
back
side of the wind turbine body into the groove of the plastic
stud to
enable
yawing and movement of the turbine body.
The wire connector hole should be located on the
opposite
side of the tube (13) with two vertically aligned holes.
Insert the Aluminium Tube into the Support Base. Install the Body Assembly onto the top of the Aluminium Tube and
secure it with the screw (14). The screw should be secured from the
front
side of the wind turbine body through the
hole on aluminum tube into the solid plastic stud to
disable
yawing and movement of the turbine body.
5
V
*
3
3
To adjust and set the pitch of the blades,
carefully pull out the blade and rotate it to adjust
the pitch. Totally you have 3 pitches, which can
be adjusted.
The blades themselves have different set angles at different sections to enhance the performance. This setting is
to compensate the rotating speed of the blade at different radius (sections) so that the blades will not stall at a
particular section. You may have to learn more about a parameter called Tip Speed Ratio to understand more
thoroughly. This Ratio defines how fast the turbine is rotating under a wind speed environment. By changing the
blade pitch, this ratio will be changed. Thus the output power of the turbine is changed. Each adjustment
represents a change of 22 degrees. Therefore, the pitch is allowed to be adjusted from 6 to 50 degrees.
At smaller pitch value settings, the start up wind speed has to be very high. Maximum output power occurs at a
pitch of around 28 degrees. The start up wind speed is higher at a lower pitch setting. If the wind speed is low you
should increase the pitch so that you can achieve a higher power output.
Step 4. Blade Pitch Setting
The Pitch Angle
4
50
o
28
o
6
o
11
12
18


