background image

Installation Instructions Kemlan Power Flue Horizon Gas Fireplaces

MODEL

A

B

C

D

E

F

G

H

I *

J

K

L

M

N

O

CANTLEVER 700

1190

1270

480

336

280

177

440

405

1250

150

TBD

80

470

190

215

CANTLEVER 1100

1420

1505

480

336

280

177

440

405

1485

150

TBD

80

470

190

215

CANTLEVER 1500

1850

1930

480

336

280

177

440

405

1910

150

TBD

80

470

190

215

CANTILEVER 2000

2203

2283

480

336

280

177

440

405

2263

150

TBD

80

470

190

215

A

B

K

L

D

F

J

C

M

N

O

E

I *

* FRAME WIDTH

G

H

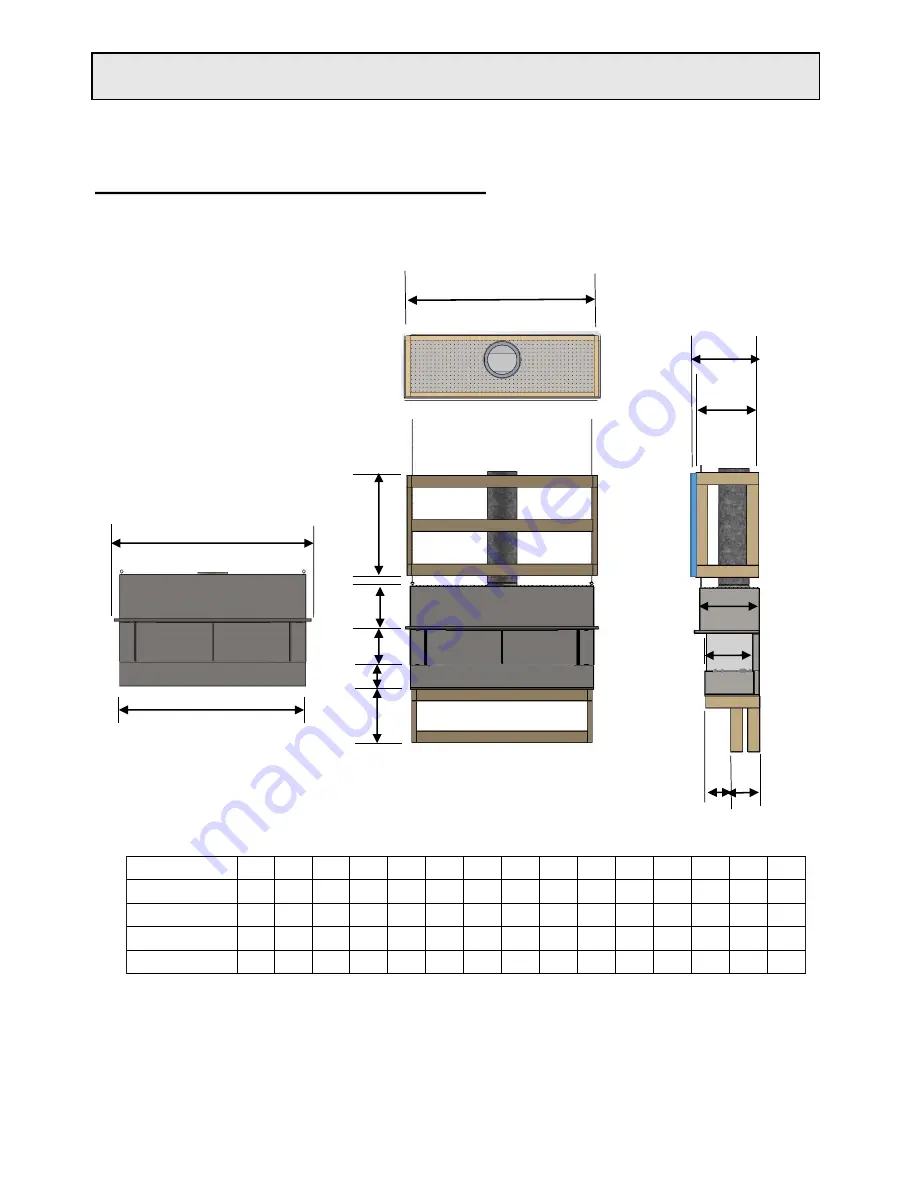
FRAMING DIMENSIONS: CANTILEVER

28/02/2019

Ver. 25

8

Summary of Contents for 1100 LOW LINE

Page 1: ... FIREPLACES Installation Instructions Horizon Power Flue Gas Fireplaces 28 02 2019 Ver 25 1 ...

Page 2: ...lause 6 4 4 Model Type 2 Power Flue Decorative Gas Fireplace DATA PLATE Refer to information on page 16 of this Instruction booklet in respect to gas pressure consumption and gas type Natural ULPG or LPG Data Plate is located under the gas burner and is accessed by lifting front access panel or removing base plate 700 Low Line 700 Mk2 Pebble 700 Mk2 Coal 700 Ironbark Log Mk4 850 Low Line 800 Mk2 P...

Page 3: ...over 150 MJ h input From a mechanical air inlet including a spa blower MIN CLEARANCE mm 300 500 300 500 1000 500 150 g 500 500 h j 500 150 150 k Vertically below an openable window non mechanical air inlet or any other opening into a building with the exception of sub floor ventilation See table below NOTES I All distances are measured vertically or horizontally along the wall to a point in line w...

Page 4: ...itter It is the responsibility of the gas fitter to follow the regulations set out in the Gas Code that dictate the procedures to follow when installing a gas appliance particularly regarding gas pipe sizing and checking of pressures Installation 1 The Power flue system is supplied with all required electrical fittings Work needs to be undertaken by a licensed electrician if extending wiring Wirin...

Page 5: ... REQUIREMENTS LOWLINE SINGLE SIDED MODEL SHOWN CEILING IMPORTANT VENTILATION INTO CHASE FROM VENT 240MM X 90MM SUPPLIED Installation Instructions Kemlan Power Flue Horizon Gas Fireplaces INTERNAL FAN ASSEMBLY IMPORTANT BOTH CAPS NEEDS TO STAY OFF IF HEAT ZONE IS NOT USED 5 ...

Page 6: ...LACE SECTION VIEW Z Z Y DETAIL Y LIP TRIM ASSEMBLY Z Z Measurement and Specifications of P F LOWLINE PLASTER TRIM 50mm 100mm 150mm TRIMS OPTIONAL FOR BOTH MODELS IMPORTANT BOTH CAPS NEEDS TO STAY OFF IF HEAT ZONE IS NOT USED Z NOTE THE J MEASUIREMENT IS TO THE UNDERSIDE OF AN 8 FLUE THE DIAMETER OF THE 8 INCH FLUE IS 203mm H C C J J E E J SINGLE SIDED A B C D E F G H I J K 700 LOW LINE 700 280 365...

Page 7: ...ACE SECTION VIEW X X DETAIL W LIP TRIM ASSEMBLY Installation Instructions Kemlan Power Flue Horizon Gas Fireplaces Measurement and Specifications of P F CANTILEVER 7 SINGLE SIDED A A1 B C D D1 E F G H I CANTLEVER 700 1190 1270 480 455 228 279 177 405 336 1010 170 CANTLEVER 1100 1420 1505 480 455 228 279 177 405 336 1010 188 CANTLEVER 1500 1850 1930 480 455 254 304 177 405 336 1010 224 CANTILEVER 2...

Page 8: ... 1250 150 TBD 80 470 190 215 CANTLEVER 1100 1420 1505 480 336 280 177 440 405 1485 150 TBD 80 470 190 215 CANTLEVER 1500 1850 1930 480 336 280 177 440 405 1910 150 TBD 80 470 190 215 CANTILEVER 2000 2203 2283 480 336 280 177 440 405 2263 150 TBD 80 470 190 215 A B K L D F J C M N O E I FRAME WIDTH G H FRAMING DIMENSIONS CANTILEVER 28 02 2019 Ver 25 8 ...

Page 9: ...k load of 130kg can also be used Once hooks have been attached to the eyelets the turn buckle can then be simply wound up to take the tension Tighten the turn buckle until both the top and bottom glass runners are parallel Removable glass panel can now be placed in position allowing an even gap between glass and underside of channel DRILL THROUGH THE BEAM RAFTER OR FRAMING IF REQUIRED AND PUSH THR...

Page 10: ... 5 x 200 VENTED FLUE Note Power flue Horizontal runs greater than 5 meters in length may be compromised by fluctuations in power Flue runs greater than 5 meters when tested with underload power of 15 caused the fan to cut out and burner to turn off and require resetting Resetting can be done by turning power off and on Should power be consistent in supply then longer flue runs can be recommended a...

Page 11: ...BETWEEN END OF FLUE TO WALL Note Power flue Horizontal runs greater than 5 meters in length may be compromised by fluctuations in power Flue runs greater than 5 meters when tested with underload power of 15 caused the fan to cut out and burner to turn off and require resetting Resetting can be done by turning power off and on Should power be consistent in supply then longer flue runs can be recomm...

Page 12: ...70 850 LOW LINE 1145 445 455 1070 1100 LOW LINE 1408 445 455 1070 1500 LOW LINE 1796 475 485 1200 2000 LOW LINE 2293 475 485 1200 DOUBLE SIDED A B B C 700 LOW LINE 1056 480 500 970 850 LOW LINE 1145 480 500 1070 1100 LOW LINE 1408 480 500 1070 1500 LOW LINE 1796 490 510 1200 2000 LOW LINE 2293 490 510 1200 B CEILING IMPORTANT VENTILATION INTO CHASE FROM VENT 240MM X 90MM SUPPLIED IMPORTANT VENTILA...

Page 13: ... SPIRAL DUCT 150MM MAX WITH NO AIR POCKETS CANNOT BE VENTED UNDERNEATH UNIT INSULATION BOARD SECTION A A HEATZONE ACTIVE FLUE CASING STANDARD VENT HOLES FULL WELD HEAT ZONE CONVERSION IMPORTANT VENTILATION INTO CHASE FROM VENT 240MM X 90MM SUPPLIED CEILING IMPORTANT IF HEATZONE KIT IS USED UNUSED OUTLET MUST REMAIN UNCAPPED 13 ...

Page 14: ...RANCE TO TIMBER INTERNAL FAN CASING ACCESS PANEL FOR FAN SERVICE TO ARCHITECTS DETAIL 500 x 500MM MIN 75MM MIN CLEARANCE TO TIMBER MUFFLER EXTERNAL FAN CASING 10MM COMPRESSED FIBRE CEMENT SHEET BETWEEN UNIT AND BOTTOM SUPPORT FRAMING 10MM COMPRESSED FIBRE CEMENT SHEET BETWEEN UNIT AND BOTTOM SUPPORT FRAMING 28 02 2019 Ver 25 Rear clearances to combustible material Cantilever 0mm Low line 25mm CEIL...

Page 15: ...DE EXIT EXTERNAL FAN SIDE EXIT BLACK STEEL EDGE TRIM GLASS SIDE VENTILATION TO BURNERS 90 DEG BEND SINGLE SIDED ELEVATION MAX HEIGHT 220MM BASED ON 2 4M CEILING CANTILEVER ELEVATION MAX HEIGHT 220MM BASED ON 2 4M CEILING CEILING CEILING FLOOR Installation Instructions Kemlan Power Flue Horizon Gas Fireplaces IMPORTANT VENTILATION INTO CHASE FROM VENT 240MM X 90MM SUPPLIED 28 02 2019 Ver 25 15 ...

Page 16: ...Installation Instructions Kemlan Power Flue Horizon Gas Fireplaces 28 02 2019 Ver 25 16 ...

Page 17: ...off wall switch System does not have a high low burner switch Laying the fire Coal Pebble Evenly spread a bag of Vermiculite into the burner tray Tray should be completely filled to the top with Vermiculite to a depth of approximately 45mm Unpack the coals pebbles contained in a clear plastic bag and lay a row of coals pebbles on the vermiculite along the back of the burner tray leaving approximat...

Page 18: ...00 992 X 135 MARK 2 COALS 1400 1400 X 64 MARK 2 PEBBLES 1400 1400 X 64 MARK 2 COALS 1800 1800 X 64 MARK 2 PEBBLES 1800 1800 X 64 MARK 2 COALS 1000 992 X 135 MARK 2 PEBBLES 700 800 600 X 155 Installation Instructions Kemlan Power Flue Horizon Gas Fireplaces 28 02 2019 Ver 25 18 ...

Page 19: ...log has two holes on the underside to position in place 1 L O C AT E 4 C E R A M I C C OA L S Four ceramic coals are supplied with the burner base These coals must be laid in the position indicated on the drawing with the taller coals on the ends and smaller coals in between 3 LOCATE LOG NO S 2 3 Two front log NO S 2 3 are supplied to fit into the space between the metal frame and the ceramic base...

Page 20: ...hand side of the burner on the rear log in front of the pilot Charred end facing inwards The left hand side of the log is positioned between the metal uprights on the side of the grate LOCATE LOG NO 7 The charred effect of the log is positioned on the smaller coal in the centre of the burner on the right hand side LOCATE LOG NO 8 This smaller log is placed on the top of log NO 2 and rests on the l...

Page 21: ...LOCATE LOG NO S 2 3 Two front log no s 2 and 3 are supplied to fit into the space between the metal frame and the ceramic base These logs do not cover the front burner ports but are designed to deflect the front flame back into the fire L O G S P O S I T I O N I N G OF A L L L O G S It is important to follow the log recommended positioning Not doing so can adversely effect the operation of the app...

Page 22: ...nd side of the burner with the right hand side of the logs positioned between the metal uprights of the grate Two pins are provided to firmly position these two logs onto the large rear log no 1 P O S I T I O N I N G O F A L L L O G S It is important to follow the log recommended positioning Not doing so can adversely effect the operation of the appliance This diagram shows the recommended log pos...

Page 23: ... articles on or against this appliance DO NOT use or store flammable materials near this appliance DO NOT spray aerosols in the vicinity of this appliance whilst it is in operation DO NOT modify this appliance Primarily a decorative appliance not certified as a space heater 6 The appliance is a live fuel effect product designed to operate with luminous flames and may exhibit slight carbon depositi...

Page 24: ...UG CONNECTOR 2 FAN SPEED CONTROLLER SWITCH 3 DUCT FAN CAPACITOR 4 DUCT FAN PLUG FEMALE CONNECTOR 5 ON OFF BURNER SWITCH 6 SUPPLY 240V POWER CORD 7 7 2 1 3 4 5 6 POWER FLUE FAN SPEED CONTROL COMPONENTS Installation Instructions Kemlan Power Flue Horizon Gas Fireplaces 24 ...

Page 25: ...uarter increments After each turn wait 30 seconds This will give the fan and burner pressure time to equalise 6 When you have turned the speed controller too low the main burner will switch off You will need to increase the speed by a quarter turn wait until the main burner re ignites Let it run for 2 5 minutes If the main burner stays consistent you will have reached your minimum fan speed Turn f...

Page 26: ...rvice information contact Kemlan Australia Installation Instructions Kemlan Power Flue Horizon Gas Fireplaces Head Office 13 French Avenue Brendale Queensland 4500 Telephone PH 07 3490 5500 TAIS 00 L140 D5 000V 28 02 2019 Ver 25 26 ...

Page 27: ... FAN ON INDEPENDENT POWER SWITCH FAN COMES ON PILOT ON MAIN BURNER DOES NOT LIGHT 1 FLAME SENSOR NOT SENDING SIGNAL TO OPEN VALVE CHECK ELECTRODE IS IN PILOT FLAME CLEAN ELECTRODE CHECK ELECTRODE CONNECTIONS REPLACE ELECTRODE IF DAMAGED 2 MODULE NOT SENDING CHECK CONNECTIONS SIGNAL TO OPEN VALVE REPLACE MODULE 3 FAULTY VALVE REPLACE VALVE FLAME FAIL LOCKOUT UNIT HAS DETECTED LOSS OF FLAME AND LOCK...

Page 28: ...TO OPEN VALVE FLAME CHECK ELECTRODE CONNETCTIONS CLEAN ELECTRODE CHECK ELECTRODE FOR DAMAGE REPLACE ELECRODE 2 MODULE NOT SENDING REPLACE MODULE SIGNAL TO OPEN VALVE 3 FAULTY VALVE REPLACE VALVE FLAME FAIL LOCKOUT 1 POWER FAILURE TURN ON OFF SWITCH OFF AND UNIT HAS DETECTED LOSS OF FLAME AND LOCKED OUT ON AGAIN TO RESET ONCE POWER ESTABLISHED 2 GAS SUPPLY CHECK GAS PRESSURE AND ADJUST RESET AT ON ...

Page 29: ...ault occurs the sequence of the flashing red light indicates the fault These codes are listed below The green light indicated the ignition box is sensing the flame Fan Forced Models The codes above still apply plus the codes below Atmospheric Models Flash Code Meaning Possible Cause Red LED Long 1 short 0 Running OK Appliance running correctly Green LED will be on 2 1 Maximum retries exceeded Chec...

Page 30: ...g out repairs turn off the power visually inspect all cables and connections for damage or corrosion On start up once the unit has passed the self test and pressure switch is closed on fan forced models you should be able to hear a clunk from the gas valve as it opens If no sound from the gas valve check connections If the valve clunks but no ignition check gas supply and spark electrode On fan fo...

Page 31: ...ocontrollers disagree 2 4 Hardware failure on GAS1 valve drive or microcontrollers disagree 2 5 Hardware failure on GAS2 valve drive or microcontrollers disagree 2 6 Hardware failure on flame sensor 2 7 Relay Enable signal hardware failure stuck in ON state 3 1 Lockout due to pressure switch opening 3 2 Lockout due to EE memory corruption 3 3 Lockout due to inter microcontroller communications lin...

Page 32: ...ted finish of the heater 2 4 Damage caused by water ingress 2 5 Cost of removal of defective heater or re installation of replacement heater 2 6 Failure to use fireplace components supplied by Kemlan Industries Pty Ltd 2 7 Cost of inspection for damaged heater 3 CLAIMS 3 1 Should any defects occur contact the Kemlan distributor from whom you purchased the heater 3 2 Under this warranty the defecti...

Reviews: