background image

GB

* Certain Models only       ** May vary according to model

11

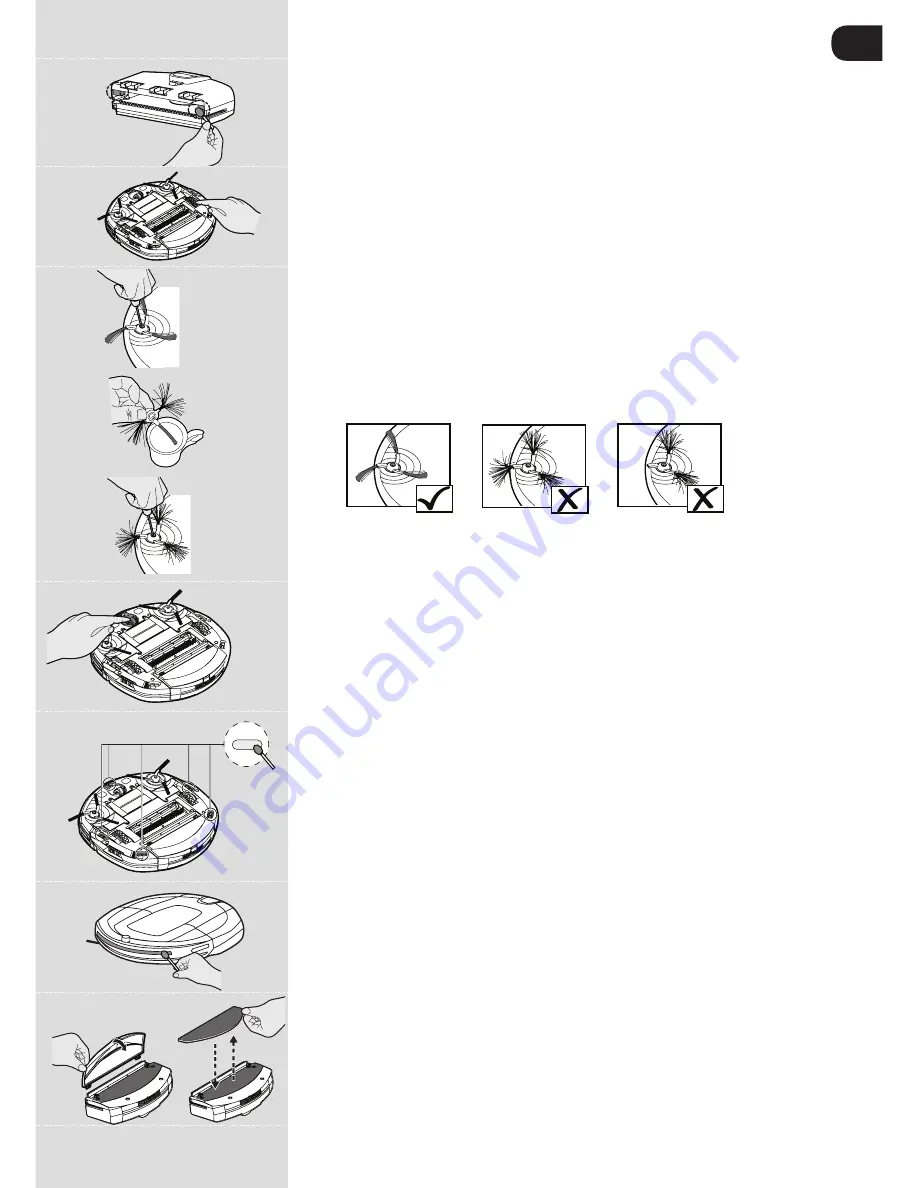
CLeANiNG tHe DUst seNsors* 

[Fig.19]

The dust sensors are located in the dust container of Robo.com³. Clean the sensor window each time the 
dust container is emptied. Frequent cleaning is recommended to ensure optimum performance of your 
Robo.com³.
Use a dry soft cloth or cotton swab to wipe the sensor window.

CLeANiNG tHe DriVe WHeeLs [Fig.20]

1. Switch the Robo.com³ off and turn it over.
2. Remove any dirt or hair trapped in the wheels.
3. Clean the wheels with a dry cloth.
4. Check that the wheels can rotate freely.

CLeANiNG tHe eDGe BrUsHes [Fig.21]

The edge brushes can be easily worn from heavy use so you should check it regularly to monitor 
their conditions.
1. Switch the Robo.com³ off and turn it over.
2. Remove the retaining screw with a screwdriver.
3. Use a pair of scissors to remove any trapped hair or debris.

CorreCtiNG eDGe BrUsHes DeForMAtioN

The edge brushes can sometimes be deformed during transportation or when the product is used 
under particular conditions. If this happens it is possible to return to the original shape by putting the 
bristles in hot water.
                    gOOD                       RECOVERABLE     REQUIRES REPLACEMENT              

1. Switch the Robo.com³ off and turn it over.
2. Remove the retaining screw with a screwdriver. Remove the edge brushes.
3. gently lower the bristles in hot water.
4. Hold each set of bristles until they have recovered and straightened. Then remove and leave to dry.
5.  Once completely dry reassemble and screw in place.

WArNiNG:

 Please assemble it on the correct side, referring to ‘R’ and ‘L’ mark. 

rePLACiNG tHe eDGe BrUsHes

If the edge brush is damaged it will need to be replaced. Replacement edge brush can be obtained 
from your Hoover retailer.
1. Switch the Robo.com³ off and turn it over.
2. Remove the retaining screw with a screwdriver.
3. Remove the old edge brush and push the new one in place.
4. Replace and tighten the screw.

WArNiNG: 

Please assemble it on the correct side, referring to ‘R’ and ‘L’ mark. 

CLeANiNG tHe FroNt WHeeL [Fig.22]

1. Switch the Robo.com³ off and turn it over.
2. Remove any dirt or hair trapped in the wheel.
3.  Clean the wheel with a dry cloth.
4.  Check that the wheel can rotate freely.

CLeANiNG tHe FLoor seNsors [Fig.23]

The floor detection sensors are located in the base of the Robo.com³. Clean the sensors each time 

the dust container is emptied. Frequent cleaning is recommended to ensure optimum cleaning 
performance and safe operation of your Robo.com³.
1. Turn Robo.com³ off and remove from the charging station. 
2. Turn the Robo.com³ over.
3. Use a dry soft cloth or cotton swab to wipe the sensors.

CLeANiNG tHe seNsor WiNDoWs [Fig.24]

The wall detection sensors are located in bumper of Robo.com³.  Clean the sensor windows  
each time the dust container is emptied. frequent cleaning is recommended to ensure optimum 
performance of your Robo.com³.
Use a dry soft cloth or cotton swab to wipe the sensor windows.

CLeANiNG tHe FLoor PoLisHer PAD * [Fig.25]

1. Turn Robo.com³ off.
2. Press the dust container release button and remove the dust container from the Robo.com³.

3. Pull out the clip of floor polisher pad holder from the dust container.
4. Remove the floor polisher pad from the floor polisher pad holder and wash using hand warm 

Fig.19

Fig.20

Fig.21

Fig.22

Fig.23

Fig.24

Fig.25

Summary of Contents for Robo.com3

Page 1: ...User MANUAL ...

Page 2: ...not continue to use your appliance or charger if it appears faulty Hoover service To ensure the continued safe and efficient operation of this appliance we recommend that any servicing or repairs are only carried out by an authorised Hoover service engineer Do not use the appliance to clean animals or people Do not replace the Robot batteries with non rechargeable batteries End of life battery rem...

Page 3: ...riod of 6 months if they are maintained and operated according to this User Manual In the event of a significant drop of the Robo com performance replacement batteries can be obtained from your Hoover retailer Only use Hoover approved replacement parts for your Robo com Use of parts that are not approved by Hoover are dangerous and will invalidate your warranty Only use the supplied charging stati...

Page 4: ... 23 24 25 26 14 27 28 29 14 9 10 11 32 31 30 Robo com Bottom View 1 Bumper 2 R Soft Furniture Protector 3 Display Screen Control Panel 4 Carry Handle 5 Top Infrared Lens 12 Left Edge Brush 13 Auto Charging Plate 14 Floor Sensor 15 Front Wheel 16 Battery Cover 17 Right Edge Brush 18 Right Sensor Window 19 Right Driving Wheel 20 On Off Power Switch 6 Front Sensor Window 7 F Soft Furniture Protector ...

Page 5: ...wer Supply Connector 36 Main Power Adaptor 41 Long Range 42 Infrared Transmitter 43 Power Indicator 44 Near Infrared Transmitter 44 43 37 39 40 41 42 38 46 41 43 40 39 42 42 42 42 34 35 36 34 33 22 32 31 30 44 43 37 39 40 41 42 38 54 55 51 46 45 47 48 49 50 34 35 36 34 33 22 32 31 30 44 43 37 39 40 41 42 38 46 41 43 40 39 42 42 42 42 34 35 36 34 33 22 32 31 30 44 43 37 39 40 41 42 38 54 55 51 46 4...

Page 6: ... 55 Spot Button 56 Turbo Button 57 Full Go Button 58 Demo Button 59 Voice Button DEMO 46 41 43 49 45 48 38 40 39 42 42 42 42 47 44 60 70 69 68 73 67 72 74 61 64 65 71 66 66 62 54 55 51 56 57 58 59 46 45 47 48 49 50 52 53 60 70 69 68 73 67 72 74 61 63 65 71 66 64 62 DEMO 46 41 43 49 45 48 38 40 39 42 42 42 42 47 44 60 70 69 68 73 67 72 74 61 64 65 71 66 66 62 54 55 51 56 57 58 59 46 45 47 48 49 50 ...

Page 7: ...ar a ring tone Charging station SETUP Before use remove obstacles that may get in the path of the Robo com Pay attention to Objects that can be easily knocked over Edges of carpets or rugs that it may get caught on Floor length curtains and tablecloths Heat sources or flammable items Power cords and cables Fragile objects 1 Place the charging station on a non reflective level floor preferably agai...

Page 8: ... level For longer battery life to choose the correct range icon Note the near infrared transmitter will stop the Robo com coming any closer than 50cm to the virtual barrier CHANGING THE VOICE LANGUAGE Fig 8 The Robo com is able to communicate in English French Italian or Spanish The default language is English To change this With Remote Control 1 Turn the Robo com on 2 Press and hold the Voice But...

Page 9: ...activated With the remote control or Wi Fi application the Robo com can be controlled up to a long distance even behind a wall Full Go Press the full go button on the remote control or Wi Fi application to make Robot return to the base On the display the full go indicator will be illuminated After being fully charged Robo com will automatically start cleaning for one cycle and the FULL GO option w...

Page 10: ...ing performance regularly clean the pre motor filter the pre motor filter should be cleaned every 5 dust container empties and should be washed IMPORTANT the pre motor filter should be cleaned and washed after the dust container has been emptied 5 times Failure to clean your filter may result in air blockage overheating and product failure This may invalidate your guarantee 1 Turn the Robo com off...

Page 11: ...de referring to R and L mark Replacing the EDGE Brushes If the edge brush is damaged it will need to be replaced Replacement edge brush can be obtained from your Hoover retailer 1 Switch the Robo com off and turn it over 2 Remove the retaining screw with a screwdriver 3 Remove the old edge brush and push the new one in place 4 Replace and tighten the screw Warning please assemble it on the correct...

Page 12: ...w batteries ensuring the polarity is correct Replace the cover 3 Dispose of the batteries safely Used batteries should be taken to a recycling station and not disposed of with household waste troubleshooting The following is a list of commonly encountered problems and solutions If any of these problems persist contact your local Hoover representative The Robo com does not work Check that the Robo ...

Page 13: ...city office your household and waste disposal service or the shop where you purchased the appliance This appliance complies with the European Directives 2006 95 EC 2004 108 EC and 2011 65 EU HOOVER Limited Pentrebach Merthyr Tydfil Mid Glamorgan CF48 4TU UK Your Guarantee The guarantee conditions for this appliance are as defined by our representative in the country in which it is sold Details reg...

Page 14: ...PRINTED IN P R C 48010192 ...

Reviews: