background image

2. To remove the handle (1), press the handle release button (10) and remove the handle

from the main body by pulling upward

3. Place the 2 in 1 accessory (14) into the accessory holder.

OPERATING INSTRUCTIONS

1. Remove the power cord from the cord storage hooks (13)
2. Press the On/Off button (15) to switch on your appliance
3. After using the appliance, switch it off by pressing the On/Off button (15)

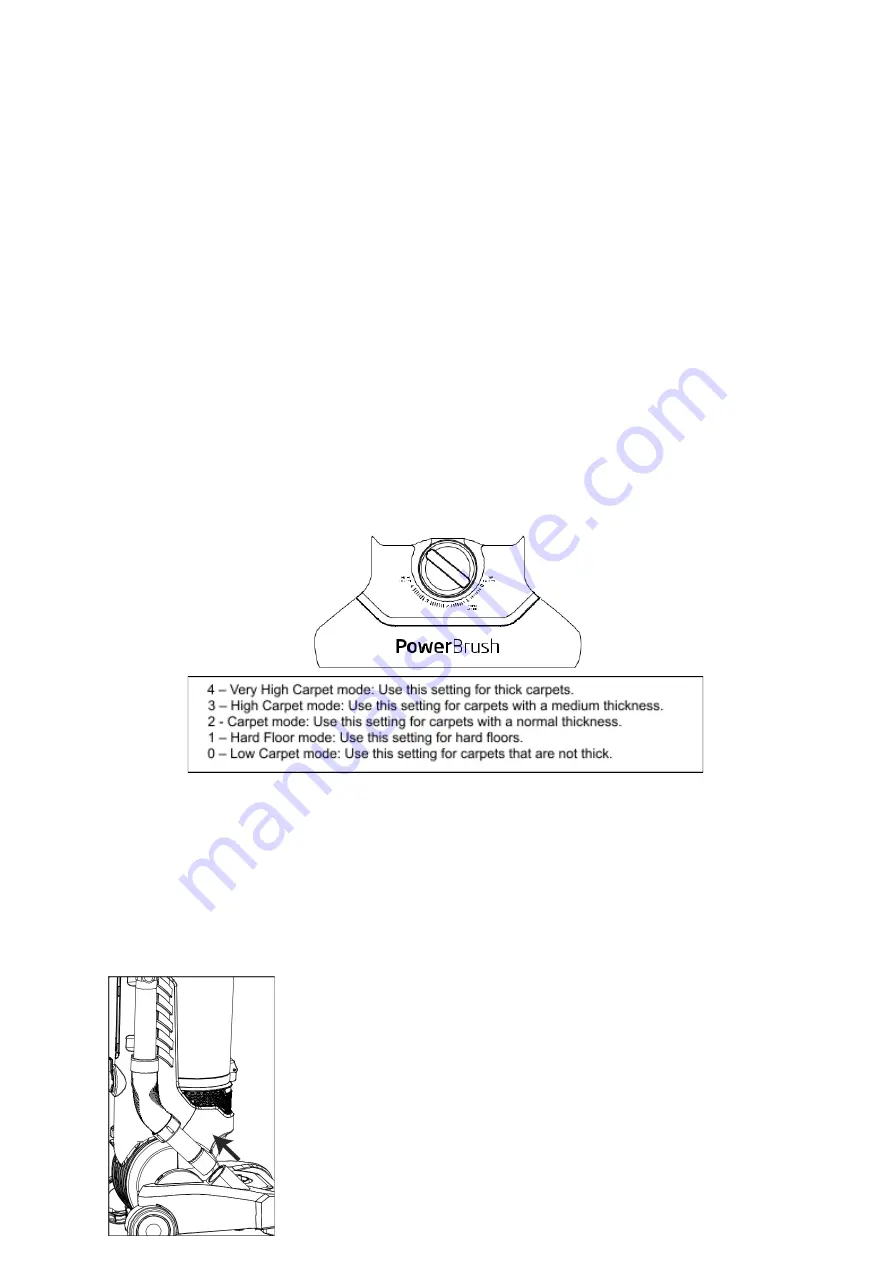
Using the brush roller

1. You can adjust the power brush height by turning the height adjust dial (8) on the

power brush (9).

Accessories

Note: You can store the 2 in 1 accessory (14) tool on the main body tool holder.

Using the accessories with the accessory hose

1. Remove the accessory hose (7) from the main body

Summary of Contents for HU87-TA-ZA

Page 1: ...INSTRUCTIONS AND WARRANTY MODEL HU87 TA ZA HOOVER TURBO AIR UPRIGHT VACUUM ...

Page 2: ... appliance is intended for household use only Commercial use invalidates the warranty and the supplier cannot be held responsible for injury or damage caused when using the appliance for any other purpose than that intended 5 Avoid any contact with moving parts 6 This appliance is not intended for use by persons including children with reduced physical sensory or mental capabilities or lack of exp...

Page 3: ...However if it is necessary to use an extension lead ensure that the lead is suited to the power consumption of the appliance to avoid overheating of the extension cord appliance or plug point Do not place the extension cord in a position where it can be pulled on by children or animals or tripped over 19 This appliance is not suitable for outdoor use Do not use this appliance for anything other th...

Page 4: ...his is to allow the motor to cool down and to prevent the motor form overheating which may cause motor failure Do not operate this unit for more than 4 hours with cool down periods included at any given time Also ensure that the product is cleaned after each use Please ensure to clean all the filters as shown in the general cleaning and maintenance section after each use The vacuum cleaner is fitt...

Page 5: ...er lid 6 Dust container 7 Accessory hose 8 Height adjust dial 9 Power brush 10 Handle release button 11 Extension hose holder 12 Extension hose 13 Cord storage hooks 14 2 in1 accessory 15 On Off button 16 Turbo brush ...

Page 6: ...ove all the parts from the packaging Assembly of the body and handle 1 Push the handle release button 10 on the main body and while doing so Insert the handle 1 into the main body you will hear a click sound once it is in place ...

Page 7: ...e hooks 13 2 Press the On Off button 15 to switch on your appliance 3 After using the appliance switch it off by pressing the On Off button 15 Using the brush roller 1 You can adjust the power brush height by turning the height adjust dial 8 on the power brush 9 Accessories Note You can store the 2 in 1 accessory 14 tool on the main body tool holder Using the accessories with the accessory hose 1 ...

Page 8: ...ry onto the hose end Using the extension hose 1 Remove the extension hose from the main body 2 Remove the tube 2 from the main body by pushing the handle release button 10 pulling upward 3 Attach the handle on to the hose extension ...

Page 9: ... the turbo brush The brush tool 16 is inserted in the hose or extension hose as the below image GENERAL MAINTENANCE AND CLEANING IMPORTANT Switch off the appliance and unplug it before cleaning The dust container filter must always be in place when operating the vacuum A Cleaning the dust container 1 Press the dust container release button 3 and pull the handle of the dust container 6 to remove it...

Page 10: ...ton 3 and empty contents into the dustbin 4 After the dust container 6 has been emptied close the opened lid gently B Cleaning the pre motor filter 1 Open the filter cover by pulling the latch gently as shown below 2 Remove the separator 3 Remove the pre motor filter from the separator ...

Page 11: ...t motor filter cover by turning it counter clockwise 2 Remove the post motor filter by lifting it 3 Wash the post motor filter with warm water NB Leave the filters to dry for 24 hours The filters must be completely dry before use D Cleaning the cyclone filter separator 1 Open the filter cover ...

Page 12: ...at only completely dry filters are placed back into the vacuum cleaner after they have been washed Wet or damp filters attract dust which restricts airflow This causes the motor to overheat which in turn shortens the lifespan of the vacuum cleaner Note The Brush Roller needs to be checked on a regular basis and any pieces of string or debris should be removed to ensure that the product does not ge...

Page 13: ...n out debris using a plastic knife or something similar NB Do not use sharp metal objects as it could damage the roller brush and it s functionality STORING THE APPLIANCE 1 Unplug the unit from the wall outlet and clean all the parts as instructed above Ensure that all parts are dry before storing 2 Store the appliance in its box or in a clean dry place 3 Never store the appliance while it is stil...

Page 14: ...ing returned If the supply cord is damaged it must be replaced by the manufacturer or an authorised service agent to avoid any hazard If service becomes necessary within the warranty period the appliance should be returned to an approved Home of Living Brands Pty Limited service centre Servicing outside the warranty period is still available but will however be chargeable PLEASE AFFIX YOUR PROOF O...

Page 15: ...d to cover products damaged as a result of disaster misuse tamper abuse or any unauthorised modification or repair of the product 5 This warranty will extend only to the product provided at the date of the purchase and not to any expendables attached or installed by the customer 6 If the customer requests that the supplier repairs the product and the product breaks or fails to work properly within...

Reviews: