background image

UV100E ULTRAVIOLET SYSTEMS

9

68-0262—5

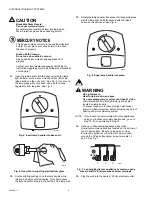
Fig. 11. Remove lamp or bulb.

4.

Holding the lamp handle, wipe the lamp glass using a 

soft cloth dampened with window cleaner. If you touch 

the lamp glass with your hands, be sure to clean the 

area of any oils left from bare hands. See Fig. 12.

Fig. 12. Clean glass with soft cloth.

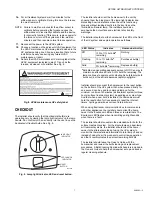
5.

Also wipe away any dust that may have collected 

between the lamp light indicator on the base and the 

black lamp base. See Fig. 13.

Fig. 13. Wipe lamp light indicator base.

6.

Dry bulbs with a clean, dry cloth.

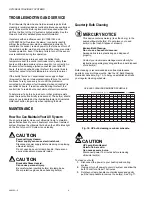
7.

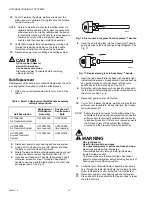
Insert the lamp handle into the base with the lamp light 

indicator at the eleven o’clock position. Continue pushing 

and gently rotating counterclockwise until the lamp 

handle inserts fully into the base. See Fig. 14.

Fig. 14. Position lamp handle for insertion back into 

 lamp base.

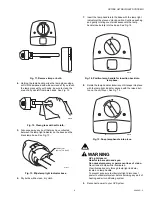
8.

Rotate the lamp handle clockwise until it snaps into place 

with the lamp light indicator aligned with the raised but-

ton on the unit cover. See Fig. 15.

Fig. 15. Snap lamp handle into place.

WARNING

UV Light Hazard.

Harmful to bare skin and eyes.

Can cause temporary or permanent loss of vision.

Never look at bulbs while illuminated. 

View illumination only through lamp light indicator 

located on lamp handle. 

To prevent exposure to ultraviolet light, disconnect 

power to ultraviolet system before servicing any part of 

heating and air conditioning system.

9.

Reconnect power to your UV System.

M22841

M22843

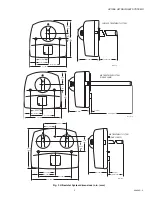
LAMP LIGHT 
INDICATOR BASE

M22845

M22847

M22849

Summary of Contents for UV100E series

Page 1: ...ent Reduced power consumption and extended bulb life Communicates with other home appliances through Enviracom three wire communications bus Automatic brownout and high temperature protection for UV lamps Return air models supplied with integrated airflow sensor to monitor air flowing through ductwork Dual purpose reset button Commands lamp on with a single one second push Resets internal lamp run...

Page 2: ...em is mounted in the supply side air duct or downstream or upstream from air conditioner evaporator coils in HVAC system It reduces mold growth and spores on duct surfaces coils and drip pans Does not use an airflow sensor Without Enviracom hooked up operates steady on off cycle lamp operates three hours on three hours off for a total two year life cycle With Enviracom hooked up after initial thre...

Page 3: ...aviolet light to be seen after installation Do not attempt to bypass duct mount switch CAUTION Personal Injury Hazard Power supply can cause electrical shock Disconnect power supply before beginning installation Do not open base unit or lamp handle there are no user serviceable components inside Selecting Mounting Location CAUTION Equipment Damage Hazard Ultraviolet light can cause color shift or ...

Page 4: ... Mount to allow correct operation a Do not mount upside down b Do not mount with lamps facing up CAUTION Sharp Edges Hazard Can cause personal injury Be careful when inserting ultraviolet device into sheet metal cutout Wear protective gloves when working near sheet metal Duct Mounting Use the following instructions to mount the UV System on the air duct of an HVAC system 1 Disconnect power to the ...

Page 5: ...25 7 178 3 1 2 89 4 102 14 7 8 379 M20190A SURFACE TREATMENT SYSTEM 2 1 4 57 3 1 2 89 4 1 2 114 7 178 1 25 7 178 3 1 2 89 4 102 7 7 16 188 AIR TREATMENT SYSTEM SINGLE LAMP 1 2 12 M20191A 3 1 2 89 5 127 7 178 10 254 2 3 16 56 8 1 2 216 3 1 4 83 4 102 14 7 8 379 1 2 12 M20192A 3 1 2 89 5 127 AIR TREATMENT SYSTEM DUAL LAMP ...

Page 6: ...clockwise This should cause the lamp handle to drop into the bottom of the lamp well 13 Rotate the lamp handle clockwise until it snaps into place with the lamp light indicator aligned with the raised button on the unit cover See Fig 6 Fig 6 Snap lamp handle into place WARNING UV Light Hazard Harmful to bare skin and eyes Can cause temporary or permanent loss of vision View illumination only throu...

Page 7: ... follows a Bulb life means emitting adequate amount of UV C energy to maintain an effective kill rate At 0 bulb life remaining the lamp continues to operate until catastrophic bulb failure bulb burns out but the kill rate becomes rapidly negligible Installer should also orient the homeowner to the reset button on the bottom of the UV system that when pressed briefly for one second can be used to c...

Page 8: ... longer only when replacing the bulb MAINTENANCE How You Can Maintain Your UV System You should regularly clean your ultraviolet lamp to maintain peak effectiveness of your air treatment or surface treatment system Replace the ultraviolet bulb when the LED status light on the front of your UV System is on steadily CAUTION Personal Injury Hazard Power supply can cause electrical shock Disconnect po...

Page 9: ...tinue pushing and gently rotating counterclockwise until the lamp handle inserts fully into the base See Fig 14 Fig 14 Position lamp handle for insertion back into lamp base 8 Rotate the lamp handle clockwise until it snaps into place with the lamp light indicator aligned with the raised but ton on the unit cover See Fig 15 Fig 15 Snap lamp handle into place WARNING UV Light Hazard Harmful to bare...

Page 10: ... SnapLamp handle 7 Insert the lamp handle into the base with the lamp light indicator at the eleven o clock position Continue pushing and gently rotating counterclockwise until the lamp handle inserts fully into the base See Fig 4 8 Rotate the lamp clockwise until it snaps into place with the lamp light indicator aligned with the raised button on the unit cover See Fig 6 9 Reconnect power to your ...

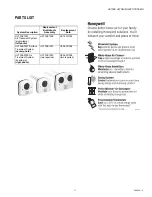
Page 11: ... Handle Assembly Replacement Bulb UV100E1043 Air Treatment System single lamp left photo UC100E1006 UC18W1004 UV100E3007 Surface Treatment System center photo UC100E1030 UC36W1006 UV100E2009 Air Treatment System dual lamp right photo UC100E1030 two required UC36W1006 two required M18621B ...

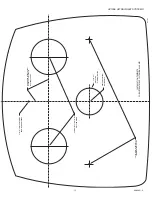
Page 12: ...on next page Fig 19 Air Treatment System dual lamp template M20194A CENTER OF 2 IN 51 MM HOLE FOR LAMP 1 1 2 IN 38 HOLE FOR AIRFLOW SENSOR CENTER OF AIRFLOW SENSOR HOLE 3 32 IN 3 MM PILOT HOLES FOR MOUNTING SCREWS ALIGN EITHER OF THESE LINES AS CLOSE AS POSSIBLE TO DUCT CENTER LINE INSTALLATION TEMPLATE FOR AIR TREATMENT SYSTEM SINGLE LAMP ...

Page 13: ...MP 3 32 IN 3 MM PILOT HOLES FOR MOUNTING SCREWS ALIGN EITHER OF THESE LINES AS CLOSE AS POSSIBLE TO DUCT CENTER LINE INSTALLATION TEMPLATE FOR AIR TREATMENT SYSTEM DUAL LAMP 3 32 IN 3 MM PILOT HOLES FOR MOUNTING SCREWS CENTER OF AIRFLOW SENSOR HOLE 1 1 2 IN 38 HOLE FOR AIRFLOW SENSOR ...

Page 14: ... 20 Surface Treatment System template M20193A CENTER OF 2 IN 51 MM HOLE FOR LAMP 3 32 IN 3 MM PILOT HOLES FOR MOUNTING SCREWS ALIGN EITHER OF THESE LINES AS CLOSE AS POSSIBLE TO DUCT CENTER LINE INSTALLATION TEMPLATE FOR SURFACE TREATMENT SYSTEM ...

Page 15: ...UV100E ULTRAVIOLET SYSTEMS 15 68 0262 5 ...

Page 16: ...nc Honeywell Limited Honeywell Limitée 1985 Douglas Drive North 35 Dynamic Drive Golden Valley MN 55422 Toronto Ontario M1V 4Z9 customer honeywell com UV100E ULTRAVIOLET SYSTEMS U S Registered Trademark 2007 Honeywell International Inc 68 0262 5 M S Rev 03 07 ...

Reviews: