HRXD Quick Installation Guide
www.honeywellvideo.com
+1.800.796.CCTV (North America only)
Specifications subject to change without notice.
Imperial conversions are approximate.
© 2007 Honeywell International Inc.
Document 800-00280 – Rev A – 05/07
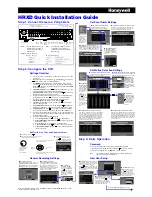
Front Panel Navigation Controls
Live Monitoring
The HRXD recorder continues recording while archiving, during playback and
when transmitting to remote sites. This allows you to view recorded video
while the DVR continues recording. When in Live mode, pressing SEQUENCE
will display all live channels sequentially.
Playback
Press PLAY/PAUSE to view recorded video. The DVR will either start playing
video from the most recent image or from the last recalled image. See the
table above for brief descriptions of the playback controls.
Easy Evidence Find
There are many ways to search for video. While in Search mode, press MENU
to open the Search menu. Pick a search method to find an incident with:
Date and Time Search
Control
Description
Camera buttons
(1 to 16)
•
Cause selected camera to display full screen.
•
Buttons 1 to 9 are used to enter passwords.
DISPLAY Button
•
Toggles between different display formats.
•
Press and hold for 5 seconds to switch from Video Out and VGA out.
SPOT Button
•
Press to select which cameras will display on the four spot monitors.
Select the spot monitor and choose to show either one camera or all
cameras sequentially.
MENU Button
•
Enters the Setup screen and closes the current screen/menu.
•
Displays the Search menu when in Playback mode.
•
In Search mode, press and hold for 2 seconds to start Clip-copying.
ALARM Button
•
Reset the DVR’s outputs, including the internal buzzer, during an alarm.
•
In live monitoring mode, display the event log unless an alarm is active.
ZOOM Button
•
Zooms in the current image, and opens a PIP showing the zoomed area.
•
Navigate through menus and GUI.
•
Change numbers by highlighting the number (left/right) and increase/
decrease the value (up/down).
•
Control Pan and Tilt in PTZ mode.
•
Move the PIP display on the screen and cycle through screen pages.
PANIC Button
•
Starts panic recording of all cameras. Press again to stop recording.
Enter Button
•
Press
to select a highlighted item, or complete an entry made during
system setup.
SEARCH Button
•
Enters the Search menu. Press again to exit the Search menu.
•
Zooms in while in PTZ mode.
RW Button
•
Plays video backward at high speed. Press RW multiple times to toggle
between the 3 available rewind speeds.
FF Button
•
Plays video forward at high speed. Press FF multiple times to toggle
between the 3 available fast forward speeds.
FORWARD Button
•
In Playback mode, press to go forward to the next image.
BACKWARD
Button
•
In Playback mode, press to go backward to the previous image.
PLAY/PAUSE
Button
•
Play back images at regular speed.
•
While in Playback mode, this button will pause the video.
•
Zooms out while in PTZ mode.
The shuttle ring and jog dial are part of the same control. The shuttle ring is
the outermost ring. The jog dial is the inner wheel.
•
The Shuttle Ring only functions in Playback mode. The shuttle ring is
spring loaded and returns to the center when released. Turn the ring
clockwise to play video forwards, counterclockwise to play video
backwards. Playback speeds vary with the amount the ring is turned.
•
In Playback mode the Jog Dial plays video forward and backward image
by image. In Setup mode, highlight a numerical item and use the jog dial
to increase or decrease the number.
Zoom
Jog Dial
FF
Forward
Backward
RW
Arrow Buttons
Enter
LEDs
Menu
USB
Alarm
PTZ
Internal CD-RW
Freeze
Spot
Camera
Panic
Search
Play/Pause
Shuttle Ring
Sequence
Display
Shuttle Ring
Jog Dial
Displays the first recorded image.
Displays the last recorded image.
Searches by date and time.
Searches using a calendar.
Selects video from the event log.
Searches text input strings.
Searches motion events.
Clips a video segment and saves it.
Allows you to print a selected image.
Zooms the current playback image.
Plays video at slow speed.
Switches from recorded and archived video.
Exits the Search menu.
1.
Move the cursor over the date/time and press
.
2.
Move Left or Right to highlight the date/time value to change.
3.
Use the Up and Down buttons to change the date/time value
to the date/time that you want to search through.
4.
Once you have set the date and time you want, press
.
5.
Highlight Go and press
.
6.
The selected time and date will display. If no video was
recorded in that time, a
No Video
message will appear.
7.
Use the playback controls to search through the video.
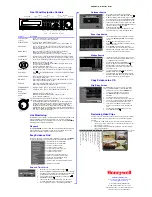
Calendar Search
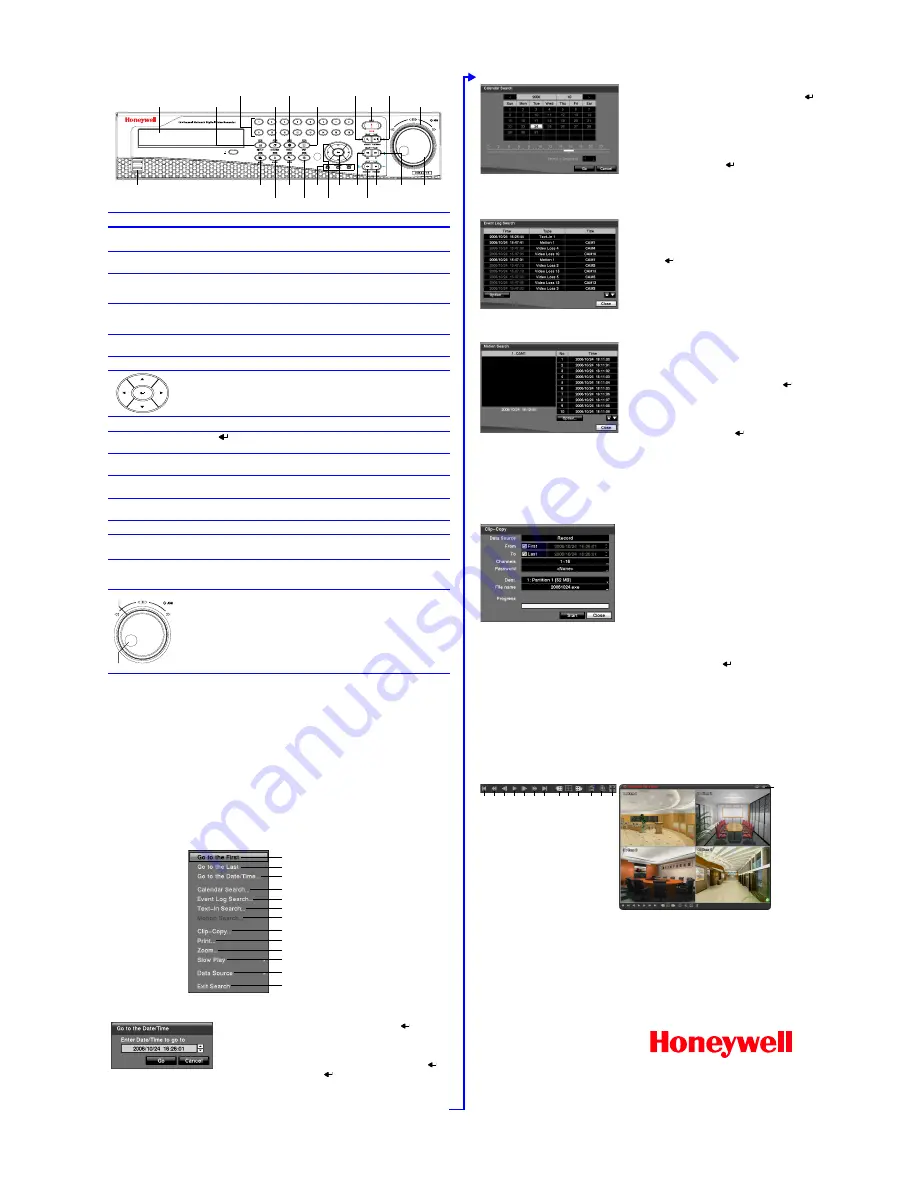
Event Log Search
Motion Search
Copy Evidence to a CD
Clip-Copy Screen
Reviewing Video Clips
You do not need to install any special software on your personal computer
to review the video clips. The copied video clips contain the Clip Player
program.
1.
If you used a USB storage device, disconnect it from the DVR and
connect it to your PC. If you used a recordable CD, insert the CD into
your computer’s CD drive.
2.
The Clip Player screen displays the clip images. Use the Clip Player
controls to view the video.
1.
Days with recorded video display in white.
2.
Highlight a day with recorded video and press
.
3.
A time bar displays at the bottom of the calendar.
Hours with video recorded are highlighted orange.
4.
Select the time bar and select the time to search.
5.
If there is more than one video stream in the same
time range, move to Select a Segment and select
the video stream you want to search.
6.
Highlight Go and press
.
7.
The selected time and date will display. Use the
playback controls to search through the video.
1.
The DVR maintains a log of each time an Event
occurs. The Event Log Search screen displays
this list.
2.
Highlight the event that you want to view.
3.
Press
to extract the video and display the first
image of the event.
4.
Press Search to return to live monitoring.
5.
You can narrow your event search by selecting
Option... and setting up a new search condition.
See the User Guide for more information.
1.
The Motion Search screen allows you to search
for motion activity that occurred within the area of
a configurable zone of interest.
2.
Use the arrow buttons to highlight the event for
which you want to view video and press
.
3.
The first image of the associated event video
displays in the small search screen in the left
pane of the screen.
4.
To view and play back the video in full screen,
highlight Close and press
.
5.
You can narrow your event search by selecting
Option... and setting up a new search condition.
See the User Guide for more information.
The Clip-Copy screen can be used to copy video
clips to an internal CD-RW, or external USB drive.
1.
In Search mode, press and hold MENU for 2
seconds to open the Clip-Copy screen.
2.
The Data Source (Record or Archive) is
displayed.
3.
Set the start and stop times and dates.
4.
Select the cameras to include in your video clip.
5.
If necessary, enter a password that will have to
be entered when reviewing the video clips.
6.
In the box beside Dest., select the storage
device you would like to record the video clip
onto.
7.
Change the default File name, if necessary.
8.
Select Start and press
.
Exits the Player
program
Go f
o
rw
ard
one
fr
am
e
Play th
e video
c
lip
Go
b
a
c
k
one fram
e
Play in
fa
st revers
e
Go t
o
the
be
g
inni
n
g of
the
c
lip
Play
in
fa
st forw
ar
d
Go t
o
the
e
n
d of
the
c
lip
Show the p
revious
pag
e
Cyc
le
throug
h s
c
re
en
layouts
Show the next p
a
ge
Se
le
c
t fr
om
Sa
ve,
P
rin
t, I
n
fo,
I
m
age
Processing
and
Vid
e
o
Format
Selec
t fr
om
Normal and
Double
sc
ree
n
vie
w
s
D
isp
la
y im
ag
e f
u
ll sc
reen


