background image

Remote Software


______________________________________________________________________________________________ 

90 


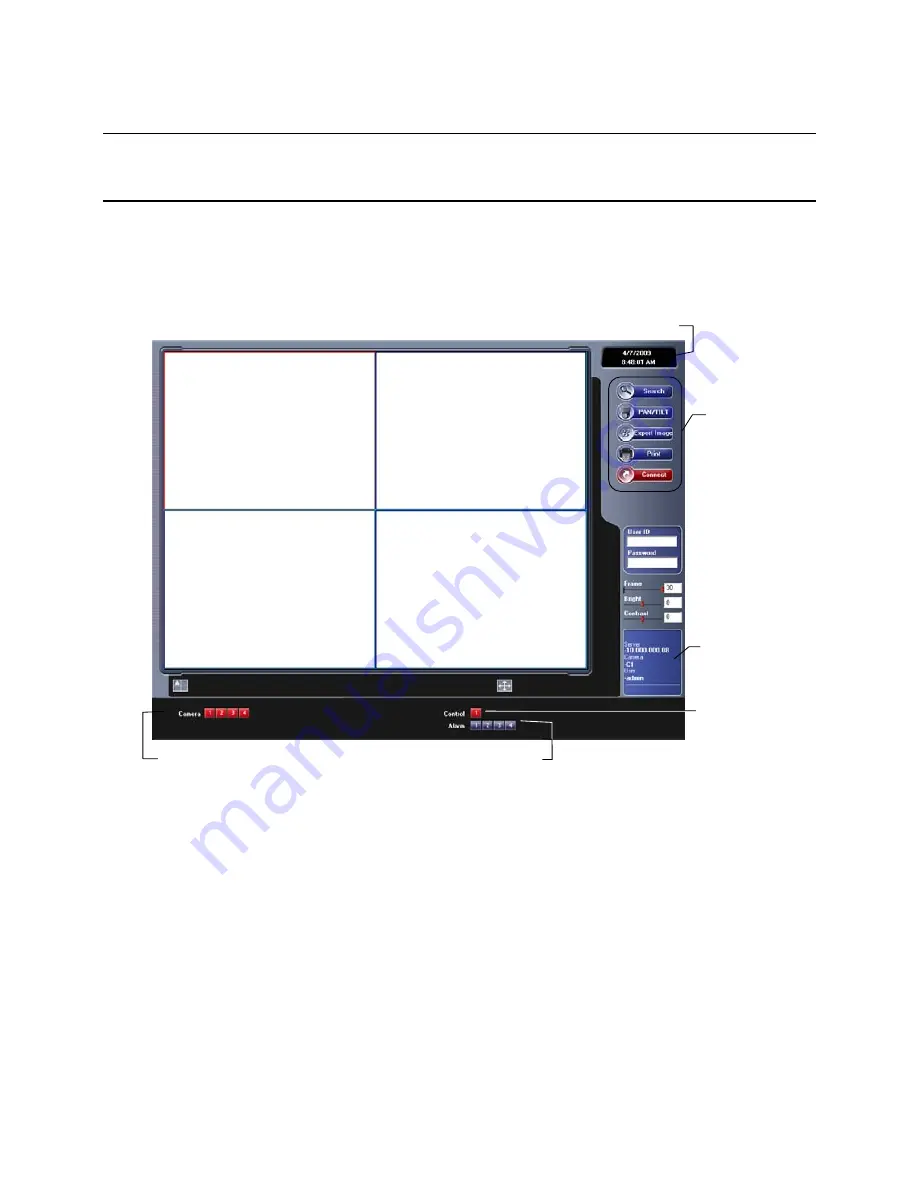
Web Viewer Overview 

The DVR allows access to the video using Microsoft® Internet Explorer® 
browser 6+. 

To log in to the DVR server from the Web Viewer, a user account must be 
made for the user. This ensures that only authorized users are allowed to log 
in. In addition, each user can be assigned different privileges that allow or 
deny access to different functions.  


Search 

Open the Search screen. 

PAN/TILT 

Open the PTZ controller. 

Export Image 

Save JPG file of selected image. 

Print 

Print selected image on connected printer. 

Connect 

Connect to a DVR. 

Frame 

Adjust the frames per second playback 

Bright 

Adjust the brightness of the connected cameras 

Contrast 

Adjust the contrast of the connected cameras 


Camera Display Buttons 

Current Date & Time 

Connected 
User Info 

Status of/Activates 
Control Outputs 

Status of Alarm Sensors 

Menu Buttons 

Summary of Contents for HRDP DVR

Page 1: ...____________________________________________________________________________________________ Document 800 06801 Rev D 02 11 Xt HRDP and HRDPX H 264 DVR Digital Recording and Transmission System User Guide ...

Page 2: ...______________________________________________________________________________________________ 2 ...

Page 3: ..._____________________________________________________________________________ Document 800 06801 Rev D 3 02 11 Revisions Issue Date Revisions A 05 10 Initial Release B 06 10 Updated Content C 09 10 Updated Content D 02 11 Added HRDPX H 264 ...

Page 4: ...______________________________________________________________________________________________ Document 800 06801 Rev D 02 11 ...

Page 5: ...nt off and on the user is encouraged to try to correct the interference by one or more of the following measures Reorient or relocate the receiving antenna Increase the separation between the equipment and receiver Connect the equipment into an outlet on a circuit different from that to which the receiver is connected Consult the dealer or an experienced radio TV technician for help Compliance War...

Page 6: ... be routed so that they are likely to be walked on or pinched by items placed against them paying particular attention to cords at plugs receptacles and the point where they exit the product 8 Overloading Do not overload wall outlets extension cords or integral convenience receptacles as this can result in a risk of fire or electrical shock 9 Lightning For added protection for this product during ...

Page 7: ...te normally by following the operating instructions Adjust only those controls that are covered by the operating instructions as an improper adjustment of other controls may result in damage and will often require extensive work by a qualified technician to restore the unit to its normal operation If the unit has been dropped or the enclosure has been damaged When the unit exhibits a distinct chan...

Page 8: ...ng Place the unit on a level surface Do not use it on a shaky or unstable surface such as a wobbling table or inclined stand If this unit is placed next to a TV radio or VCR the playback picture may become poor and the sound may be distorted If this happens place the DVR away from the TV radio or VCR Notes on Cleaning Use a soft dry cloth for cleaning For stubborn dirt soak the cloth in a weak det...

Page 9: ...a cool location When this product is moved to a cool and humid location from a warm location When this product is used in a room where the temperature fluctuates When this product is used near an air conditioning unit vent When this product is used in a humid place Do not use the DVR when moisture condensation may occur If the DVR is used in such a situation it may damage discs and internal parts ...

Page 10: ...ading Mounting of the equipment in the rack should be such that a hazardous condition is not achieved due to uneven mechanical loading D Circuit Overloading Consideration should be given to the connection of the equipment to the supply circuit and the effect that overloading of the circuits might have on overcurrent protection and supply wiring Appropriate consideration of equipment nameplate rati...

Page 11: ...21 Logging In for the First Time 21 4 Installation 22 Front Panel Controls 22 Rear Panel Connectors 23 16 Channel 23 8 Channel 24 4 Channel 24 Remote Control 25 Connection Guide 26 Connecting the Monitor 26 Video Inputs and Looping Outputs 26 Connecting to a Network 26 Connecting Audio 26 Connecting a PTZ Camera 27 Connecting to a Sensor Input 27 Connecting to a Relay Output 27 Installing the Rack...

Page 12: ...iguration 38 Color Setup Adjust 39 PTZ Configuration 39 Spot Sequence Configuration 40 Monitor Configuration 41 Record 42 Recording Configuration 42 Frame 42 Schedule 43 Holiday Setup 45 Instant Recording 45 Audio 45 Instant Recording 46 Using Instant Recording 46 Motion Event Configuration 47 Input 47 Setting Up Motion Detection Recording 48 Sensor 49 Action 50 Alarm Monitor 51 Network 52 Network...

Page 13: ...kup in Search Mode 66 Express Search 67 Jump to First Saved Data 67 Jump to Last Saved Data 67 Event Search 67 Daylight Savings Search 68 Search Popup Menu 68 Backup Export 69 Manual Export 69 Search Backup Data 70 Deinterlacing 70 Watermark 70 Using the Backup Viewer 71 Controlling Backup Viewer 71 Setup and Save Functions 72 Upgrade Firmware at the DVR 72 Play Back Backup Image 73 Screen Divisio...

Page 14: ...n of an Image 84 Printing an Image 84 Save Clip 84 Saving a Video Clip 85 Status Search 86 Performing a Status Search 86 PTZ Overview 87 Accessing PTZ Menus 87 Controlling a PTZ Camera 87 Using the Graphical PTZ Controller 88 Using the On screen Compass 89 Web Viewer Overview 90 Connecting to a DVR Using Web Viewer 91 Search Video Using Web Viewer 91 Performing a Basic Search 92 Status Search 92 P...

Page 15: ...iew 101 Connecting to a DVR using FVMS 101 8 Appendix 102 Button Index 102 LED Status Indicators 102 Enter Exit Buttons 103 Function Buttons 103 Numeric Buttons and Rec 103 Directional and Playback Control Buttons 104 DVR FAQ 105 General 105 Live Monitoring 105 Recording 106 Searching and Playing Video 106 Backup 106 Network 106 Miscellaneous 106 Troubleshooting 107 Specifications HRDP H 264 108 S...

Page 16: ...Contents ______________________________________________________________________________________________ 16 Notes ...

Page 17: ...ess integration within your existing IT infrastructure The HRDP offers unparalleled stability security and ease of use in a 2U chassis Accordingly your security investment has never been easier to maintain Multiple users may connect through digital networks such as LANs and WANs for simultaneous live viewing and digital search This powerful software enables users to view live video perform searche...

Page 18: ...Real Time Video Display 480 NTSC Images Per Second 400 PAL Images Per Second Auto Termination 75 Ohm on Looping Outputs Continuous Recording with Disk Overwrite Mode Continuous Recording on Archiving Transmitting to Remote and Playback Motion Based Recording Uniquely Configurable for Each Channel Customizable Motion Detection Grids Uniquely Configurable for Each Channel Multiple Recording Modes Ma...

Page 19: ...er USB flash drives may also work with the HRDP DVR but have not yet been tested Manufacturer Model SanDisk Cruzer Talent Flash Corsair Voyager Lexar JumpDrive Kingston Traveler Note The USB ports on the HRDP H 264 only provide enough power for a flash based external device To use an external hard disk drive HDD then you must use external power or a USB Y cable to provide sufficient power Most ext...

Page 20: ...ywell MAXPRO Honeywell VCL Honeywell GC 655P Honeywell HSD 250 Honeywell HSD 251 American Dynamics Cynix Speed Dome DynaColor ERNITech FastraxII Ganz PT HISHARP HSDN 251 230 KALATEL LG LVC A70X LILIN OpenEye 500 OpenEye 510 OpenEye Pelco D ORX 1000 Pelco D Pelco P PTC 400C RS 485 DIRECT SCC 641 SCC 645A SDM 100 SJ 3728R1 SK P SK S SPD 1600 SRX 1008 TBT DOME Vison 360 Visiontech WSD7425D WV CS854 Y...

Page 21: ... Configuration section for more details 6 Complete Camera Configuration for all attached cameras See the Camera Configuration section for more detail 7 Complete PTZ Configuration for any attached Pan Tilt Zoom cameras See the PTZ Configuration section for more details 8 Create a recording schedule See the Record section for more details 9 Complete Sensor Configuration to enable any external device...

Page 22: ...________________________________________________ 22 Installation Front Panel Controls USB Port LED Lights Power HDD Record Network HDD Temp DVD Drive Numeric Keypad Arrow Buttons Live Display Setup Menu Lock logout Search Mode Backup Menu Rotate Instant Record ...

Page 23: ... The rear panel of the DVR contains virtually all of the connectors you will be using The diagram below shows the location and description of each connector 16 Channel Primary and Spot Monitor Outputs Power Input RS 232 Input VGA Output USB Port Video In Ports Video Out Ports Relay Output Sensor Input Audio Input PTZ Connection Audio Output NTSC PAL switch Network Port ...

Page 24: ...Outputs Sensor Inputs Audio Input Cable Connections PTZ Connection Primary and Spot Monitor Outputs Network Port USB Port Power Input Audio Output NTSC PAL switch Primary and Spot Monitor Outputs Network Port RS 232 Input VGA Output USB Port Relay Output Sensor Input Audio Input Cable Connection PTZ Connection Video Out Ports Video In Ports Power Input Audio Output NTSC PAL switch ...

Page 25: ...1 Remote Control ROTATE ALARM OSD PTZ EXIT REPL AY ENTER ZOOM FOCUS IRIS PTZ PRESE T 10 LIVE SEARCH BACKUP SETUP 0 7 8 9 4 5 6 1 ID 2 3 REC S P 30 30 Record Toggle ID Select Arrow Panorama Arrow Rewind Pause Arrow Display Options Play Fast Forward Log Off Lock PTZ Controls The ID Select button allows you to use one remote control for several DVRs ...

Page 26: ...s on the rear of its chassis Each video input has a corresponding looping BNC output for passing the video signal to another monitoring recording device Connecting to a Network Use the RJ45 jack on the rear of the DVR when connecting to a network Connecting Audio To record audio on the DVR connect the audio source to the connections on the audio ports on the back of the DVR To listen to live or re...

Page 27: ...to send a signal to the DVR when an event occurs Mechanical or electrical switches can be wired to the Alarm In and Ground GND connectors Note All connectors marked GND are common Connect the ground side of the alarm input and or alarm output to the GND connector Connecting to a Relay Output To make connections on the Alarm Connector Strip Press and hold the button and insert the wire into the hol...

Page 28: ...hold the Setup Power button on the front panel of the DVR log in when prompted and select OK to shut down Note Only authorized users can shut down the DVR Setting the Remote Controller ID When more than one HRDP DVR is installed in the same location you can use one remote controller to control multiple DVRs up to 20 DVRs To control multiple DVRs you must change the remote controller ID to the DVR ...

Page 29: ...onfigure all of the DVR settings schedule recording networking and shutdown Press the SETUP key on the front of the DVR or remote control to enter the setup menus and log in See the Logging In for the First Time section if entering setup for the first time Use the and keys on the front of the DVR or remote control to navigate individual menus and use the and keys to select a new setup menu ...

Page 30: ... settings for an easy and custom recording schedule on the DVR Global Resolution 352 x240 704 240 704 480 Record Mode Continuous Motion Average Days to Record The estimated days of recording determined by resolution IPS Images Per Second Picture Quality and available storage size IPS Per Channel 1 30 Maximum varies with resolution Picture Quality Low Normal High Highest ...

Page 31: ...red for the operation of multiple units using the supplied IR remote control Each system must have a unique ID to function properly Date Format US MM DD YYYY EURO DD MM YYYY ASIA YYYY MM DD User Selectable Date Press ENTER to select the Date and use the number keys and or arrow buttons to set the date Press ENTER again to deselect Time Press ENTER to select the Time and use the number keys and or ...

Page 32: ...les Audible keypad touch confirmation Auto Log Off OFF or 1 10 Minutes This feature will close the Configuration Menu after XX minutes of inactivity This is a security feature S W Upgrade Start firmware upgrade from selected media USB or CD DVD Upgrade Firmware 1 Press SETUP on the front panel or remote control or Click MENU on the hover menu and select SETUP 2 Select SYSTEM SYSTEM CONFIGURATION 3...

Page 33: ... press ENTER select YES to confirm formatting and press ENTER To format a USB device use the arrow keys to select the device and press ENTER Select Format and press ENTER Select YES to to confirm and press ENTER Tip Refer to the list of Approved USB Flash Drives in the Introduction chapter To refresh the list of connected USB devices select RESET and press ENTER Caution All USB devices must be for...

Page 34: ...k Drive is full Enable HDD OVERWRITE to allow the DVR to write over previously recorded data starting with the oldest date when the HDD is full If set to DISABLE the DVR will not record any new data once the HDD becomes full Enable a DISK FULL WARNING for notification when the HDD becomes full and HDD Overwrite is disabled Check Checks the HDD for errors or failure ...

Page 35: ...ABLE S M A R T to ENABLE or DISABLE 2 Set a CHECK INTERVAL between 1 and 24 hours 3 Define a TEMP THRESHOLD and select Celsius or Fahrenheit Note The recommended upper optimum operating temperature for the HDD is between 104F to 122F 40C to 50C 4 Select a S M A R T WARNING to be activated when the HDD reaches the defined threshold 5 Select SAVE and press ENTER to save settings Tip Select HDD INFOR...

Page 36: ...Setup ______________________________________________________________________________________________ 36 User Configuration Use the User Configuration to Add or Delete users ...

Page 37: ...p is made This is a server side feature only PTZ Allow the user control of any connected PTZ cameras HEALTH CHECK Allow the user to use the Health Check function of FVMS to connect to and monitor the DVR NETWORK CONNECTION Allow the user to log in using Web Viewer MENU ACCESS PERMISSION Allow the user to access the selected portion of the setup menu LIVE PLAYBACK Allow the user to view live and re...

Page 38: ... off when shutdown is complete by unplugging the power adapter cord on the back of the DVR Note Improper shut down of the system can cause data loss and system corruption Camera Camera Configuration CH Camera Channels NAME Use the on screen keyboard to enter a camera name user defined HIDDEN ON OFF Note HIDDEN on the CAMERA CONFIGURATION page hides cameras from the main monitor VGA MAIN BNC when n...

Page 39: ...or settings to BRIGHTNESS 0 20 CONTRAST 0 20 COLOR 0 20 DEFAULT Apply default system color settings APPLY ALL Apply current color settings to all cameras PTZ Configuration CH Camera Channels BAUD RATE Sets the port information for the connected camera Consult the documentation provided by the camera manufacturer to obtain this information ID Sets the PTZ ID from 1 255 PROTOCOL Select a PTZ protoco...

Page 40: ...sequencing SPOT Configure the SPOT OUT connection INTERVAL 1 100 seconds Set the sequence interval time POPUP ON OFF When set to ON this function interrupts the sequencing when an event occurs and switches to the event channel CHANNEL SELECT 1 16 ALL Select cameras to include in sequence SEQUENCE Configure the appearance of the sequence on the live view screen MAIN VGA PAGE DWELL TIME 0 100 second...

Page 41: ...TRANSPARENCY SETUP 0 20 Set the transparency of the setup windows VGA RESOLUTION Set monitor resolution FIT IN VGA Adjusts the display to display properly on a VGA monitor When the FIT IN VGA check box is cleared the display is adjusted to display on a monitor connected to the MAIN BNC output OSD Select the items to display on the screen DATE TIME TITLE PTZ RECORD AUDIO ...

Page 42: ... or sensor event occurs INTENSIVE RECORDING automatically increases the recording rate to the maximum IPS that is available based on your current recording configuration frame rate up to 30 IPS per channel If events occur on multiple channels with intensive recording enabled the available IPS is evenly distributed across those channels PREALARM 0 5 seconds Pre Alarm Recording POSTALARM 0 30 second...

Page 43: ...ck hour block or the day of the week to set the entire day NO RECORDING No Color No recording Even if you set recording frames and select ON in RECORD CAMERA the DVR will not record anything if you set OFF in RECORD SCHEDULE CONTINUOUS Yellow CONTINUOUS recording MOTION Green MOTION detection recording In this mode the DVR records only when motion is detected in the motion area and stops recording...

Page 44: ... area The DVR also will log a Motion Event and send the event to the Remote Monitoring software If you set motion to OFF in RECORD MOTION EVENT CONFGURATION and set CONT MOT in SETUP RECORD SCHEDULE the DVR will NOTrecord when motion is detected CONT SENS Brown CONTINUOUS SENSOR activated recording In this mode the DVR records continuously and switches to SENSOR recording mode when a sensor is tri...

Page 45: ...dule in the H DAY row 4 Select HOLIDAY SETUP 5 Select DATE and set the date using the on screen calendar 6 Type a description in the box next to the DATE box using the on screen keyboard 7 Select ADD to add the holiday Instant Recording The DVR remote controller has an Instant Recording button Press the REC INSTANT button to start recording all the channels at the recording rate configured in Inst...

Page 46: ... affects file size SIZE Set the resolution of the video image Using Instant Recording To activate Instant Recording on the DVR Press the REC key on the front panel of the DVR or remote control or click the Instant recording button on the mouse over OSD menu The I REC recording icon will appear in the lower right corner of the screen To cancel Instant Recording on the DVR Press the REC key on the f...

Page 47: ...tion and Alarm Monitor When an event comes in Input the DVR records the image according to its settings Camera Configuration and triggers an alarm Action Input CH Channels 1 8 Channels 9 16 MOTION ON OFF Specify whether to use motion input or not SENSITIVITY 1 10 1 least sensitive 10 most sensitive AREA Define the motion detection area SENSOR Associate a sensor with the camera channel VIDEO LOSS T...

Page 48: ...Select AREA and press ENTER to set a motion area global setting each channel can be configured individually 5 Use the mouse to select or clear squares on the grid a Right click and select CHANNEL SELECT b Click the squares to include in the motion grid c Right click again and select SAVE to save the selected motion grid 6 When finished selecting motion areas press ENTER on the front of the DVR or ...

Page 49: ...ss ENTER to save settings Alarm Setup 1 Use the arrow buttons to select Alarm1 and press ENTER to turn the SIGNAL to OFF or ON 2 Set each Alarm to N O Normally Open or N C Normally Closed 3 Repeat for all relays 4 Select SAVE and press ENTER to save settings Power Off The POWER OFF option is a preset function that triggers an alarm relay when the DVR loses power This function is preconfigured to s...

Page 50: ...arm relay will open When the temperature is at a safe level again the alarm will close Note SET and CLEAR are used to test the alarm relay operation SET is used to manually activate all relays that are set to ON CLEAR is used to manually deactivate all relays Action CH Channels 1 8 Channels 9 16 Alarm OFF 1 4 Associate an alarm relay with a channel Delay 0 100 Seconds Delay time before relay activ...

Page 51: ...oftware 1 Select SEND TO ALARM MONITOR and press ENTER to select ON 2 Select the types of events to send to the Emergency Agent MOTION SENSOR MOTION SENSOR 3 Enter the IP ADDRESS of the remote client 4 Enter the PORT number Note The port number selected is the port that Alarm Monitor uses on the remote PC The port shown in this screen must match the port shown in Alarm Monitor or HFVMS and the por...

Page 52: ... CONFIGURATION Set up the connection ports and Max transfer speed for remote connections CENTER PORT The HRDP uses the Center port and the primary communication port to create remote connections This port must be the same as the port setting on the remote PC VIDEO PORT The HRDP uses multiple ports to create remote connections the remote port is user defined default 4000 and a secondary port is aut...

Page 53: ...ount of data the DVR sends across the network at a time DDNS DDNS Dynamic Domain Name Service is a service that allows a connection to an IP address using a hostname URL address instead of a numeric IP address Most Internet Service Providers use Dynamic IP Addressing that frequently changes the public IP address of your internet connection this means that remote connections through HFVMS and HRDP ...

Page 54: ..._________________________________________________________________ 54 Serial Configuration Configure connected serial devices TYPE None External Controller MODEL Select appropriate model Port Information BAUD RATE DATA BIT PARITY STOP BIT ...

Page 55: ...igger an e mail notification MOTION After a motion alarm is triggered SENSOR After a sensor alarm is triggered VIDEO LOSS After video loss on a camera POWER When the DVR is shutdown and restarted SETUP When a user accesses Setup LOG IN When a user logs in LOGIN FAIL After three failed login attempts DISK FULL When the HDD reaches the user defined maximum disk full percentage See DISK MANAGEMENT OV...

Page 56: ...__________ 56 Information System Log View Displays system log information System Log View displays the recent activity of all users on the DVR You can export and save the System Log to review user activity Version View Displays system information and software version information for the DVR ...

Page 57: ...DP DVR User Guide ______________________________________________________________________________________________ Document 800 06801 Rev D 57 02 11 Status View Displays status screens for Disk Record Audio ...

Page 58: ..._________________________ 58 Sensor Network Event DISK RECORD AUDIO SENSOR NETWORK EVENT STATUS EVENT EXIT CH 1 2 3 4 5 6 7 8 CH9 CH16 MOTION ON ON ON ON ON ON ON ON SENSOR OFF OFF OFF OFF OFF OFF OFF OFF VIDEO LOSS OFF OFF OFF OFF OFF OFF OFF OFF ALARM ON ON ON ON ON ON ON ON ...

Page 59: ...tion Login The LOG IN window will display on the monitor until a user logs in with the correct ID password Tip To prevent unauthorized changes to the system settings the administrator should change the default administrator password and create a User account Default Administrator Log In The default administrator account login is USER admin PASSWORD blank ...

Page 60: ...cted by pressing corresponding number key on the DVR front panel The images can be seen in real time in the configuration of 1 4 9 16 channels and PiP screen To toggle through the viewing options press LIVE on the DVR To select a channel using a mouse double click the video image To return to a previous screen mode after selecting a viewing channel double click again ...

Page 61: ...CH screen Continuous Recording Motion Detection Recording Sensor Activated Recording Continuous Motion Alarm Recording Continuous Sensor Activated Recording Motion Detection Sensor Activated Recording Emergency Recording Sensor Activated Motion Detected PTZ Camera Audio Channel Right bottom corner on full screen No HDD Smart Alarm HDD Failure Using Emergency Recording Using PTZ Warning when exceed...

Page 62: ...p PTZ Mode Click to enter PTZ mode In PTZ mode you can pan tilt and zoom by moving the mouse pointer referred to as a virtual joystick Quick Search Click to automatically play back the most recent video clip Dock Tool Menu Click to dock the Tool menu at the bottom of the screen If the Tool menu is not docked it will be shown only when the you places the mouse pointer in the lower portion of the sc...

Page 63: ...ALL Pause all channels displayed on screen SHOW MOTION AREA Display the motion grid for the selected camera DISPLAY PIP Change screen display to PIP AUDIO Select an audio channel to play live LOGOFF Select to log out the active user SEARCH Open the Search Menu PTZ Switch to PTZ mode MENU Open the Setup Menu No Signal If no camera is connected to a channel NO SIGNAL is shown on the display screen W...

Page 64: ...Note Full PTZ functions are available using the front panel buttons a mouse the IR remote control or a keyboard controller PTZ Popup Menu Right click the desired camera to open the PTZ Popup menu while in PTZ mode Arrow Buttons Move Camera M Open camera s on screen display menu dependant on camera model support see your camera s manual for information ZOOM Zoom in out on PTZ camera Enabled by defa...

Page 65: ...Popup menu while in PTZ mode 2 Select a PTZ Preset ID number 3 Select MOVE under PRESET to move the camera to the desired position 4 Select SET to save the preset position Search Searching Recorded Data Search recorded video on the DVR to find a specific time or event 1 Press the SEARCH key on the front of the DVR or the remote control to enter Search Mode 2 Select TARGET media HDD DVD RW USB 3 Se...

Page 66: ...cording to the recording method selected Yellow Continuous recording Green Motion detection recording Orange Sensor activated recording Sky Blue Continuous Motion detection recording Dark orange Continuous Sensor activated recording Pink Motion detection Sensor activated recording Red Instant Recording Dark Blue Data recorded during DST Daylight Saving Time Quick Backup in Search Mode You can easi...

Page 67: ...up down arrows to change between hours and minutes view Tip Dates with an asterisk contain recorded video data Jump to First Saved Data Go to the first frame of the recorded data This is the oldest image recorded Jump to Last Saved Data Go to the last frame of the recorded image This is the latest image recorded Event Search Use the Event Search to find particular events The 11 most recent events ...

Page 68: ...repeated If any overlapped time data exists the system will display the times on this page Search Popup Menu Use to access display options in Search Mode Right click the desired channel to open the Search Popup Menu TIME SELECTION Change the Date Time to search AUDIO ON ON OFF SAVE JPEG Save a JPEG still image of the current frame Note SAVE JPEG is only available when a single camera is selected T...

Page 69: ...o configure a data backup 1 Press BACKUP on the front panel or remote control or Click MENU on the hover menu and select BACKUP 2 Connect a USB device or insert a CD DVD Note The DVR supports DVD R and DVD R DVD RW RW may not operate correctly 3 Select SCAN to locate the device Caution If you are using a new USB device to back up your data you must format it first as FAT32 4 Select the desired CAM...

Page 70: ...up file 1 Insert the backup file media in a computer 2 Double click the Export Viewer program to open 3 Open the desired backup file saved by date 4 Use the controls on the Export Viewer screen to playback zoom print or save an image 5 Right click the playback screen to select additional options including Audio Play Deinterlace Digital Zoom Save and Print Deinterlacing De interlacing is often requ...

Page 71: ...__________________________________ Document 800 06801 Rev D 71 02 11 Using the Backup Viewer Play recorded video on a PC using Backup Viewer the proprietary media player included with every backup file Controlling Backup Viewer Pause Back Play Forward Play Previous Frame Next Frame ...

Page 72: ...e the AVI start time the AVI end time and to include audio data if desired and press OK ZOOM Select this button to turn your cursor into a magnifying glass and click the desired camera image to zoom in EXPORT JPEG To save a JPEG Click this button enter the desired Digital Signature and click OK then browse to the desired save location PRINT Opens the print window on your computer Upgrade Firmware ...

Page 73: ... in groups such as two by two three by three and four by four The button options are shown below Single Channel View Displays one camera channel To return to a different Multi Camera View select a different Screen Division button Four Channel View Displays cameras 1 4 in the Video Display Area Click the button again to rotate to cameras 5 8 9 12 etc To return to a different Multi Camera View selec...

Page 74: ... empty PROFILE and define a name for the settings configuration To save settings to a USB device select EXPORT 4 Select SAVE and confirm to continue the export process Import Settings 1 Press the SETUP key on the front of the DVR or remote control 2 Select SYSTEM CONFIGURATION and log in 3 Select a previously saved PROFILE and select LOAD To import a profile saved on a USB device select IMPORT 4 S...

Page 75: ...ccess the DVR remotely using software installed on a personal computer Minimum System Requirements Windows XP Vista or 7 Operating System Intel Dual Core Processor 1GB RAM 256 MB NVIDIA or ATI Video Card DirectX 9 or higher 256k Network Connection 32 bit color 1280x1024 Resolution Recommended System Requirements Windows XP Vista or 7 Operating System Intel Core 2 Duo 2 8 GHz processor 2GB RAM Dire...

Page 76: ...e DVR does not display the IP Address after setting DHCP to ON Select Save to change the network and open Network Configuration again 7 Select SAVE to save current settings Creating a DVR Connection with Remote Software 1 Install the Remote Software on a PC using the disc provided with your DVR 2 Open the Remote Software The Local Setup window will open automatically 3 Click New 4 Select HRDP H 26...

Page 77: ...name and password of an authorized user as defined in the SYSTEM USER CONFIGURATION menu on the DVR Note User Name and Password are both case sensitive 4 Click Connect Connecting Multiple DVRs Connect up to four HRDP DVRs to the Remote Software to easily switch between DVRs 1 Configure all DVR connections as described above in Configuring a Remote PC 2 After connecting to the first DVR click CONNE...

Page 78: ...e View screen and selecting Restart in Windows Mode 2 Open Windows Explorer Do this by right clicking the My Computer Icon located on the top left hand corner of the Desktop and select Explore 3 Click Control Panel to open it If you do not see Control Panel listed click My Computer to expand the folder tree 4 Double click Date and Time inside Control Panel 5 Adjust the Date and Time 6 When finishe...

Page 79: ...estarted the program defaults to the Live View screen The following diagram outlines the buttons and features used on the Live View screen It is important to be familiar with these options as this is the screen displayed the majority of the time Camera Display Buttons Current Date Time Displays Connected Users Status of Activates Control Outputs Status of Activates Alarm Sensors Menu Buttons ...

Page 80: ...display area Recording Status Indicator The following are the different states for each camera Recording Displayed when the camera is currently being recorded to the DVR Motion Detection Displayed when a camera set up for motion detection detects motion Display Displayed when the video from the camera is currently not being recorded to the DVR Camera No and Name Current Recording Status Special Re...

Page 81: ...as 13 16 in the Video Display Area To return to a different Multi Camera View select a different Screen Division option from the Screen Division Menu 16 Camera View Displays cameras 1 16 in the Video Display Area To return to a different Multi Camera View select a different Screen Division option from the Screen Division Menu Full Screen The Full Screen Option allows you to view the Video Display ...

Page 82: ..._____________________________________________________________________________ 82 Search Overview Screen Division Buttons Search Options Play Controls Actual Date Time Search Date Time Hour Minute Control Calendar Button Select Cameras ...

Page 83: ...ayed forwards backwards or frame by frame Adjust the Brightness of an Image 1 Pause the video and select an image to adjust by double clicking the desired image Multiple images cannot be adjusted at one time 2 Move the Bright slide bar to the right or left to adjust the brightness 3 Reset the Brightness by moving the slider back to the center of the bar Zooming in on an Image 1 Pause the video and...

Page 84: ...tion 4 Click the Print button to print the selected images Note The message NO DEFAULT PRINTERS INSTALLED will display if no printer is installed Save Clip The DVR can export single images in the JPG file format save video clips in the AVI format or output to a VCR using the s video port The JPG and AVI file formats are extremely common with universal computer support making them ideal formats to ...

Page 85: ...des different levels of quality compatibility and file size c Enter the duration seconds to record Although 50 is the longest time displayed a longer recording may be entered manually d Select Quality 50 100 When size is not an issue set quality to 100 JPEG File a Select Mark Digital Signature 4 Click Next 5 Define the file name in the Export Name box 6 Define the location to save the file by usin...

Page 86: ...ate hours with recorded video Performing a Status Search 1 In Search mode click Status 2 Click the Date button to open the calendar and select a date 3 Click along the orange recorded video block to select a desired camera or time frame 4 After locating the desired video close the Status Search window and use the playback controls to play forward reverse or frame by frame Cameras 24 Hours 0 23 AM ...

Page 87: ...l PTZ Onscreen Menu Since every PTZ camera is different the functions of these options can vary slightly The DVR provides an easy way to access the cameras options For explanations of what those options are please refer to the manual that came with the camera Note Use the arrow buttons on the PTZ controller move through the PTZ Menu options and or highlight options Controlling a PTZ Camera The fir...

Page 88: ...Arrow buttons to control the direction of the PTZ camera To select a new camera click the video display of a different camera on the Live View screen Note Eight directions are available only for select protocols Only four of the PTZ Control buttons work for all protocols UP DOWN LEFT RIGHT Activate Corresponding Preset Position Current Camera Arrow Buttons ...

Page 89: ...02 11 Using the On screen Compass 1 Click PAN TILT on the Live View screen 2 Control the PTZ by dragging the mouse on the screen in the desired direction 3 A green line will appear to show the direction the PTZ will move The shorter the line the less the PTZ will move The longer the line the more the PTZ will travel in the specified direction ...

Page 90: ...ddition each user can be assigned different privileges that allow or deny access to different functions Search Open the Search screen PAN TILT Open the PTZ controller Export Image Save JPG file of selected image Print Print selected image on connected printer Connect Connect to a DVR Frame Adjust the frames per second playback Bright Adjust the brightness of the connected cameras Contrast Adjust t...

Page 91: ... Yes Note If you receive a message saying Internet Explorer security settings do not allow you to download Active X components then you will need to adjust the browser security settings Add the IP address of the DVR to the trusted sites list inside Internet Explorer settings Contact the System administrator for additional help with adjusting Internet Explorer settings 4 Type the User ID and Passwo...

Page 92: ...arch 1 In Search mode click Status 2 Click Select Date to open the calendar and select a date 3 Click along the orange recorded video block to select a desired camera or time frame 4 After locating the desired video close the Status Search window and use the playback controls to play forward reverse or frame by frame Clean Image The DVR can record video using one of three different resolutions Whe...

Page 93: ...mats which make them the most ideal formats to use JPEG Optimized for compressing full color or grayscale photographic images JPEG images are 24 bit 16 7 million color graphics Use JPEG to export a single image or frame AVI AVI image data can be stored uncompressed but it is typically compressed using a Windows supplied or third party compression and decompression module called a codec AVI is used...

Page 94: ...Remote Software ______________________________________________________________________________________________ 94 without exporting file ...

Page 95: ...y double clicking an alarm entry the search window will open with the associated DVR camera and time related to the event already selected Note If all Alarm Event results are not visible click Off to turn the Filter Options off Assign Status Settings 1 Select an Alarm Event from the list 2 Right click the event and select a status level Default Review Dismiss Critical 3 Select a defined Alarm Conf...

Page 96: ...t setting Note The Alarm Monitor uses one port to transfer the data through The port can be adjusted inside the Network settings if necessary It is recommended that the default setting should be used unless the port must be changed 7 Create a schedule for the appropriate sensors and cameras Set up Alarm Monitor Options 1 From the Option menu click Setup 2 Enter the Network Port number This port is...

Page 97: ...irm List will be available on a list under Status Setting in the Alarm Monitor window 2 Click Add 3 Click OK to save changes and close the window Filter Alarm Events 1 Select one or more Status Level buttons 2 Select a date 3 Select a DVR from the Server list 4 Select the type of alarm event or select All Events 5 Select Normal or Emergency Alarm or select All Alarms 6 Select a Confirmed type 7 Se...

Page 98: ...m window 2 Use the play controls to locate the desired video frame 3 Select the Continue Playing check box to watch all recorded events When not selected playback stops at the end of the alarm event 4 Select the Same Camera check box to watch all events recorded by a single camera 5 Click Apply after making any changes Play controls Video display Alarm event information Go to next event Go to prev...

Page 99: ...he video 4 Click the stop button 5 Select the Export Type JPG or AVI Save JPG a Select the Digital Signature Text check box to print the digital signature on the JPG file and click Next b Click Save As to define the save location and click Next c Click Start to save the image Save AVI a Select a CODEC from the list and the number of frames to include in the AVI file Reduce Export Quality only if n...

Page 100: ... program can be installed on any Windows XP or Windows Vista computer Using the Digital Verifier 1 Open the Digital Verification program by selecting Start Programs HRDP Digital Verifier Digital Signature Verifier 2 Click the Browse button to load the JPG image 3 Enter the Site Code of the DVR that the image was originally extracted from The Site Code is specified in the System Configuration Menu ...

Page 101: ...ptional accessory for HRDP FVMS software is Multi Site Management Software a powerful utility that allows 100 or more DVRs to be controlled using one computer This software allows you to view live video search saved video edit and configure setup on each DVR and import maps of buildings and other locations 1 Configure the DVR for remote access as shown above in Set up a Remote Connection 2 Follow ...

Page 102: ...Button Index LED Status Indicators Power Illuminates when power is supplied to the DVR HDD Flashes when the hard drive is being accessed Record Flashes when live video is recording Network Illuminates when the DVR is connected to a network HDD Temp Illuminates when HDD temperature increases beyond the acceptable range ...

Page 103: ...ress a third time to complete Backup Zoom In PTZ mode press to use PTZ Zoom function Use the buttons to adjust Rotate Rotate through to the remaining channels in the current display mode or rotate the display configuration Preset In PTZ mode press to use the Preset function Key Log out the current user Use to prevent accidental or unauthorized system wide changes Iris In PTZ mode press to use the ...

Page 104: ...earch Pause Frame back I Frame Only Live Start playback of the latest recordings By default the system searches recordings in the past 30 secs If no recording is archived the system will play back the latest one PTZ Adjust zoom focus and iris on a PTZ channel Search Start playback of recordings Press successively to change the fast forward speed Search Pause Frame Forward Navigation Move up PTZ Mo...

Page 105: ...arch Pause playback channels Search Pause Resume playback DVR FAQ General Q What does Embedded Linux mean A Embedded Linux means that the operating system of the DVR has been imprinted into the CPU Central Processing Unit This means that the system response time is faster more stable and that the core of the DVR is protected against external factors such as virus Q Is the DVR upgradeable by CD or ...

Page 106: ...For more information on this topic see the Search section of this manual Q Is it possible to back up recorded video A Yes for more information on this topic see the Backup section of this manual Backup Q Is it possible to back up to DVD media A Yes you have DVD RW installed in your DVR Q Can I back up to a USB memory stick A Yes for more information on this topic view the Backup section of this ma...

Page 107: ...connections Check power at the outlet No Live Video Check camera video cable and connections Check monitor video cable and connections Check camera power Check camera lens setting Live Video Too Bright If a cable is attached to the video channels looping output make sure that it is properly terminated DVR has stopped recording The HDD is full delete video or set the DVR Overwrite Mode to On in Dis...

Page 108: ...x240 4CIF 704x480 PAL CIF 352x288 2CIF 704x288 4CIF 704x576 Compression H 264 Mode Motion detection Sensor Schedule Variable compression rates recording frame motion sensitivity Recording Storage media Internal 2 x HDD Option USB Audio 4 Channel G 726 Compression Playback Mode Multi channel playback Max 16ch Simultaneous playback Searching By Channel Time Date Motion Detection Sensor Events Remote...

Page 109: ...lution NTSC CIF 352x240 2CIF 704x240 4CIF 704x480 PAL CIF 352x288 2CIF 704x288 4CIF 704x576 Compression H 264 Mode Motion detection Sensor Schedule Variable compression rates recording frame motion sensitivity Recording Storage media Internal 2 x HDD Option USB Audio 4 Channel G 726 Compression Playback Mode Multi channel playback Max 16ch Simultaneous playback Searching By Channel Time Date Motio...

Page 110: ...Yi Road Shanghai 200051 China www asia security honeywell com 86 21 5257 4568 Honeywell Systems Group Italia SpA Via della Resistenza 53 59 20090 Buccinasco Milan Italy www honeywell com security it 39 02 4888 051 Honeywell Security Middle East N Africa Post Office Box 18530 LOB Building 08 Office 199 Jebel Ali Dubai United Arab Emirates www honeywell com security me 971 04 881 5506 Honeywell Secu...

Reviews: