


TrueSTEAM
TM
?
TrueSTEAM Humidification System 69-2285—01
GETTING
ST
AR
TED
MOUNTING
PLUMBING
WIRING
APPENDICES
OPERA
TION
AND SER
VICE
1
NEED HELP? For assistance with this product please visit http://yourhome.honeywell.com
or call Honeywell Customer Care toll-free at 1-800-468-1502.
Read and save these instructions.
® U.S. Registered Trademark. Patents pending. Copyright © 2009 Honeywell International Inc. All rights reserved.
Critical Installation Information ................................2
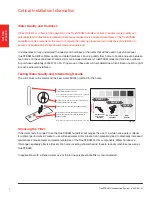
Water Quality and Hardness ...............................................2
Testing Water Quality and Interperting Results ....................2
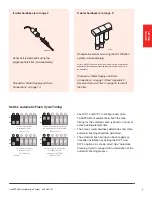
Choosing the Filter ...............................................................2
Set the Automatic Flush Cycle Timing .................................3
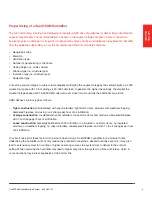
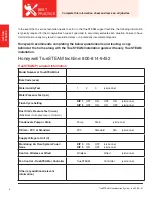
Proper Sizing of a TrueSTEAM Humidifier
..........................5
TrueSTEAM Pre-Install Information .....................................6
Safety Definitions and Precautions
..........................7
Safety Definitions
.................................................................7
Safety Precautions ...............................................................7
Setting Homeowner Expectations ............................8
Important Installation Requirements
........................9
Personal Safety ..................................................................9
Mounting Location ..............................................................9
Duct Nozzle ........................................................................9
Water Drainage ...................................................................9
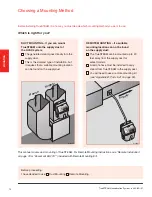
Choosing a Mounting Method
.................................10
Which is right for you? .......................................................10
Duct Mounting
..........................................................11
STEP ONE: Select a Mounting Location ...........................11
STEP TWO: Connect the Duct Nozzle ..............................11
STEP THREE: Install Mounting Bracket to the Duct ..........12
STEP FOUR: Install TrueSTEAM onto the
Mounting Bracket ...............................................................12
Water Supply and Drain Connections
....................13
STEP ONE: Connect the Cold Water Supply ....................13
STEP TWO: Tap into a Water Line ....................................13
STEP THREE: Connect TrueSTEAM to the
Cold Water Pipe .................................................................14
STEP FOUR: Connect to the Water Drain .........................14
Other Plumbing Options
..........................................15
For All Options Shown: ......................................................15
Connect to TrueSTEAM .....................................................15
Remote Installation ..................................................18
Proper Hose Installation
..........................................20
Reverse Osmosis Filter ...........................................23
Parts of the RO Filter .........................................................23
Setting up the RO Filter ....................................................24
Maintaining the RO Filter ..................................................25
Before Wiring TrueSTEAM
.......................................26
Using the DIP Switches .....................................................26
STEP ONE: Remove the TrueSTEAM Cover ....................26
STEP TWO: Understand the DIP Switches .......................26
Deciding on the Wiring Configuration
....................28
STEP ONE: Make Power Monitoring Decision ..................28
STEP TWO: Make System Fan Regulation Decision ........30
STEP THREE: Make Add-On Air Proving Decision ...........32
Using the Terminals ...........................................................33
Routing the Wires ..............................................................33
Using the Correct Control Diagram ........................34
Startup and Checkout
..............................................45
Routine Maintenance
...............................................46
Automatic Cleaning Cycle ..................................................46
STEP ONE: Initiate a Flush Cycle .....................................46
STEP TWO: Remove the Water Tank ................................48
STEP THREE: Clean the Tank ..........................................49
STEP FOUR: Replace the Water Level Sensor .................49
Changing the Water Filter ..................................................50
Water Level Sensor Troubleshooting Steps
..........51
Test Setup ..........................................................................51
Test Pins ............................................................................51
Testing for Shorts ...............................................................51
Good Water Sensor ...........................................................51
Bad Water Sensor ..............................................................51
STEP FIVE: Reinstall the Tank .........................................52
Troubleshooting
.......................................................53
A: Specifications
......................................................58
B: Parts List
..............................................................59


