background image

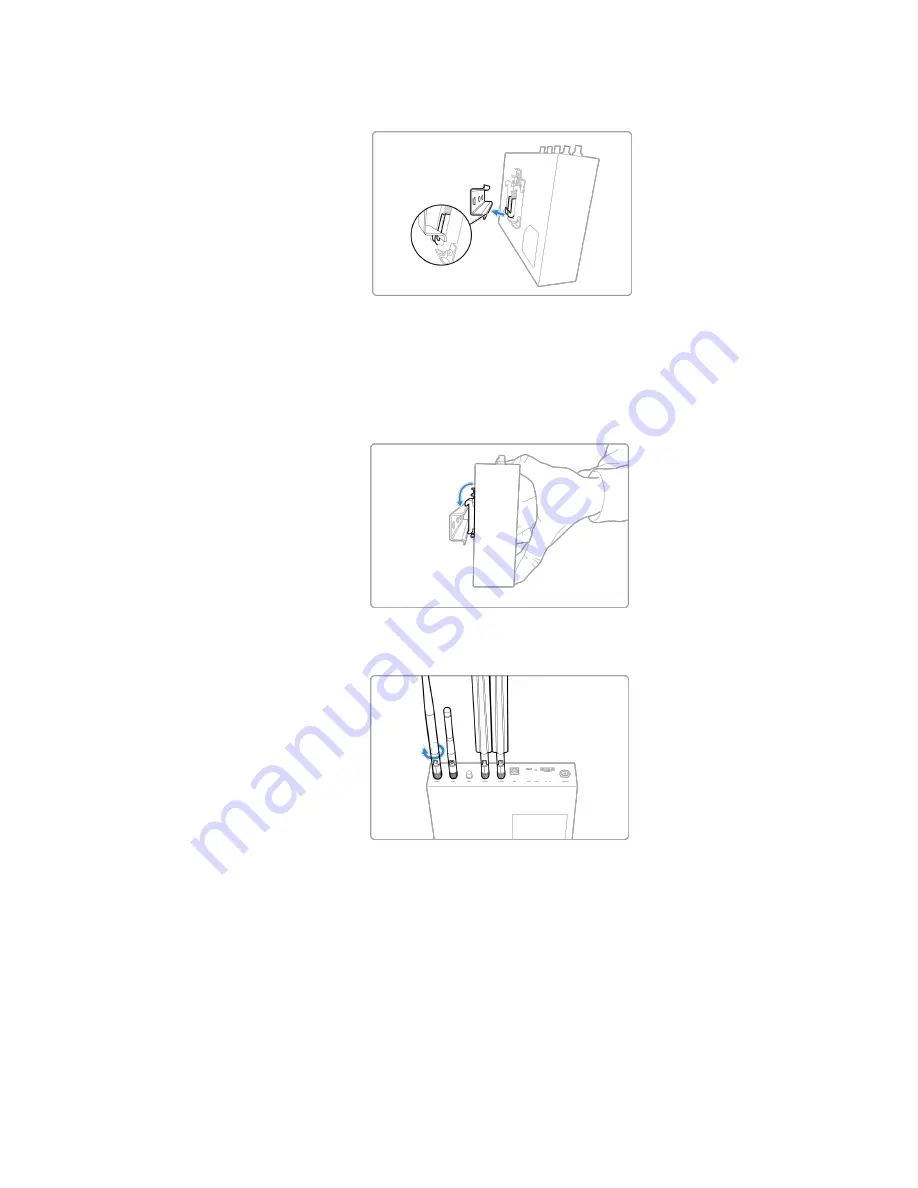
8.

Hook the lower edge of the DIN rail under the buckle.

9.

Pull the device up and let the hook above the buckle hook the upper edge of the DIN rail.
Use a pair of slotted TS35 DIN rails (35mm high x 7.5mm deep) cut to slightly longer
than the length of the assembled system, and attach to a strong wall or other rigid
surface using low-profile screws.

10.

Install the antenna and fix it on the connector.

HCH

15

User Manual

Summary of Contents for CENTRAL HUB

Page 1: ...HONEYWELL CENTRAL HUB Wireless Gas Monitor Connector ...

Page 2: ......

Page 3: ...ures 5 Specifications 6 Appearance 8 Indicator Lights 9 Installation 11 Dimensions 11 Mounting the Device 12 SIM Card and DIN Rail installation Method 13 Operation 17 Hardware Wiring 17 Software 17 Connecting a Gas Detector to Honeywell Central Hub 33 Maintenance and Precautions 35 Configuration Tool Accessories 36 Contact Us 37 HCH 2 User Manual ...

Page 4: ......

Page 5: ...consumption conditions realizing the unity of low power consumption and long distance LTE Long Term Evolution is the long term evolution of the UMTS Universal Mobile Telecommunications System technical standard developed by the 3GPP The 3rd Generation Partnership Project organization NFC Near Field Communication NFC for short is an emerging technology Devices using NFC technology such as mobile ph...

Page 6: ...LTE WiFi WAN Support GPS positioning and regularly report device location information to the platform Support remote upgrading of device software versions through the platform Support storage expansion external TF card users can save data logs and support data log export Support multi channel LoRa instrument sensor and other equipment access Rich uplink interface support LTE WAN Wi Fi backhaul Mul...

Page 7: ... standard end device l RTR work as a Router can bypass end device data Ethernet 10 100M adaptive Central Hub setting WAN 4G LTE LTE FDD CAT 4 Mini PCIE interface GPS Reserved Wi Fi IEEE 802 11n 2 4 GHz BLE Wi Fi combine module Bluetooth BLE 5 0 HW reserved BLE Wi Fi combine module Storage Micro SD card 32GB memory For local datalog USB connector USB Type C backup Power input Reserved for vehicle a...

Page 8: ...0 indoor no hazardous area only Size Weight 194 131 44 5 mm 950g device 1 7kg with package Certification RE D for EU FCC IC for NA Mobile Network Operator Approvals for cellular module Safety UL EN60950 1 for AC adaptor Environmental RoHS HCH 7 User Manual ...

Page 9: ... 7 LTE D 4G LTE Module Antenna Port 2 Reset Button 8 LTE M 4G LTE Module Antenna Port 3 Power Input Port 9 Wi Fi Antenna Port 4 OTG USB C 10 LoRa or Mesh Antenna Port 5 LAN Ethernet Port 11 Status Indication Lights 6 GNSS Antenna Port HCH 8 User Manual ...

Page 10: ...the LORA MESH module normally Green light off Device failed to initialize LORA MESH Flashing green With LORA MESH instrument sensor access WAN Green light off The device Wi Fi is not turned on or cannot access the AP hotspot Steady green The device Wi Fi has been connected to the AP hotspot and the communication with the internet network is normal but it is not connected to the Honeywell Cloud pla...

Page 11: ...een connected to the LTE network but not connected to the Honeywell Cloud platform Flashing green The device has been connected to the Honeywell Cloud platform Fault RF LAN Wi Fi LTE 5 lights all steady ON Long push RST button 5s factory reset 5 lights all flashing The device software is updating LAN Wi Fi LTE 3 lights all flashing 10s When the device powers on initialization finished device ready...

Page 12: ...CHAPTER 4 Installation Dimensions Size 193mm length 129mm width 45mm height HCH 11 User Manual ...

Page 13: ...uired 3 Install the antennas o There are LoRa LTE Wi Fi antennas inside the box o Find the LoRa antenna marked LORA and connect it to the RF connector on the instrument o Connect LTE marked antenna to LTE M connector and WIFI marked antenna to WiFi connector 4 Connect the power adapter to the V V connector and screw tightly HCH 12 User Manual ...

Page 14: ... 1 Take out the device and open the small SIM card cover on the back 2 Open the small cover of the SIM card at the back 3 Look for the location of the SIM card gap and insert the SIM card Activated Nano SIM card can be adapted to Standard size to fit into SIM card gap HCH 13 User Manual ...

Page 15: ...tightly 5 Put on the SIM cover and tighten the two screws pay attention to the front and back of the cover plate 6 Remove the 6 countersunk head screws 7 Replace with countersunk head screws to fix the DIN buckle Be mindful of the direction Do not overtighten HCH 14 User Manual ...

Page 16: ...kle hook the upper edge of the DIN rail Use a pair of slotted TS35 DIN rails 35mm high x 7 5mm deep cut to slightly longer than the length of the assembled system and attach to a strong wall or other rigid surface using low profile screws 10 Install the antenna and fix it on the connector HCH 15 User Manual ...

Page 17: ...11 Install the power adapter 12 Lock the screws tightly to avoid loosening HCH 16 User Manual ...

Page 18: ...e Software Device Webpage Login 1 Computer Configuration The computer s local network card automatically obtains an IP address by default no configuration is required 2 Ordinary user login Login URL https 169 254 100 1 The default user name of ordinary users hch300admin Default password for ordinary users Hon123 HCH 17 User Manual ...

Page 19: ...HCH 18 User Manual ...

Page 20: ...elect the Uplink Setting as LTE and click the SAVE button to save the configuration The three items for APN Access Point Name APN Config APN User and APN Password are optional Ordinary SIM cards do not need to be configured for Internet access by default but some IoT cards need to configure APN parameters and the user name and password for authentication After configuration click SAVE to save the ...

Page 21: ... The WAN upstream can be configured to dynamically obtain an IP address by DHCP or manually configure a static IP address to access the Internet If configuring a Static IP address please contact contact your IT Department for assistance Note IP address shown below only as an example HCH 20 User Manual ...

Page 22: ...ts are covered you can use Wi Fi to access the Internet You need to fill in the SSID name and Wi Fi password information and then click SAVE to save the configuration NOTE The WiFi SSID Password allow to input max 64 characters length HCH 21 User Manual ...

Page 23: ...e administrator 3 In the list click the Site for which the Central Gateway will be downloaded If there is no site first create one with the Add option to the right 4 In the Site screen click the Information tab 5 Click the Add button to the right and select Central Hub 6 Click Download now or Email Download Link 7 Download activation file Log in to the Honeywell Cloud server to download the activa...

Page 24: ... be activated only after the device is connected to the network See Uplink Connection Configuration on page 19 for more information 9 Log into the setup gateway page to activate 10 Set device name Give the device a unique name and click the Save button to save the configuration HCH 23 User Manual ...

Page 25: ...load as fakepathsetup config NOTE For user who use WAN mode uplink HCH to Safety Suite to activate the device follow the process below l Record the HCH300 device MAC address on status first page l Disconnect HCH from computer network port connection and Connect device network cable to Router LAN port Router will assign new IP address for the HCH device l Visit your Router management web page and r...

Page 26: ... with the same first 6 digits on their IP address Go to step 3 above and login to the device setup page on computer using the new IP address of the HCH See below Continue step 4 and 5 to finish activating process Note IP address shown below only as an example HCH 25 User Manual ...

Page 27: ...tion 2 RF parameter configuration Open the menu Configurations and then click on the RF Configuration page Fill in the PANID value select the Channel information and click the SAVE button to save the configuration The RF Settings item displays Active to indicate that the setting is effective HCH 26 User Manual ...

Page 28: ... configuration Location name can be set by the user to record the location name The PreSharedSecret description is for some encryption products like BW RigRat You need to keep the same PreSharedSecret as the settings as in BW RigRat if it enables this encryption Diagnostic Information Open the menu Device Information to view the related information of connected instruments and sensors HCH 27 User ...

Page 29: ...port button to export the Log data package The data package is a tar package which needs to be unzipped first The latter is a csv file Note The TF card must be inserted before the equipment is installed and used and the data export function can be used only when the TF card is inserted in the equipment HCH 28 User Manual ...

Page 30: ...click the Upgrade Version button to upgrade the device version The upgrade process takes about 3 minutes 2 Version check After the upgrade is complete log in to the web page again and open the menu by clicking on the Honeywell name on the top left of the screen to check whether the current running version is the target version to be upgraded HCH 29 User Manual ...

Page 31: ...inary users log in to the web page and open the Settings menu and click on User Manage page to enter a new user name and password the password must be entered twice and the password must be the same and click SAVE to save the configuration HCH 30 User Manual ...

Page 32: ...ration to the factory configuration System Status View Click on the Honeywell logo to open the System Status page Here you can view the system status such as product model product serial number software version hardware version running time current system running time memory rate GPS positioning information TF Card information etc HCH 31 User Manual ...

Page 33: ... network status currently connected operator information signal strength LTE module IMEI number SIM card IMSI number obtained IP address and Secondary DNS Status shows Connected and the IP Address item shows that the IP address has been obtained indicating that the device is connected to the Internet HCH 32 User Manual ...

Page 34: ...s 1 Turn on the Honeywell Central Hub 2 Connect the HCH and laptop or PC by a network cable 3 Open Microsoft Edge browser and input the login URL user name and password on product label Login https 169 254 100 1 User Name hch300admin Password Hon123 4 Set PAN ID and Channel on HCH on the tab RF Configuration HCH 33 User Manual ...

Page 35: ... and channel You can find the gas detectors on the tab Device Information 6 Use one of the three available uplink approaches Ethernet Wi Fi or LTE if you want to connect to Honeywell Safety Suite See User Manual for more information HCH 34 User Manual ...

Page 36: ...pact which may damage the internal structure l The power supply voltage is controlled within the required range of the manual to prevent the equipment from burning out l The equipment needs to prevent water from entering which will affect normal operation l Please check the wiring before powering on to avoid any wrong connection or short circuit HCH 35 User Manual ...

Page 37: ...CHAPTER 7 Configuration Tool Accessories Appearance Interface HCH 36 User Manual ...

Page 38: ...e 1 888 749 8878 Email rae callcenter honeywell com RAE HEADQUARTERS RAE Systems by Honeywell 1349 Moffett Park Drive Sunnyvale CA 94089 USA Phone 408 952 8200 RAE tech honeywell com WORLDWIDE SALES OFFICES USA Canada 1 877 723 2878 Europe 800 333 222 44 41 44 943 4380 Middle East 971 4 450 5852 China 86 10 5885 8788 3000 Asia Pacific 852 2669 0828 HCH 37 User Manual ...

Page 39: ... Tuesday August 23 2022 3008 5855 001_EN_RevA_HCH300_UserManual ...

Reviews: