


CLIF-CBUSLC INTERFACE – INSTALLATION & COMMISSIONING INSTRUCTIONS
15
EN1Z-1026GE51
R0417
ENGINEERING, COMMISSIONING
Please refer also to ARENA
AX
/ COACH
AX
– User Guide
(Product Literature No.: EN2Z-0996GE51) for detailed
information.
Required Preparations
In order to access (with a laptop or PC) the CLIF-CBUSLC via
Ethernet/IP for the first time, a password must be defined. For
setup, you must connect a PC with a web browser to the USB
2.0 Device interface as described below.
USB 2.0 Device Interface
This USB 2.0 Device interface is the interface for setting up
the communication settings and downloading new firmware.
An "A-Male to B-Male" USB cable is required.
Fig. 17. A-male to B-male USB cable
For access via USB, the CLIF-CBUSLC has a permanent
default IP address 192.168.255.241.
Set-Up
After removing the CLIF-CBUSLC from its shipping box,
attach power and wait approx. 1 minute while it powers up.
During power-up, the red warning LED (see Fig. 9 on pg. 10)
will be lit. As soon as this warning LED goes dark, you may
commence with the set-up, as follows:
1.
Connect one end of the A-male to B-male USB cable (see
Fig. 17) to your PC and the other end to the USB 2.0
Device Interface (see Fig. 6 on pg. 6) located on the front
of your CLIF-CBUSLC.
2.
Enter URL
http://192.168.255.241
in your web browser. An
initial mask will then appear on the screen of your PC.
3.
When setting up your CLIF-CBUSLC for the first time, you
will have to enter an administrator password. This
administrator password must contain:
▪
8 or more (but not more than 31) characters
▪
uppercase
letters
▪
lowercase
letters
▪
numerals
▪
no
whitespace
characters
4.
A login mask will appear. You may now login using the
administrator password.
5.
Press the CONFIGURATION button.
6.
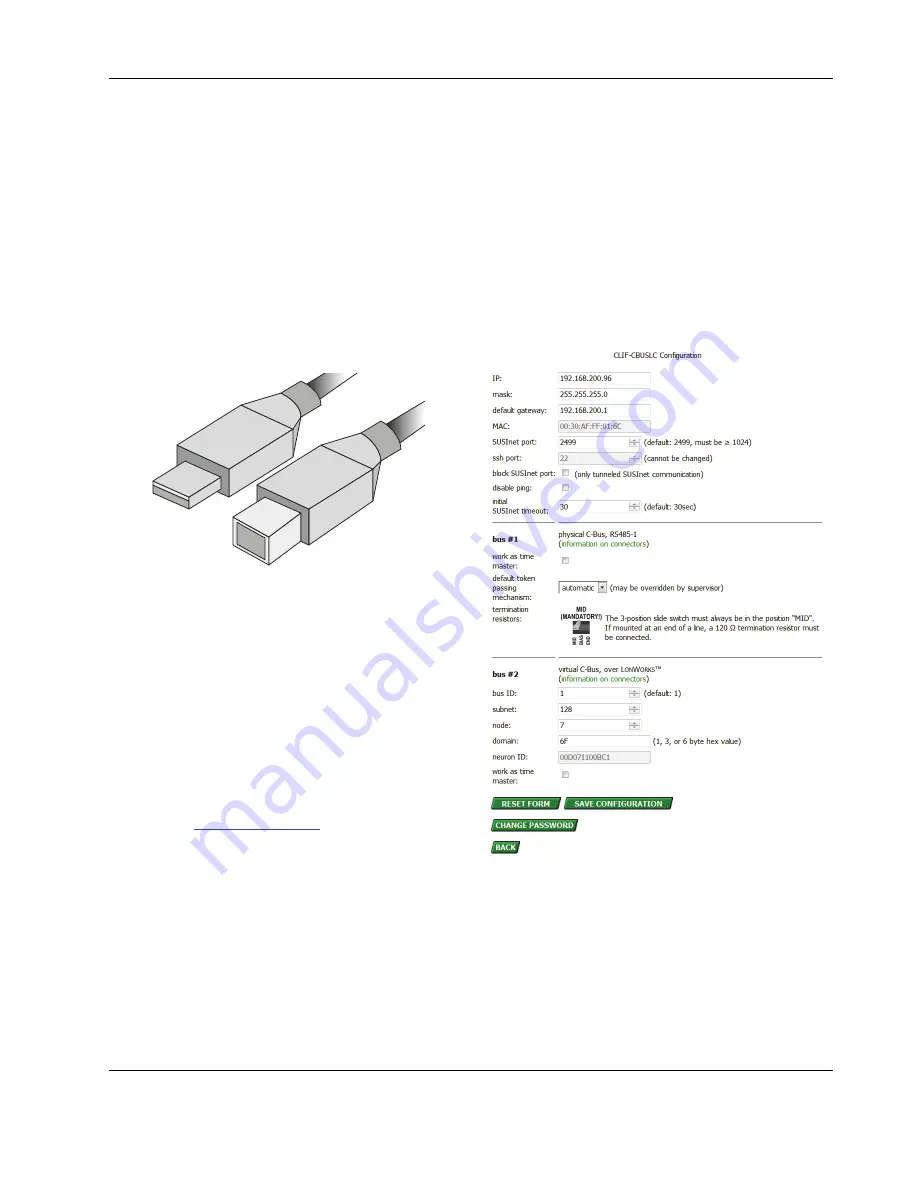
The configuration mask (see Fig. 18) will then appear.
Enter the IP address, subnet mask, and default gateway
address.
Do not select "block SUSInet port" (this is needed only if
you want to tunnel SUSInet communication over ssh)
7.
In case you are using the virtual C-Bus over L
ON
W
ORKS
option, enter the L
ON
W
ORKS
communication parameters
(subnet, node, domain). You can retreive this information
from the engineering tool. Use the same subnet and
domain and a node address which is not used by another
device).
8.
If you want your interface to hourly synchronize the time of
your bus devices, select "work as time master".
9.
Press "SAVE CONFIGURATION". When you are done,
you may log out or go back to the status display.
Fig. 18. Configuration mask
NOTE:
Regarding time master functionality, the CLIF-
CBUSLC does not observe daylight saving time.
If your controllers do automatic daylight saving
time, we recommend not to use the time master
functionality. If there is a local workstation per-
manently on the bus, we recommend that this
workstation should be responsible to synchronize
date and time.