- 2 -
Wall
Surface
Control Panel Terminal Strip
AUX DATA
IN
DATA
OUT
AUX
2
1
Y
G
To Control Panel
Terminal Strip
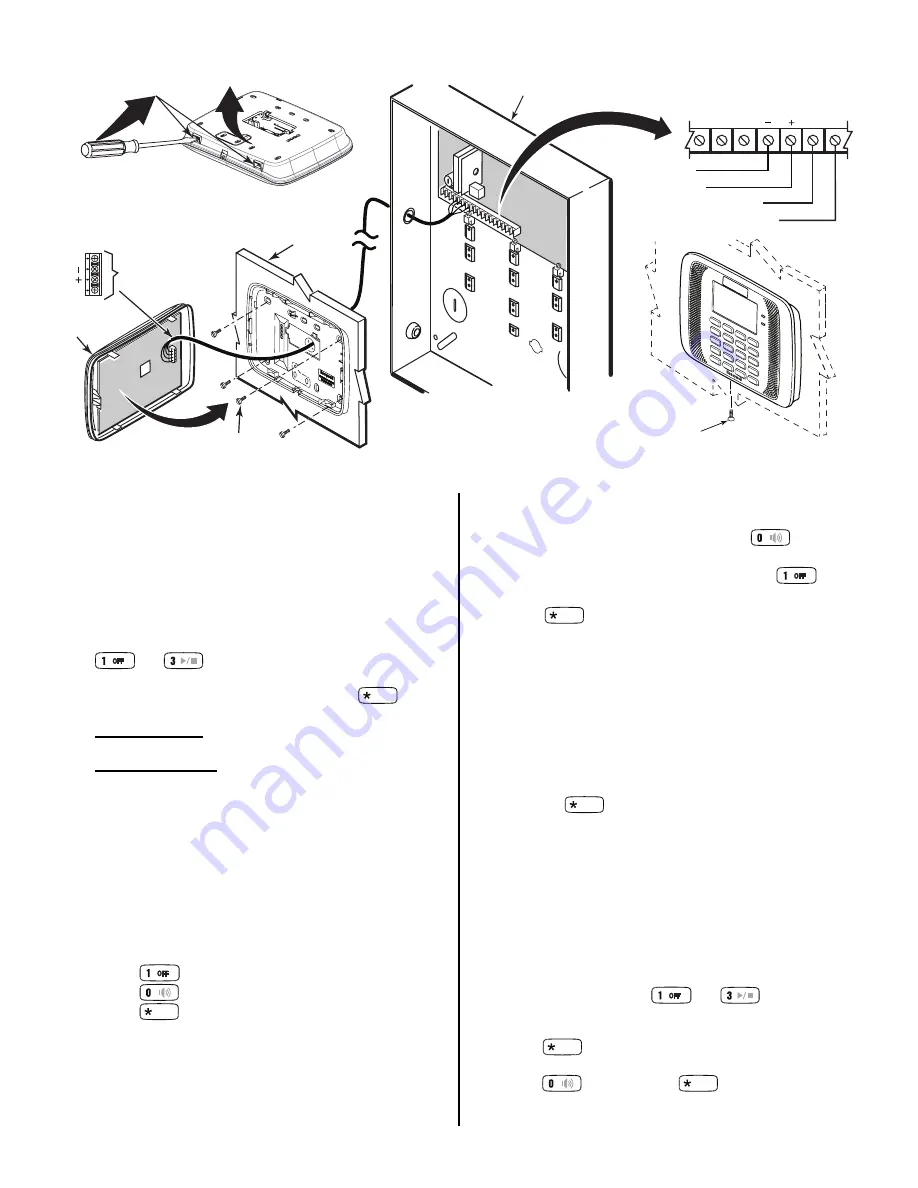
Optional Front Cover Securing Screw
(Required in European Installations)
Install Four (4)
Mounting Screws
Control Panel
1. OPEN
Keypad
Front Cover
2. WIRE
3. MOUNT
• Connect only one wire per terminal.
• For Daisy-Chain Configurations, use
wire splicing so only one wire is
connected to each terminal.
• Mount on drywall, or in
a single or double-gang
electrical box.
6152-6162-installation-3-21-13
Black (Gnd)
Red (+12vdc)
Green (Data To Control)
Yellow (Data From Control)
4. SET UP
Initial keypad programming sets the keypad address and the
option to enter a user code to be used to enable single button
arming.
1.
Set or change the keypad's address [Default = 16]
Refer to the control panel manual for appropriate keypad
addresses. The keypad can either be set for a device
address of 00-30, or to the non-addressable mode (31).
a. Within 60 seconds of power up, press and hold down the
and
keys at the same time for 3 seconds.
The screen displays the keypad’s address.*
b. Enter a two-digit keypad address and press
to
save the address and advance to the next option.
For 6152 Keypad, the next option is Set user code to
enable single button arming keys (skip to 4).
For 6152V keypads, the next option is Voice Chime
mode (see 2).
*
Notes:
•
If unable to enter address mode, reboot the keypad and try
again after the LEDs stop flashing (refer to Settings Key Table
on page 1).
•
The keypad will not enter address mode if the control panel to
which it is connected is in programming mode.
•
If 30 seconds passes with no key entry, the keypad automatically
exits address mode. Reboot the keypad and enter address mode
again.
2. Set the Voice Chime mode
At the “C” (Voice Chime) prompt:
-
Press
to set the Voice Chime mode ON.
-
Press
to set the Voice Chime mode OFF.
-
Press
to save the displayed Voice Chime mode
and move to the next option.
Note: Setting Voice Chime mode OFF does not affect the voice
status or alarm annunciation.
3. Set the Additional Console mode
The Additional Console mode must be set for all voice
keypads being used.
At the “A” (Additional Console) prompt, set as follows:
-
On the Primary voice keypad, press
to set the
Additional Console mode to NO.
-
On any secondary voice keypads, press
to set
Additional Console mode to YES.
Press
to save the mode and move to the next
option.
4. Set user code to enable Single Button Arming
If desired, the Arming Keys can be set for Single Button
Arming by entering a user code at this prompt. This user
code must be a valid code programmed in the system
before the arming keys will function. (See the User Guide for
details on programming user codes.)
Recommended: Set a dedicated user code for this feature.
a. At the User Code prompt (the screen flashes “u4”, “- -”
and “- -.”), enter a valid four-digit user code.
b. Press
to accept the user code and exit address
mode.
Note: if this code is deleted from the keypad or the user
number is deleted from the system, the Single Button Arming is
disabled.
The user code must be entered for each keypad in the
system where Single Button Arming is desired.
When enabled, press any of the Single Button Arming keys for
two seconds to Quick Arm the system (see keypad illustration
on page 1).
Disabling Single Button Arming
1. Press and hold down the
and
keys at the
same time for 3 seconds. The screen displays the keypad’s
address.
2. Press
to move to the User Code entry screen (the
screen flashes “u4”, “- -” and “- -”).
3. Enter
and then press
to exit.
When Single Button Arming is disabled, a user code is
required to arm the system with the Arming keys.


