CHECKOUT
ML7984:
1. Make sure the valve stem is completely screwed into the
actuator drive shaft with no threads showing before applying
power.
2. Make sure the valve stem is locked in place with the set
screw.
3. Make sure the Configuration DIP switches are set correctly.
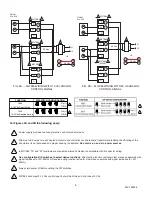
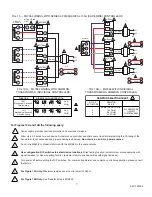
4. With 24 Vac or 28 Vdc power source connected to T5 and T6,
actuator operation can be verified by connecting appropriate
control signal (Series 70/90) from controller to the signal input
terminals (Fig. 8-11). For direct acting: A modulating action can
be obtained by increasing the control signal. The actuator will
travel from stem down to stem up. On signal failure
(disconnected/no signal), actuator defaults to closed position.
For reverse acting: Decreasing controller signal will drive actuator
from full stem down to full stem up. On signal failure (disconnect/
no signal), actuator defaults to open position.
5. Operate the system (valve, actuator, and controller) for several
cycles to ensure proper installation.
6. When checkout is complete, return the controller to the desired
setting.
NOTES:
1. Device will ignore any input changes until it has completed its
repositioning relative to the initial signal input.
2. 272630D position feedback/auxiliary switch module is inactive
during self-calibration.
ML6984: 5-Wire Installation:
1. Make sure the valve stem is completely screwed into the
actuator drive shaft with no threads showing before applying
power.
2. Make sure the valve stem is locked in place with the set
screw.
3. Connect 24 Vac or 28 Vdc power to T5 and T6.
4. Jumper R & B. The valve stem should move up.
5. Jumper R & W. The valve stem should move down.
6. For Floating operation, open R connection Valve stem should
remain in position.
7. Re-connect all control wiring.
8. Operate the system (valve, actuator, and controller) for
several cycles to ensure proper installation.
9. When checkout is complete, return the controller to the
desired setting.
ML6984: 3-Wire Installation:
1. Make sure the valve stem is completely screwed into the
actuator drive shaft with no threads showing before applying
power.
2. Make sure the valve stem is locked in place with the set
screw.
3. Connect 24 Vac to T6.
4. Manually override the controller to signal the actuator to
open/close for a few cycles to ensure proper installation.
5. When checkout is complete, return the controller to the
desired setting.
TROUBLESHOOTING GUIDE FOR ML VALVE ACTUATOR
95C-10939-4
11
SYMPTOM
Valve seat leaks or will not close
properly
POSSIBLE CAUSES
ACTIONS
Wrong actuator used and/or system head
pressue too high
Actuator not properly installed
Incorrect DIP switch settings
Bearing failed due to overheat
1) Check valve close-off rating
2) Check Voltage at actuator terminals
Ensure valve stem is fully threaded
into brass drive shaft and locked in
place with the set screw
Check against Product Instruction
Sheet
1) Check for excessive temperature
and replace complete actuator
2) Use high temperature kit (43196000-
001)
Noisy motor
Brushes worn out
Check for excessive cycling and
replace actuator or brushes (Part
#272775)

