


8
Refuel With Care
Petrol is extremely flammable and petrol vapor can explode.Never
smoke near petrol, and keep other flames and sparks away. Refuel
outdoors only, in a well-ventilated area, with the engine OFF. Do not
smoke while fueling the engine. Add fuel before starting the engine.
Never remove the cap off the fuel tank or add petrol while the engine
is running or the engine is hot. If petrol is spilled, do not attempt to
start the engine but move the machine away from the area of the spill
and avoid creating any source of ignition until petrol vapors have
dissipated.
Store fuel in a cool place in a container specifically designed for the
purpose. In general, plastics containers are unsuitable.
Wear Protective Clothing
Never mow while barefoot or wearing open sandals, or thongs. Wear
long trousers and heavy shoes. It is advisable to wear suitable eye
protection when operating a mower.
Stop the Engine When Not Mowing
Stop the engine whenever you leave the mower, even for a moment.
Avoid Slopes
Mow across the face of slopes,
never up and down. Exercize
extreme caution when changing
direction on slopes. Do not mow
excessively steep slopes (more
than 20
°
). Mowing on a slope
when the grass is damp or wet
could cause you to slip, fall, and
lose control of the mower.
NOTICE
Mowing on steep slopes can starve the engine of oil, causing engine
damage that is not covered by the
LIMITED WARRANTY (
page 23
).
Keep all four wheels on the ground, and be careful to avoid losing
your footing and your control of the mower. Keep a firm grip on the
handlebar, and walk, never run, with the mower. Be very careful when
mowing uneven or rough ground.
If stuck, do not kick or shove the mower with your foot. Use the
handlebar to control the mower.
Avoid Obstacles
Gravel, loose stones, and landscaping material can be picked up by
the mower and thrown many feet with enough force to cause serious
personal injury and/or property damage. Stop the engine before
pushing the mower across gravel drives, walks, or roads.
Be careful when mowing over obstacles that stick up above the
surface of the lawn such as sprinkler heads, paving, edging, raised
tree roots, etc.
Stop the engine, disconnect the spark plug wire and inspect the
mower if the mower begins to vibrate abnormally or after striking a
foreign object (page 12). Striking objects may damage the blades,
bend the crankshaft, and/or break the mower deck or other
components. Vibration usually indicates serious trouble.
The
LIMITED WARRANTY
(page 23) does not cover parts damaged
by accidental impact collision.
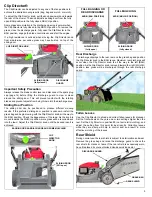
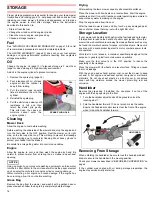
Operating the Controls
Throttle Lever
For best cut quality, always
mow with the throttle lever in
the FAST position. When the
blades rotate at the preset
fast speed, they create a
strong fan action that lifts and
cuts grass more efficiently.
Do not try to increase the
preset engine speed; the
blades could fracture and
come apart.
Blade Control Lever
To start blade rotation, hold
down the yellow button
on
top of the blade control lever,
and then push the lever
forward quickly and hold it
against the handlebar.
Release the yellow button.
Operate the blade control
lever with a quick and
complete motion so that the
blade control is always either
fully engaged or released.
This will help to prevent
stalling the engine, and it will
also extend the service life of
the blade control mechanism.
To stop blade rotation, release the blade control lever. The engine will
continue to run. Always release the blade control lever before starting
the engine to prevent the blades from turning.
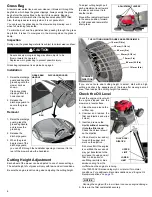
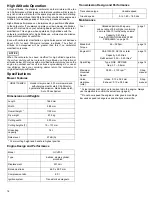
Drive Clutch Lever
Push the drive clutch
lever forward to propel the
mower.
Release the drive clutch
lever to stop the mower’s
forward movement.
You can control the
self-propelled speed with
the drive clutch lever. The
mower will move
gradually faster as you
push the drive clutch lever
forward. If you push the
lever all the way forward to the handlebar, the mower will move at the
speed determined by the shift lever setting.
When moving and using the drive clutch lever to change the
self-propelled speed, continue to fully hold the blade control lever
against the handlebar. This will help prevent damage to the blade
control mechanism. Use the shift lever (see page 9) to change the
maximum speed so you can hold the drive clutch lever comfortably
against the handlebar.
For self-propelled mowing, press the button on top of the blade control
lever, push the blade control lever completely forward, and then push
the drive clutch lever forward. The drive clutch lever will hold the blade
control lever against the handlebar.
Always release the drive clutch lever before starting the engine. If the
drive clutch is engaged, the mower will move forward when you
operate the starter.
WARNING
A worn, cracked, or damaged blade can break, and
pieces of the damaged blade can become dangerous
projectiles.
Thrown objects can cause serious injury.
Inspect the blades regularly (see page 12), and do not
operate the mower with a worn or damaged blade.
FAST
THROTTLE
LEVER
BLADE
CONTROL
LEVER
BUTTON
DRIVE CLUTCH LEVER
BLADE CONTROL
LEVER