


13
Oil Change
Change the oil after the first month or 5 hours of use. Thereafter,
change the oil every 6 months or 50 hours of use. Change the oil
more frequently when used under heavy load or high outdoor
temperatures. See “Engine Oil Recommendations” on this page for
recommended oil properties.
Drain the used oil while the engine is warm. Warm oil drains quickly
and completely.
To reduce the chance of scratching the side of the mower deck or
wheels when tipping, place a piece of cardboard or drop cloth on the
ground. The use of a commercially available siphon pump will save
time and make the oil change easier.
1. Turn the fuel valve OFF (page 3). This will reduce the possibility of
fuel leakage
2. Wipe the oil filler area clean, and then remove the oil filler
cap/dipstick.
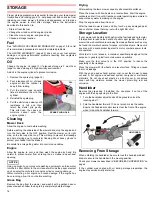
3. Place a suitable container next to the
mower to catch the used oil, and then
tilt the mower on its right side.
The used oil will drain through the filler
neck. Allow the oil to drain completely.
After draining, take the oil to your local
recycling centre or service station. Do
not throw it in the trash, pour it on the
ground, or pour it down a drain.
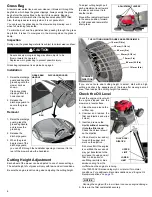
4. Fill with the recommended oil.
Do not overfill. Allow a couple
of minutes for the oil to settle in
the engine, and then measure
the oil level (page 4).
Refill amount:
0.35 ~ 0.40 litres
NOTICE
Using non detergent oil can
shorten the engine’s service
life, and using 2-stroke oil can
damage the engine.
Engine Oil Recommendations
Oil is a major factor affecting performance and service life. Always
change the oil in accordance with the
Maintenance Schedule
(page 11).
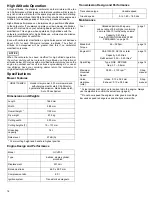
Recommended oil for general use:
SAE 10W-30
Other viscosities shown in the chart may be used when the average
temperature in your area is within the recommended range.
The SAE oil viscosity and service category are in the API label on the
oil container. Honda recommends API service category SJ or later oil.
Air Filter
Clean the air filter after the first 25 hours of use. Thereafter, clean the
filter every 6 months or 50 hours of use. Clean the filter more often
when used in dusty areas. Replace the filter every 2 years or 150
hours of use.
A properly maintained air filter will help prevent dirt from entering your
engine. Dirt entering the carburetor can be drawn into small passages
in the carburetor and cause premature engine wear. These small
passages can become blocked, causing starting or running problems.
NOTICE
Operating the engine without an air filter, with a damaged air filter, or
with an improperly installed air filter cover will allow dirt to enter the
engine, causing rapid engine wear. This type of damage is not
covered by the LIMITED WARRANTY (page 23).
We recommend the use of a Honda Genuine air filter to ensure it
seals and performs as designed. Using a non-Honda air filter can
result in dirt bypassing the filter, causing damage to the engine or fuel
system.
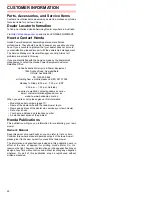
1. Press down on the cover tabs and remove the cover.
2. Remove the filter from the air cleaner housing.
3. Inspect the filter; replace if damaged.
4. Clean the filter by tapping it several times on a hard surface to
remove dirt, or blow compressed air (not exceeding 207 kPa)
through the air filter from the inside. Never try to brush off dirt;
brushing will force dirt into the fibers.
5. Wipe dirt from the inside of the air cleaner housing and cover using
a moist rag. Be careful to prevent dirt from entering the air duct
that leads to the carburetor.
6. Reinstall the filter and cover. Be sure both tabs are fully locked in
place.
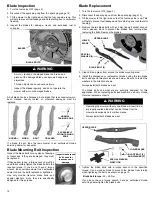
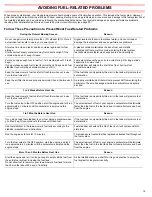
WARNING
If the blade bolts are not torqued properly, the blades
could loosen and be thrown from the mower and seriously
hurt or kill someone.
Ensure the blade bolts are torqued properly.
TORQUE
WRENCH
TORQUE:
36 ~ 43 ft-lb
(49 ~ 59 N•m)
BLADES
WOODEN BLOCK
-20
20 30 40°C
-10 0 10
40 60
100°F
80
0
20
5W-30 • 10W-30
AIR CLEANER
HOUSING
FILTER
COVER
COVER
TABS