background image

46

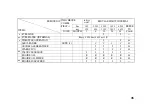
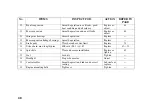
FREQUENCY

ITEMS

WHICHEVER 

INITIAL

MAINT.

REGULAR MAINT. INTERVAL

COMES
FIRST

km

150

1,000

2,000

3,000

4,000

REFER

TO

PAGE

mi

100

600

1,200

1,800

2,400

NOTE

MONTH

1

6

12

18

24

DRIVE CHAIN

NOTE (1)

I, L

Every 500 km (300 mi) or 

every 3 months: I,L

67

DRIVE CHAIN SLIDER

I

I

I

I

68

BRAKE FLUID

NOTE (2)

I

I

I

I

14,16

BRAKE PADS WEAR

I

I

I

I

78

BRAKE SYSTEM

I

I

I

I

I

14-16, 78

HEADLIGHT AIM

I

I

31

CLUTCH SYSTEM

I

I

I

I

I

17

SIDE STAND

I

I

86

SUSPENSION

I

I

84, 85

SPARK ARRESTER

Every 1,600 km (1,000 mi) or 

every 100 operating hours: C

66

NUTS, BOLTS, FASTENERS

I

I

I

✽✽

WHEELS/TYRES

I

I

I

I

I

23, 73

✽✽

STEERING HEAD BEARINGS

I

I

I

Summary of Contents for CRF250F

Page 1: ...OWNER S MANUAL MANUAL DEL PROPIETARIO C R F 2 5 0 F ...

Page 2: ...Honda CRF250F Moto Honda da Amazônia Ltda 2018 MANUAL DEL PROPIETARIO ...

Page 3: ...ransporte de un pasajero de manera segura Nunca exceda la capacidad máxima de peso SÓLO PARA USO FUERA DE CARRETERA Su motocicleta ha sido diseñada y fabricada para ser usada solamente fuera de carretera LEA DETENIDAMENTE ESTE MANUAL Preste especial atención a los mensajes de seguridad que aparecen en este manual Estos mensajes se explican detalladamente en la sección Algunas palabras sobre seguri...

Page 4: ... aviso y sin incurrir en ningún tipo de obligación No se permite la reproducción de ninguna parte de esta publicación sin permiso por escrito Honda CRF250F OWNER S MANUAL All information in this publication is based on the latest production information available at the time of approval for printing Honda Motor Co Ltd reserves the right to make changes at any time without notice and without incurri...

Page 5: ...icleta antes de cada conducción y realice un mantenimiento regular Para ayudarle a lograr los retos y disfrutar de la aventura plenamente familiarícese completamente con este Manual ANTES DE CONDUCIR SU MOTOCICLETA A medida que lea este manual encontrará informaciones precedidas por un símbolo de AVISO Esta información está destinada a ayudarlo a evitar daños a su motocicleta a otras propiedades o...

Page 6: ...e manual los códigos siguientes indican cada país U Australia Nueva Zelanda LA Las especificaciones pueden cambiar con cada lugar El vehículo ilustrado en este manual puede no coincidir con su actual vehículo ...

Page 7: ...dvierte sobre posibles peligros que podrían causarle daños a usted o a otras personas Por supuesto no resulta práctico ni posible advertirle de todos los peligros asociados con el manejo o el mantenimiento de una motocicleta Usted debe usar su propio buen juicio Encontrará estas informaciones importantes de seguridad en una variedad de formas incluyendo Etiquetas de seguridad en la motocicleta Men...

Page 8: ...N Usted PUEDE ser HERIDO si no sigue las instrucciones Temas de Seguridad como Recordatorios de Seguridad Importantes o Precauciones de Seguridad Importantes Secciones de Seguridad como Seguridad de la Motocicleta Instrucciones cómo usar esta motocicleta de forma correcta y segura Encontrará en todo este manual informaciones de seguridad importantes léalo con mucha atención ...

Page 9: ...CTRICES DE CARGA 9 UBICACIÓN DE LAS PIEZAS 12 INDICADORES 14 COMPONENTES PRINCIPALES Información que usted necesita para utilizar esta motocicleta 14 FRENOS 17 EMBRAGUE 19 COMBUSTIBLE 22 ACEITE DEL MOTOR 23 NEUMÁTICOS 27 COMPONENTES INDIVIDUALES ESENCIALES 27 INTERRUPTOR DE ENCENDIDO 28 BOTÓN DE ARRANQUE 29 BOTÓN DE PARADA DEL MOTOR ...

Page 10: ...s necesario para la operación 30 CARENADO LATERAL 31 AJUSTE VERTICAL DEL HAZ DEL FARO 32 OPERACIÓN 32 INSPECCIÓN PREVIA A LA CIRCULACIÓN 34 ARRANQUE DEL MOTOR 36 RODAJE 37 CIRCULANDO 39 FRENADO 40 ESTACIONAMIENTO 40 INSTRUCCIONES ANTI ROBO ...

Page 11: ...IENTO DEL ACELERADOR 66 PARACHISPAS 67 CADENA DE TRANSMISIÓN 73 LLANTAS Y RADIOS 74 EXTRACCIÓN DE LA RUEDA 78 DESGASTE DE LAS PASTILLAS DE FRENO 79 BATERÍA 81 REEMPLAZO DE FUSIBLES 84 SUSPENSIÓN DELANTERA 85 SUSPENSIÓN TRASERA 86 CABALLETE LATERAL 87 REEMPLAZO DE LA BOMBILLA 90 LIMPIEZA 93 TRANSPORTE 95 GUÍA DE ALMACENAMIENTO 95 ALMACENAMIENTO 97 RETIRADA DEL ALMACENAMIENTO 98 CUIDADOS PARA SITUAC...

Page 12: ...importancia Conduzca siempre con el casco puesto Está comprobado que los cascos reducen en gran medida el número y la gravedad de las heridas en la cabeza Por lo tanto póngase siempre un casco homologado Le recomendamos también que emplee protección de los ojos botas resistentes guantes y otros equipos de protección página 3 Nunca lleve un pasajero Esta motocicleta está diseñada para llevar a una ...

Page 13: ...uctor experimentado también puede ser muy valioso Si necesita ayuda pregúntele a su concesionario si hay grupos de conducción en su zona Tenga cuidado con los peligros de circular fuera de carretera El terreno puede presentar muchos obstáculos cuando se circula fuera de carretera Analice bien el terreno en todo momento para estar preparado para giros imprevistos baches piedras raíces de árboles y ...

Page 14: ...ar que surjan problemas inspeccione la motocicleta antes de cada uso y realice todas las tareas de mantenimiento recomendadas EQUIPO DE PROTECCIÓN Para su seguridad le recomendamos encarecidamente que use siempre un casco de motocicleta certificado protección para los ojos botas guantes pantalones y un jersey de manga larga camisa o chaqueta cuando viaje Aunque no es posible una protección complet...

Page 15: ...n pero un casco de cara completa ofrece más Use siempre un protector facial o gafas protectoras para proteger sus ojos y ayudar a su visión Accesorios adicionales para circular Además de un casco y protección para los ojos también recomendamos Botas robustas para motociclistas todo terreno para proteger tus pies tobillos y pantorrillas Guantes de motocicletas para circular fuera de carretera para ...

Page 16: ...l diseño y el rendimiento de esta motocicleta podrán también hacer que no resulte segura También el peso de cualquier accesorio reducirá la carga máxima que puede transportar la motocicleta En las páginas siguientes se muestran informaciones más específicas sobre la carga accesorios y modificaciones Carga El peso que ponga en la motocicleta y cómo lo cargue son factores de seguridad importantes Si...

Page 17: ...elocidad reducida y siga estos consejos de sentido común Mantenga la carga pequeña y ligera Asegúrese que no puede engancharse o rozar fácilmente con otros objetos y que no interfiere con sus movimientos para cambiar de posición para mantener el equilibrio y la estabilidad Ponga el peso lo más cerca del centro de la motocicleta como sea posible No cargue objetos grandes ni pesados tales como un sa...

Page 18: ...les de Honda que hayan sido específicamente diseñados y probados para su motocicleta Puesto que Honda no puede probar todos los demás accesorios usted será el responsable de la correcta selección instalación y utilización de los accesorios que no sean de Honda Solicite asistencia a su concesionario y siga siempre estas directrices Asegúrese que el accesorio no oscurezca las luces reduzca la distan...

Page 19: ...su diseño o funcionamiento Este tipo de modificación puede perjudicar seriamente al manejo la estabilidad y el frenado de la motocicleta haciendo que su conducción resulte poco segura La extracción o modificación del sistema de escape tal como los parachispas o los silenciadores o de otras partes pueden además hacer que la motocicleta resulte ilegal ...

Page 20: ...ction indicator lamp MIL Throttle grip Engine stop button Ignition switch Interruptor de encendido Maneta del embrague Lámpara indicadora de falla del PGM FI MIL Tapón de llenado de combustible Botón de arranque Puño del acelerador Interruptor de parada del motor Indicador de reserva de combustible Depósito del líquido del freno delantero Maneta del freno delantero ...

Page 21: ...ck Engine oil filter Rear brake pedal Foot peg Spark arrester Rear brake caliper Filtro de aire Tapón de llenado de aceite del motor varilla de nivel Filtro de aceite del motor Parachispas Pinza del freno trasero Estribera Pedal del freno trasero ...

Page 22: ...ront brake caliper Side stand Spark plug Battery Foot peg Sub fuse Bujía de encendido Batería Fusible principal Fusible auxiliar Respiradero del cárter Cadena de transmisión Estribera Caballete lateral Tornillo de drenaje de aceite del motor Pedal de cambio Pinza del freno delantero ...

Page 23: ...S Los indicadores están instalados en las ubicaciones como se muestra en la ilustración Sus funciones se describen en las tablas 1 2 1 Lámpara indicadora de falla del PGM FI MIL 2 Indicador de reserva de combustible ...

Page 24: ...que lo revise en busca de problemas Si se enciende en cualquier otro momento reduzca la velocidad y lleve la motocicleta a su concesionario tan pronto como sea posible 2 Indicador de reserva de combustible Cuando este indicador se enciende mientras circula la reserva de combustible en el depósito se acerca 1 3 L 0 34 US gal 0 29 Imp gal También debe encenderse durante unos segundos y luego apagars...

Page 25: ... es excesivo y las pastillas de freno no están desgastadas más allá del límite recomendado página 78 probablemente significa que hay aire en el sistema de frenos y debe ser purgado Consulte a su concesionario para realizar este servicio Freno delantero Nivel del líquido de freno Con la motocicleta en posición vertical compruebe el nivel de líquido Debe estar por encima de la marca LWR 1 Si el nive...

Page 26: ...justador 4 hacia la derecha Para posicionar la maneta del freno más cerca del puño gire el ajustador hacia la izquierda 4 Apriete la contratuerca Vuelva a colocar el guardapolvo en su posición normal 5 Accione la maneta del freno suéltela y a continuación gire la rueda y compruebe si gira libremente Repita este procedimiento varias veces 1 3 2 4 1 Guardapolvo de goma 2 Contratuerca 3 Maneta del fr...

Page 27: ...aste de las pastillas de freno página 78 Las pastillas desgastadas deben ser reemplazadas Si las pastillas no están desgastadas haga inspeccionar su sistema de frenos para detectar fugas El líquido de frenos recomendado es DOT 4 en un contenedor sellado o un equivalente 1 1 Marca de nivel LOWER Otras comprobaciones Asegúrese que no haya fugas de líquido Compruebe que las mangueras y accesorios no ...

Page 28: ...neta del embrague es 10 20 mm 0 4 0 8 in 1 1 Maneta de embrague 1 Tirehaciaatrásdelguardapolvodegoma 2 2 Afloje la contratuerca 3 y gire el ajustador superior del cable de embrague 4 Apriete la contratuerca y compruebe el ajuste 3 Si el ajustador está enroscado hacia fuera cerca de su límite o si no se puede obtener la holgura correcta afloje la contratuerca y gire el ajustador superior del cable ...

Page 29: ...e la motocicleta no avance lentamente Suelte gradualmente la maneta de embrague y abra el acelerador La motocicleta debe ponerse en marcha suavemente y acelerar gradualmente Si no puede obtener el ajuste correcto o si el embrague no funciona correctamente póngase en contacto con su concesionario Otras comprobaciones Compruebe si el cable de embrague no está retorcido o desgastado lo que podría cau...

Page 30: ... del cuello de llenado 4 Después de repostar combustible asegúrese de apretar el tapón de llenado hacia la derecha hasta que haga clic Inserte el tubo del respiradero en la tuerca de la columna de dirección ADVERTENCIA El combustible es muy inflamable y explosivo Usted puede sufrir quemaduras o lesiones graves al manejar combustible Detenga el motor y mantenga las chispas y llamas alejadas Realice...

Page 31: ...o o las detonaciones persisten póngase en contacto con su concesionario De lo contrario esto lo consideraremos como una mala utilización y los daños causados por una mala utilización no están cubiertos por la garantía limitada de Honda De vez en cuando puede experimentar un ligero golpe de chispa mientras opera bajo cargas pesadas Esto no es motivo de preocupación simplemente significa que el moto...

Page 32: ...es e inhibidores contra la corrosión Los daños en el sistema de combustible o los problemas de rendimiento del motor debido a la utilización de combustibles que contengan alcohol no están cubiertos por la garantía Honda no puede aprobar la utilización de combustibles con metanol porque no dispone de pruebas que demuestren su buen funcionamiento Antes de adquirir combustible de una gasolinera desco...

Page 33: ...í durante 3 5 minutos 3 Detenga el motor Después de 2 o 3 minutos retire el tapón de llenado varilla de nivel límpielo y vuelva a insertarlo sin enroscar Retire el tapón de llenado varilla de nivel El nivel de aceite debe estar entre las marcas de nivel superior e inferior del tapón de llenado varilla de nivel 4 Si es necesario añada el aceite especificado hasta alcanzar la marca de nivel superior...

Page 34: ...eumáticos Inflado Neumáticos correctamente inflados proporcionan la mejor combinación de manejo duración de la banda de rodadura y confort Por lo general los neumáticos insuficientemente inflados se desgastan sin uniformidad afectan adversamente el manejo y son más sensibles a los fallos de sobrecalentamiento Los neumáticos insuficientemente inflados también pueden causar daños en las ruedas cuand...

Page 35: ... psi Inspección Cada vez que compruebe la presión de los neumáticos deberá examinar también su banda de rodadura y paredes laterales para ver si están desgastadas dañadas o tienen incrustadas objetos extraños Observe si hay Golpes o bultos en los laterales del neumático o en su banda de rodadura Reemplace el neumático si encuentra cualquier golpe o bulto Cortes fisuras o grietas en el neumático Re...

Page 36: ...e la cámara Si se pincha o daña una cámara deberá reemplazarla lo antes posible Una cámara reparada podrá no proporcionar la misma fiabilidad que una nueva y podrá fallarle cuando esté conduciendo Si necesita hacer una reparación temporal poniendo un parche a la cámara o utilizando un aerosol de sellado conduzca con mucha precaución a velocidad reducida y reemplace la cámara antes de volver a cond...

Page 37: ... que puede resultar gravemente herido o muerto Emplee siempre los neumáticos de tamaño y tipo recomendados en este manual Los neumáticos recomendados para su motocicleta son Delantero 80 100 21 51R NHS Trasero 100 100 18 59R NHS Tipo Bias ply con cámara Siempre que reemplace un neumático utilice uno que sea equivalente al original y asegúrese que la rueda esté equilibrada después de instalar un ne...

Page 38: ...n Antes de montar introduzca la llave y gírela a la posición ON Después de estacionar la motocicleta retire la llave OFF ON 1 Ignition switch 1 OFF ON 1 Interruptor de encendido Posición de la llave Función Extracción de la llave OFF El motor no puede ponerse en funcionamiento La llave puede retirarse ON Con la transmisión en neutral o engranada con la maneta de embrague presionada el motor puede ...

Page 39: ...QUE El botón de arranque 1 está próximo al puño del acelerador Cuando se pulsa el botón de arranque el motor de arranque hace girar el motor Consulte la página 35 para el procedimiento de arranque 1 1 Botón de arranque ...

Page 40: ...l motor 1 está próximo al puño izquierdo del manillar El botón de parada del motor se utiliza para apagar el motor en caso de emergencia Presione el botón y manténgalo presionado hasta que el motor se detenga por completo 1 1 Botón de parada del motor ...

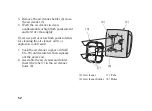
Page 41: ...sible principal y al fusible auxiliar Extracción 1 Retire el tornillo 2 2 Saque los ganchos 3 de los ojales de goma 4 y el saliente 5 del orificio 6 del protector Instalación 1 Deslice la parte superior del carenado lateral por debajo del borde inferior del asiento 2 Alinee los ganchos con los ojales de goma y también el saliente con el orificio del protector 3 Instale el tornillo y apriételo firm...

Page 42: ... DEL HAZ DEL FARO El ajuste vertical puede realizarse girando el tornillo 1 hacia la derecha o hacia la izquierda según sea necesario Obedezca las leyes y reglamentos locales 1 A B 1 Tornillo A Hacia arriba B Hacia abajo ...

Page 43: ... previa antes de cada uso y corrija cualquier problema Nivel de aceite del motor añada aceite si es necesario página 22 Compruebe si hay fugas Nivel de combustible llene el depósito de combustible si es necesario página 19 Compruebe si hay fugas Frenos compruebe el funcionamiento asegúrese que no haya fugas de líquido de freno página 14 16 y ajuste la holgura si es necesario página 15 Neumáticos c...

Page 44: ...te si es necesario páginas 17 18 Luces compruebe si el faro funciona correctamente Bujía de encendido y terminal de alta tensión compruebe si no están sueltos Botón de parada de motor compruebe el funcionamiento correcto página 29 Tuercas tornillos y fijadores compruebe la rueda delantera y trasera para asegurarse que el eje delantero las tuercas del fijador del eje y la tuerca del eje trasero est...

Page 45: ...áreas cerradas como en un garaje No haga funcionar el motor con la puerta del garaje cerrada Incluso con la puerta abierta haga funcionar el motor sólo lo suficiente para retirar la motocicleta del garaje No accione el motor de arranque eléctrico por más de 5 segundos a la vez Suelte el botón de arranque durante aproximadamente 10 segundos antes de volver a presionarlo Preparación Antes del arranq...

Page 46: ...dicado a continuación Arranque con el motor en cualquier temperatura 1 Con el acelerador completamente cerrado pulse el botón de arranque 2 Si no puede encender el motor abra el acelerador ligeramente aproximadamente 3 mm 0 1 in sin holgura about 3 mm 0 1 in without freeplay Aproximadamente 3 mm 0 1 in sin holgura ...

Page 47: ...u motocicleta está diseñada para detener automáticamente el motor y la bomba de combustible si la motocicleta se ha inclinado demasiado un sensor del ángulo de inclinación corta el sistema de encendido Antes de arrancar el motor se debe girar el interruptor de encendido a la posición OFF y luego volver a posición ON RODAJE Ayude a asegurar la confiabilidad y el rendimiento futuros de su motociclet...

Page 48: ...otor está al ralentí tire de la maneta del embrague y pise el pedal de cambio para cambiar a 1ª marcha más baja 3 Suelte lentamente la maneta del embrague y al mismo tiempo aumente gradualmente la revolución del motor abriendo el acelerador La coordinación del acelerador y la maneta del embrague asegura una salida blanda 4 Cuando la motocicleta alcance una velocidad moderada cierre el acelerador t...

Page 49: ...rerevolucionar la rueda trasera puede perder tracción resultando en una posible pérdida de control del vehículo No cambie de marcha sin desembragar cerrando el acelerador El motor y la transmisión podrían dañarse por exceso de revoluciones y impactos No remolque la motocicleta o la haga rodar por largas distancias con el motor apagado La transmisión no será correctamente lubricada y puede producir...

Page 50: ...queo de la rueda reduciendo el control de la motocicleta Cuando sea posible reduzca la velocidad o frene antes de entrar en un giro si se cierra el acelerador o se frena a mitad del camino se puede deslizar la rueda El patinaje de las ruedas reducirá el control de la motocicleta Cuando conduce en superficies húmedas mojadas o blandas la capacidad de maniobra y parada se verá reducida Todas las acc...

Page 51: ...ba para reducir la posibilidad de rodar por el caballete lateral o volcar 3 Extraiga la llave INSTRUCCIONES ANTI ROBO 1 Asegúrese que la información de registro para su motocicleta es exacta y está actualizada 2 Estacione su motocicleta en un garaje cerrado siempre que sea posible 3 Utilice un dispositivo adicional anti robo de buena calidad 4 Ponga su nombre dirección y número de teléfono en este...

Page 52: ... de conducción promedias Si usted expone la motocicleta a condiciones severas tal como competiciones o la conduce en áreas especialmente húmedas o polvorientas necesitará dispensarle un mantenimiento más frecuente Realizar un mantenimiento frecuente en el filtro de aire es especialmente importante para ayudarle a evitar costosas reparaciones de motor Si la motocicleta vuelca o sufre una colisión a...

Page 53: ...mente por un técnico de Honda u otro mecánico cualificado las instrucciones incluidas en este manual solamente son para asistirle en caso de emergencia A continuación algunas de las precauciones de seguridad más importantes Sin embargo nos resulta imposible alertarle de todos los riesgos concebibles que puedan surgir al realizar el mantenimiento Sólo usted puede decidir si debe o no realizar una d...

Page 54: ... y piezas adecuadas y que tiene las capacidades técnicas requeridas Para ayudar a evitar que la motocicleta pueda se caiga colóquela en una superficie firme y nivelada utilizando el caballete lateral o un soporte de mantenimiento para apoyarla Para reducir la posibilidad de ocasionar un incendio o una explosión tenga cuidado cuando trabaje cerca de combustibles Utilice solamente disolventes no inf...

Page 55: ...los estándares y especificaciones de Honda y siempre por técnicos cualificados y debidamente equipados Su concesionario cumple todos estos requisitos El servicio deberá ser realizado por un concesionario a menos que el propietario disponga de las herramientas apropiadas y de los datos de servicio y esté cualificado mecánicamente Consulte el Manual de Taller Honda oficial Por motivos de seguridad l...

Page 56: ...24 CONDUCTO DE COMBUSTIBLE I I FILTRO DE COMBUSTIBLE INTERNO Cada 8 000 km 4 800 millas R FUNCIONAMIENTO DEL ACELERADOR I I 64 FILTRO DE AIRE NOTA 1 C C C C 51 RESPIRADERO DEL CÁRTER I I I I 54 BUJÍA DE ENCENDIDO I I I I 62 HOLGURA DE VÁLVULAS I I I I I ACEITE DEL MOTOR R R R R R 58 FILTRO DE ACEITE DEL MOTOR R R R R R 58 REVOLUCIÓN DE RALENTÍ DEL MOTOR I I I I I FRECUENCIA ...

Page 57: ...ZADOR DE LA CADENA DE TRANSMISIÓN I I I I 68 LÍQUIDO DE FRENO NOTA 2 I I I I 1 416 DESGASTE DE LAS PASTILLAS DE FRENO I I I I 78 SISTEMA DE FRENO I I I I I 14 16 78 HAZ DEL FARO I I 31 SISTEMA DE EMBRAGUE I I I I I 17 CABALLETE LATERAL I I 86 SUSPENSIÓN I I 84 85 PARACHISPAS Cada 1 600 km 1 000 millas o cada 100 horas de funcionamiento C 66 TUERCAS TORNILLOS FIJADORES I I I RUEDAS NEUMÁTICOS I I I...

Page 58: ...ace 4 Holgura de válvulas Holgura correcta Ajuste 5 Revolución de ralentí del motor Revolución de ralentí correcta Ajuste 6 Discos de embrague Funcionamiento correcto Vea la Nota 1 Reemplace 7 Filtro de aire Suciedad o roturas Limpie o reemplace 51 53 8 Bujía de encendido Holgura torque de apriete grado térmico y seguridad del terminal de alta tensión Apriete reemplace o fije 62 63 9 Rodamientos d...

Page 59: ... las conexiones de la suspensión trasera Operación suave Reemplace 14 Pastillas de freno Desgaste que excede el límite de servicio Reemplace 78 15 Cadena de transmisión longitud máxima pasadores 638 mm 25 1 in 41 Reemplace 67 72 16 Piñón y corona Desgaste y condición de instalación Reemplace o apriete 69 17 Asiento Seguridad Apriete 18 Faro Orientación del haz Ajuste 19 Cables de control Operación...

Page 60: ...9 JUEGO DE HERRAMIENTAS La llave de bujías 1 y el destornillador Phillips Nº 2 2 se almacenan en la bolsa de herramientas 3 3 1 2 1 Llave de bujías 2 Destornillador Phillips Nº 2 3 Bolsa de herramientas ...

Page 61: ...rio cuando pida piezas de repuesto Anote los números para que le sirvan como referencia N DEL CHASIS ______________________ 1 1 Número del chasis El número del chasis 1 está estampado en el lado derecho de la pipa de dirección El número del motor 2 está estampado en el lado izquierdo del motor N DEL MOTOR ______________________ 2 2 Número del motor ...

Page 62: ...uce en lugares húmedos o polvorientos 1 Quite el carenado lateral derecho página 30 2 Retire los tornillos 1 y la tapa de la caja del filtro de aire 2 2 1 1 1 Tornillos 2 Tapa de la caja del filtro de aire 3 Desenganche el resorte de ajuste 3 Evite doblar el resorte de ajuste y su fijador 4 4 Retire el filtro de aire 5 3 4 5 3 Resorte de ajuste 4 Fijador del resorte de ajuste 5 Filtro de aire ...

Page 63: ...tes de bajo punto de inflamación para la limpieza del filtro de aire De lo contrario puede producirse un incendio o una explosión 7 Sumerja el filtro de aire en aceite de engranajes SAE 80 90 hasta que se sature y después escurra el exceso de aceite 8 Monte el filtro de aire y el fijador Inserte las lengüetas 7 en los orificios del filtro de aire 8 6 8 5 7 8 5 Filtro de aire 6 Fijador del filtro d...

Page 64: ... del filtro de aire insertando la lengüeta 9 del fijador del filtro de aire en los orificios 10 de la caja del filtro de aire Enganche el resorte de ajuste Compruebe si el filtro de aire está correctamente asentado 12 Instale la tapa de la caja del filtro de aire y sus tornillos 13 Instale el carenado lateral derecho página 30 10 9 9 Lengüetas 10 Orificios ...

Page 65: ...ocicleta está circulando bajo la lluvia o con aceleración al máxima frecuente Si el tubo de drenaje se desborda el filtro de aire puede contaminarse con aceite de motor lo que disminuirá el rendimiento del motor Drene los residuos acumulados apretando el tubo del respiradero del cárter 1 1 1 Tubo del respiradero del cárter ...

Page 66: ...ivalente La motocicleta no necesita aditivos para aceite Utilice el aceite recomendado No utilice aceites con aditivos de molibdeno o grafito Pueden afectar adversamente la operación del embrague No emplee aceites de clasificación API SH o superiores que tengan la etiqueta de servicio API Energy Conserving o Resource Conserving en el recipiente Pueden afectar la lubricación y el rendimiento del em...

Page 67: ...el aceite de motor debe basarse en la temperatura atmosférica media de la zona donde conduce Lo que sigue es una guía para seleccionar el grado o viscosidad más adecuado del aceite que va a utilizarse a diferentes temperaturas atmosféricas ...

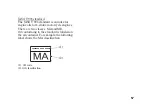
Page 68: ...encia para aceites de motores de motocicletas 4 tiempos Existen dos clases MA y MB El aceite que cumple con la normativa está etiquetado en su envase Por ejemplo la etiqueta siguiente muestra la clasificación MA 1 2 1 Código del aceite 2 Clasificación del aceite ...

Page 69: ... un sumidero El aceite de motor usado puede provocar cáncer de piel si se entra varias veces en contacto con la piel durante períodos prolongados Aunque esto sea improbable que pase a menos que se maneje aceite usado diariamente todavía es aconsejable lavarse bien las manos con agua y jabón tan pronto como sea posible después de manejar el aceite usado Para cambiar el aceite es necesario utilizar ...

Page 70: ...piente para el drenaje 3 Para drenar el aceite quite el tornillo de drenaje de aceite 1 y la arandela de sellado 2 4 Quite la tapa del filtro de aceite 3 la junta tórica 4 el resorte 5 y el filtro de aceite 6 quitando los tornillos de la tapa del filtro de aceite 7 1 2 1 Tornillo de drenaje de aceite 2 Arandela de sellado ...

Page 71: ...e originales Honda o un filtro de calidad equivalente especificado para su modelo Usar el filtro Honda errado o un filtro que no sea de Honda y que no sea de calidad equivalente puede causar daños al motor 7 4 3 6 8 5 3 Tapa del filtro de aceite 4 Junta tórica 5 Resorte 6 Filtro de aceite 7 Tornillos de la tapa del filtro de aceite 8 Marca OUT SIDE ...

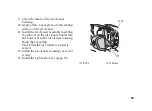
Page 72: ... 2 4 kgf m 18 lbf ft 9 Llene el cárter con el aceite de grado recomendado Si se ha cambiado el filtro de aceite 1 4 L 1 5 US qt 1 2 Imp qt Si el filtro de aceite no se ha cambiado use aproximadamente 1 4 L 1 5 US qt 1 2 Imp qt 10 Instale el tapón de llenado de aceite varilla de nivel 11 Arranque el motor y déjelo en ralentí durante 3 5 minutos 12 2 3 minutos después de haber parado el motor compru...

Page 73: ...jía de grado térmico incorrecto Podrían producirse daños graves en el motor 1 Desconecte de la capucha de la bujía 1 2 Limpie la suciedad alrededor de la base de la bujía 3 Extraiga la bujía con la llave de bujías 2 y el destornillador 3 incluidos en la bolsa de herramientas 1 3 2 1 Capucha de la bujía 2 Llave de bujías 3 Destornillador ...

Page 74: ...rese que la arandela de la bujía esté en buenas condiciones 8 Estando instalada la arandela coloque la bujía manualmente para evitar dañar la rosca 9 Apriete la bujía Si la vieja bujía es buena 1 5 de vuelta después que se asiente Si se instala una bujía nueva apriétela en dos pasos para evitar que se afloje a Primero apriete la bujía 1 4 de vuelta después que se asiente b Luego afloje la bujía c ...

Page 75: ...uierda y a la derecha 2 Inspeccione el estado del cable del acelerador 1 desde el puño del acelerador hasta el cuerpo de aceleración Los cables deben cambiarse o ajustarse si están retorcidos desgastados o mal enrutados 3 Compruebe la tensión o esfuerzo de los cables en todas las posiciones de la dirección Lubrique los cables del acelerador con lubricante de cables disponible en el mercado para ev...

Page 76: ...star la holgura afloje la contratuerca inferior 4 o la contratuerca superior 5 y gire el ajustador inferior o superior Apriete la contratuerca una vez finalizado el ajuste Después del ajuste vuelva a comprobar si es suave la rotación del puño del acelerador desde la posición totalmente cerrada a la de totalmente abierta con la dirección completamente a la derecha y a la izquierda sí como recta hac...

Page 77: ...3 2 5 1 Tornillos 2 Tapa del silenciador 3 Parachispas 4 Junta 5 Silenciador 1 Deje que el motor y el silenciador se enfríen 2 Extraiga los tornillos 1 y la tapa del silenciador 2 el parachispas 3 y la junta 4 del silenciador 5 3 Utilice un cepillo para retirar la carbonilla del tamiz del parachispas 6 Tenga cuidado para evitar dañar el tamiz del parachispas El parachispas no debe tener ninguna ro...

Page 78: ...locando un soporte debajo del motor y ponga la transmisión en neutral 2 Compruebe la holgura en la parte inferior de la cadena de transmisión en el punto medio entre el piñón y la corona La holgura de la cadena de transmisión debe ajustarse de forma que sea posible moverla verticalmente con la mano entre 30 40 mm 1 2 1 6 in 3 Haga rodar hacia delante la motocicleta Pare Compruebe la holgura de la ...

Page 79: ...stado hasta la parte inferior de los cortes 5 pida a su concesionario que reemplácelo Cambie el deslizador de la guía si la cadena puede verse a través de la ventanilla de inspección de desgaste 6 Reemplace el rodillo de la cadena si es menor que 18 mm 0 7 in 4 5 2 6 3 2 Deslizador de la cadena 3 Deslizador de la guía de la cadena 4 Rodillo de la cadena 5 Corte 6 Ventanilla de inspección de desgas...

Page 80: ... No utilice un eslabón maestro común en esta cadena Consulte a su concesionario 6 Inspeccione los dientes del piñón y dela corona buscando por desgastes o daños Reemplácelos si es necesario Damaged Sprocket Teeth REPLACE Worn Sprocket Teeth REPLACE Normal Sprocket Teeth GOOD Dientes de la relación de transmisión normales BUENO REEMPLACE REEMPLACE Dientes de la relación de transmisión dañados Dient...

Page 81: ...ra aumentar o disminuir la tensión de la cadena 4 Una vez finalizado el ajuste asegúrese que las mismas marcas de referencia de los ajustadores 4 alinean con los topes 5 en ambos lados del basculante Si la holgura de la cadena de transmisión es excesiva cuando mueva el eje trasero hasta el límite más longo del ajuste la cadena de transmisión está desgastada y tendrá que reemplazarse 3 1 5 4 5 3 4 ...

Page 82: ...ta presión y determinados disolventes para realizar la limpieza Limpie las superficies laterales de la cadena con un paño seco No cepille las juntas tóricas de goma El cepillado podría dañarlas Seque y lubrique la cadena de transmisión con lubricante diseñado específicamente para cadenas con juntas tóricas Los lubricantes de cadenas disponibles en el mercado pueden contener disolventes que pueden ...

Page 83: ...lado podría dañarlas El uso de disolventes también puede dañar las juntas tóricas 2 Inspeccione la cadena de transmisión para detectar posibles desgastes o daños Reemplace cualquier cadena que tiene rodillos dañados que esté holgada o parece irreparable Cadena DID 520VD2 Nunca use gasolina o disolventes de bajo punto de inflamación para la limpieza de la cadena de transmisión Podría producirse un ...

Page 84: ...a llanta Si el alabeo es perceptible consulte a su concesionario para su inspección El mantenimiento de la tensión de los radios y el perfecto estado de la rueda son esenciales para el funcionamiento seguro de la motocicleta Durante los primeros 150 km 100 millas los radios se aflojarán más rápidamente debido al asentamiento inicial de las piezas La excesiva flojedad de los radios puede causar ine...

Page 85: ...rueda no esté colocada en la motocicleta Los pistones de la pinza de freno serán forzados a salir de sus cilindros con la consiguiente pérdida del líquido de freno Si se diera en caso será necesario hacer el mantenimiento del sistema del freno Consulte a su concesionario para realizar este servicio Evite manchar con grasa aceite o suciedad las superficies del disco y de las pastillas Cualquier con...

Page 86: ...ntado 4 Accione el freno delantero y bombee varias veces la horquilla 5 Primero apriete las tuercas superiores del fijador del eje con el torque especificado y luego apriete las tuercas inferiores con el mismo torque Torque de las tuercas del fijador del eje 12 N m 1 2 kgf m 9 lbf ft 6 Una vez instalada la rueda accione varias veces el freno y compruebe si la rueda gira libremente Vuelva a comprob...

Page 87: ... de modo que la rueda trasera se pueda mover hacia adelante para obtener la máxima holgura de la cadena de transmisión 3 1 1 Tuerca del eje trasero 4 Mueva la rueda trasera hacia delante Retire la cadena de transmisión de la corona 5 Extraiga la tuerca del eje trasero los ajustadores de la cadena los espaciadores laterales el eje trasero y la rueda trasera del basculante 3 2 2 Eje trasero 3 Ajusta...

Page 88: ...e los espaciadores laterales en la rueda en sus ubicaciones originales Coloque cuidadosamente el disco entre las pastillas de freno para evitar que se rayen Asegúrese que la lengüeta 4 en el soporte de la pinza 5 está ubicada en la ranura 6 del basculante Compruebe si los ajustadores de la cadena están instalados correctamente 2 Apriete la tuerca del eje trasero con el torque especificado Torque d...

Page 89: ...eneralmente las pastillas se desgastan más rápido en caminos húmedos y sucios Inspeccione las pastillas en cada intervalo de mantenimiento regular página 46 Compruebe el corte 1 en cada pastilla Si cualquiera de las pastillas se ha desgastado hasta el corte reemplace ambas pastillas como un conjunto Consulte a su concesionario para realizar este servicio FRONT BRAKE REAR BRAKE 1 1 1 Cortes FRENO D...

Page 90: ...ando otros fallos eléctricos póngase en contacto con su concesionario AVISO Su batería es del tipo sin mantenimiento y podrá dañarse de forma permanente si se quita la tira de tapones ADVERTENCIA Durante el uso normal la batería desprende gas de hidrógeno explosivo Una chispa o llama puede hacer que la batería explote con fuerza suficiente para causarle la muerte o lesiones graves Póngase ropa de ...

Page 91: ...ecte el terminal positivo 3 de la batería 6 Levante el fijador de la batería 4 y a continuación retire la batería 5 teniendo cuidado de no soltar las tuercas del terminal Instalación 1 Vuelva a instalar en el orden inverso a la extracción Asegúrese de conectar primero el terminal positivo y luego el terminal negativo 2 Compruebe si todos los tornillos y otros fijadores están seguros 4 5 2 3 1 1 To...

Page 92: ...e la existencia de un cortocircuito o sobrecarga en el sistema eléctrico Consulte a su concesionario para su reparación AVISO Nunca use un fusible con una clasificación diferente de lo especificado Daños graves en el sistema eléctrico o un incendio pueden ocurrir causando una pérdida peligrosa de iluminación o de potencia del motor Fusible quemado ...

Page 93: ...magnético de arranque 2 desde los ganchos 3 de la caja de la batería 3 Desconecte el conector del interruptor magnético de arranque 4 4 Saque el fusible Si el fusible está quemado instale un fusible nuevo El fusible principal de repuesto 5 se encuentra debajo del interruptor magnético de arranque 5 Vuelva a conectar el conector e instale el interruptor magnético de arranque 6 Instale el carenado l...

Page 94: ... 3 de la caja de batería 3 Abra la tapa de la caja de fusibles y saque el fusible auxiliar Si el fusible está quemado reemplácelo por un fusible de repuesto 4 4 Instale el carenado lateral izquierdo 4 2 1 3 1 Fusible auxiliar 2 Caja de fusibles 3 Gancho 4 Fusible de repuesto AVISO Reemplazar un fusible con uno que tenga una clasificación más alta aumenta en gran medida la posibilidad de dañar el s...

Page 95: ...ruebe la seguridad de todos los tornillos de fijación de la horquilla y del manillar 1 1 1 1 1 Tornillos de fijación Conducir la motocicleta con componentes de la dirección o de la suspensión delantera sueltos desgastados o dañados puede afectar negativamente el manejo y la estabilidad del vehículo Si algún componente de la suspensión parece desgastado o dañado consulte a su distribuidor para insp...

Page 96: ...ndica cojinetes desgastados 2 Compruebe todos los puntos de fijación 2 de los componentes de la suspensión con respecto a la seguridad de sus fijaciones 3 Compruebe si hay fugas de aceite en los amortiguadores Si algún componente de la suspensión parece desgastado o dañado consulte a su distribuidor para inspeccionarlo Los componentes de la suspensión están directamente relacionados con la segurid...

Page 97: ...resorte del caballete lateral 1 en busca de daños y pérdida de tensión y el movimiento libre del conjunto del caballete lateral Si el caballete lateral chirría o está rígido limpie el área del pivote y lubrique el tornillo pivote con aceite de motor limpio 1 1 Resorte del caballete lateral ...

Page 98: ...segúrese que se enfríe antes de realizar el mantenimiento El equipo de iluminación no es legal para uso en carretera No conduzca esta motocicleta en calles carreteras o autopistas Asegúrese de girar el interruptor de encendido a la posición OFF cuando reemplazar la bombilla No emplee bombillas que no sean las especificadas Después de instalar una bombilla nueva compruebe si la luz funciona correct...

Page 99: ...88 Bombilla del faro 1 Quite el tornillo 1 1 1 Tornillo 2 Tire de los salientes 3 y quite el faro 4 4 3 3 Salientes 4 Faro ...

Page 100: ...asquillo 6 y gírelo hacia la izquierda Quite la bombilla 7 5 Instale una nueva bombilla en el orden inverso a la extracción Cuando se instala la bombilla alinee la lengüeta de la bombilla con la ranura en el faro 5 6 7 5 Guardapolvo de goma 6 Casquillo 7 Bombilla ...

Page 101: ... el motor y el sistema de escape se enfríen Recomendamos el uso de una manguera de jardín de baja presión para lavar su motocicleta Lavadoras de alta presión como los de lavado de automóviles que funcionan con monedas pueden dañar ciertas partes de su motocicleta AVISO El agua a alta presión o aire puede dañar ciertas partes de su motocicleta El chorro de agua a alta presión puede dañar ciertas pa...

Page 102: ... la función del faro Cualquier condensación en el interior del faro debe disiparse tras unos minutos de funcionamiento del motor con el faro encendido Sin embargo si ve una gran cantidad de agua o hielo acumulado dentro de la lente debe llevar el vehículo a que sea inspeccionado por el concesionario 4 Una vez finalizada la limpieza aclare completamente la motocicleta con agua limpia abundante Los ...

Page 103: ...ergente neutro para limpiar las superficies pintadas del tubo de escape y del silenciador Si usted no está seguro si el tubo de escape y el silenciador están pintados póngase en contacto con su concesionario Limpieza de superficies con pintura mate Limpie las superficies con pintura mate usando una esponja o un paño suave y agua abundante Séquelas con un paño suave y limpio Use detergente neutro p...

Page 104: ...ocicleta Evite usar una cuerda que puede aflojarse y permitir que la motocicleta se caiga Para asegurar su motocicleta sujete la rueda delantera contra la parte delantera de la plataforma del camión o del remolque Sujete los extremos inferiores de dos tiras a los ganchos de amarre en la plataforma de remolque Una los extremos superiores de las correas al manillar uno en el lado derecho y el otro e...

Page 105: ...pensión delantera se comprima aproximadamente a la mitad Demasiada presión es innecesaria y podría dañar los sellos de la horquilla Use otra correa de amarre para evitar que la parte trasera de la motocicleta se mueva Recomendamos que no transporte su motocicleta de lado Esto puede dañar la motocicleta y la fuga de combustible podría ser un peligro ...

Page 106: ...odría olvidarse de realizar estas reparaciones cuando vuelva a utilizar la motocicleta ALMACENAMIENTO 1 Cambie el aceite y el filtro del motor 2 Llene el depósito de combustible Asegúrese que el tapón de llenado de combustible está correctamente instalado ADVERTENCIA El combustible es muy inflamable y explosivo Usted puede sufrir quemaduras o lesiones graves al manejar combustible Detenga el motor...

Page 107: ...ir el aceite Vuelva a instalar la bujía y la capucha de la bujía 4 Quite la batería Almacénela en una zona protegida de temperaturas bajo cero y luz solar directa Cargue lentamente la batería una vez al mes 5 Lave y seque la motocicleta Encere todas las superficies pintadas Cubra las superficies cromadas con aceite antioxidante 6 Lubrique la cadena de transmisión página 71 7 Infle los neumáticos a...

Page 108: ...icleta 3 Cargue la batería si es necesario Instale la batería 4 Si su motocicleta ha sido almacenada durante más de dos meses vacíe y reemplace el combustible 5 Realice todas las comprobaciones de la Inspección previa a la circulación página 32 6 Haga una prueba de conducción de la motocicleta a poca velocidad en un lugar seguro alejado del tráfico ...

Page 109: ...davía está en funcionamiento párelo y revíselo con cuidado inspeccione si hay fugas de líquidos compruebe el apriete de las tuercas y tornillos importantes y fije piezas importantes como el manillar las manetas de control los frenos y las ruedas Si se han producido daños secundarios o si usted no está seguro de los posibles daños ocasionados conduzca a poca velocidad y con cuidado Algunas veces lo...

Page 110: ...l funcionamiento inestable del motor se producirá intermitentemente mientras se conduce Incluso si ocurre este síntoma puede continuar pilotando su motocicleta Si se produce un funcionamiento inestable del motor incluso si hay suficiente combustible disponible haga que su concesionario inspeccione su motocicleta lo antes posible ...

Page 111: ...e de motor Después del drenaje 1 4 L 1 5 US qt 1 2 Imp qt Después del drenaje y cambio del filtro de aceite 1 4 L 1 5 US qt 1 2 Imp qt Después del desmontaje 1 7 L 1 8 US qt 1 5 Imp qt Depósito de combustible 6 0 L 1 59 US gal 1 32 Imp gal Reserva de combustible 1 3 L 0 34 US gal 0 29 Imp gal Capacidad de pasajeros Sólo piloto sin pasajeros Capacidad de peso máxima 100 kg 220 lb ...

Page 112: ... Relación de compresión 9 6 1 Cilindrada 249 58 cm3 15 2 in3 Bujía de encendido Estándar LMAR7H 9DS NGK Holgura de la bujía 0 8 0 9 mm 0 03 0 04 in Revolución de ralentí 1 400 100 rpm Holgura de válvulas en frío Admisión 0 10 mm 0 004 in Escape 0 15 mm 0 006 in ...

Page 113: ...delantero Tamaño del neumático trasero Tipo de neumático 26 5 102 mm 4 0 in 80 100 21 51R NHS 100 100 18 59R NHS Bias ply con cámara TRANSMISIÓN Reducción primaria Relación de transmisión 1ª 2ª 3ª 4ª 5ª Reducción final 2 863 2 846 1 900 1 400 1 083 0 896 3 846 ...

Page 114: ...103 SISTEMA ELÉCTRICO Batería YTZ7S 12 V 6 Ah 10 HR Alternador 209 kW 5 000 min 1 rpm LUCES Faro 12 V 35 W FUSIBLE Fusible principal 10 A Fusible auxiliar 7 5 A ...

Page 115: ......

Page 116: ...Honda CRF250F OWNER S MANUAL Moto Honda da Amazônia Ltda 2018 ...

Page 117: ...tion does not safely permit the carrying of a passenger Never exceed the maximum weight capacity FOR OFF ROAD USE ONLY This motorcycle is designed and manufactured for off road use only READ THIS OWNER S MANUAL CAREFULLY Pay special attention to the safety messages that appear throughout the manual These messages are fully explained in the A Few Words About Safety section which appears before the ...

Page 118: ...he latest production information available at the time of approval for printing Moto Honda da Amazônia Ltda reserves the right to make changes at any time without notice and without incurring any obligation No part of this publication may be reproduced without written permission ...

Page 119: ...e inspection before every outing and regular maintenance are essential To help meet the challenges safely and enjoy the adventure fully become thoroughly familiar with this Owner s Manual BEFORE YOU RIDE THE MOTORCYCLE As you read this manual you will find information that is preceded by a symbol This information is intended to help you avoid damage to your motorcycle other property or the environ...

Page 120: ...he following code in this manual indicates each country The specifications may vary with each locale This vehicle pictured in this owner s manual may not match your actual vehicle U Australia New Zealand ...

Page 121: ...nual This information alerts you to potential hazards that could hurt you or others Of course it is not practical or possible to warn you about all hazards associated with operating or maintaining a motorcycle You must use your own good judgment You will find important safety information in a variety of forms including Safety Labels on the motorcycle Safety Messages preceded by a safety alert symb...

Page 122: ...uctions how to use this motorcycle correctly and safely This entire manual is filled with important safety information please read it carefully You WILL be KILLED or SERIOUSLY HURT if you don t follow instructions You CAN be KILLED or SERIOUSLY HURT if you don t follow instructions You CAN be HURT if you don t follow instructions ...

Page 123: ...CTIVE APPAREL 5 LOAD LIMITS AND GUIDELINES 9 PARTS LOCATION 14 MAJOR COMPONENTS Information you need to operate this motorcycle 14 BRAKES 17 CLUTCH 19 FUEL 22 ENGINE OIL 23 TYRES page 27 ESSENTIAL INDIVIDUAL COMPONENTS 27 IGNITION SWITCH 28 START BUTTON 29 ENGINE STOP BUTTON ...

Page 124: ...TURES Not required for operation 30 SIDE COVER 31 HEADLIGHT AIM VERTICAL ADJUSTMENT page 32 OPERATION 32 PRE RIDE INSPECTION 34 STARTING THE ENGINE 36 RUNNING IN 37 RIDING 39 BRAKING 40 PARKING 40 ANTI THEFT TIPS ...

Page 125: ...54 CRANKCASE BREATHER 55 ENGINE OIL 62 SPARK PLUG 64 THROTTLE OPERATION 66 SPARK ARRESTER 67 DRIVE CHAIN 73 WHEEL RIMS AND SPOKES 74 WHEEL REMOVAL 78 BRAKE PAD WEAR 79 BATTERY page 81 FUSE REPLACEMENT 84 FRONT SUSPENSION 85 REAR SUSPENSION 86 SIDE STAND 87 BULB REPLACEMENT 90 CLEANING 93 TRANSPORTING 95 STORAGE GUIDE 95 STORAGE 97 REMOVAL FROM STORAGE 98 TAKING CARE OF THE UNEXPECTED 100 SPECIFICA...

Page 126: ... consider to be most important Always Wear a Helmet It s a proven fact helmets significantly reduce the number and severity of head injuries So always wear an approved motorcycle helmet We also recommend that you wear eye protection sturdy boots gloves and other protective gear page 3 Never Carry a Passenger Your motorcycle is designed for one person only There are no handholds footrests or seat f...

Page 127: ...l instruction from an experienced rider can also be valuable If you need assistance ask your dealer about riding groups in your area Be Alert for Off Road Hazards The terrain can present a variety of challenges when you ride off road Continually read the terrain for unexpected turns drop offs rocks ruts and other hazards Always keep your speed low enough to allow time to see and react to hazards R...

Page 128: ...from your base To help avoid problems inspect your motorcycle before every ride and perform all recommended maintenance PROTECTIVE APPAREL For your safety we strongly recommend that you always wear an approved motorcycle helmet eye protection boots gloves trousers and a long sleeved jersey shirt or jacket whenever you ride Although complete protection is not possible wearing proper gear can reduce...

Page 129: ... offers some protection but a full face helmet offers more Always wear a face shield or goggles to protect your eyes and help your vision Additional Riding Gear In addition to a helmet and eye protection we also recommend Sturdy off road motorcycle boots to help protect your feet ankles and lower legs Off road motorcycle gloves to help protect your hands Riding trousers with knee and hip pads a ri...

Page 130: ... making modifications that change this motorcycle s design and performance can also make it unsafe Also the weight of any accessories will reduce the maximum load the motorcycle can carry The following pages give more specific information on loading accessories and modifications Loading How much weight you put on your motorcycle and how you load it are important to your safety If you decide to car...

Page 131: ...arry cargo ride at reduced speeds and follow these common sense guidelines Keep cargo small and light Make sure it cannot easily be caught on brush or other objects and that it does not interfere with your ability to shift position to maintain balance and stability Place weight as close to the centre of the motorcycle as possible Do not attach large or heavy items such as a sleeping bag or tent to...

Page 132: ...election installation and use of non Honda accessories Check with your dealer for assistance and always follow these guidelines Make sure the accessory does not obscure any lights reduce ground clearance and banking angle limit suspension travel or steering travel alter your riding position or interfere with operating any controls Be sure electrical equipment does not exceed the motorcycle s elect...

Page 133: ... in any way that would change its design or operation Such changes could seriously impair your motorcycle s handling stability and braking making it unsafe to ride Removing or modifying your exhaust system such as the spark arresters or mufflers or other equipment can also make your motorcycle illegal ...

Page 134: ...TS LOCATION Front brake fluid reservoir Clutch lever Front brake lever Fuel fill cap Fuel reserve indicator Start button PGM FI malfunction indicator lamp MIL Throttle grip Engine stop button Ignition switch ...

Page 135: ...10 Air cleaner Engine oil fill cap dipstick Engine oil filter Rear brake pedal Foot peg Spark arrester Rear brake caliper ...

Page 136: ...11 Main fuse Engine oil drain bolt Shift lever Drive chain Crankcase breather Front brake caliper Side stand Spark plug Battery Foot peg Sub fuse ...

Page 137: ...12 INDICATORS The indicators are equipped to the locations as shown in the illustration Their functions are described in the tables 1 PGM FI malfunction indicator lamp MIL 2 Fuel reserve indicator 1 2 ...

Page 138: ...t come on when it should have your dealer check for problems If it comes on at any other time reduce speed and take the motorcycle to your dealer as soon as possible 2 Fuel reserve indicator When this indicator comes on while riding fuel reserved in the tank is about 1 3 0 34 US gal 0 29 Imp gal Should also light for a few seconds and then go off when the ignition switch is turned on If the indica...

Page 139: ...becomes excessive and the brake pads are not worn beyond the recommended limit page 78 there is probably air in the brake system and it must be bled See your dealer for this service Front Brake Brake Fluid Level With the motorcycle in an upright position check the fluid level It should be above the LWR mark 1 If the level is at or below the LWR mark check the brake pads for wear page 78 Worn pads ...

Page 140: ...he handgrip turn the adjuster 4 clockwise To position the front brake lever closer to the handgrip turn the adjuster counterclockwise 4 Tighten the lock nut Return the dust cover to its normal position 5 Apply the brake release it then spin the wheel and check that it rotates freely Repeat this procedure several times Other Checks Make sure there are no fluid leaks Check for deterioration or crack...

Page 141: ...WER level mark check the brake pads for wear page 78 Worn pads should be replaced If the pads are not worn have your brake system inspected for leaks The recommended brake fluid is Honda DOT 4 brake fluid from a sealed container or an equivalent Other Checks Make sure there are no fluid leaks Check for deterioration or cracks in the hoses and fittings 1 LOWER level mark 1 ...

Page 142: ... mm 0 4 0 8 in 1 Pull back the rubber dust cover 2 2 Loosen the lock nut 3 and turn the clutch cable upper adjuster 4 Tighten the lock nut and check the adjustment 3 If the adjuster is threaded out near its limit or if the correct freeplay cannot be obtained loosen the lock nut and turn in the clutch cable upper adjuster completely Tighten the lock nut and install the rubber dust cover 1 Clutch le...

Page 143: ...ure the engine does not stall and the motorcycle does not creep Gradually release the clutch lever and open the throttle The motorcycle should begin to move smoothly and accelerate gradually If proper adjustment cannot be obtained or the clutch does not work correctly see your dealer Other Checks Check the clutch cable for kinks or signs of wear that could cause sticking or failure Lubricate the c...

Page 144: ...ould be no fuel in the bottom of the filler neck 4 After refueling be sure to tighten the fuel fill cap clockwise until it clicks Insert the breather tube into the steering stem nut Petrol is highly flammable and explosive You can be burned or seriously injured when handling fuel Stop the engine and keep heat sparks and flame away Refuel only outdoors Wipe up spills immediately 1 Fuel fill cap 2 B...

Page 145: ...nge brands of petrol If spark knock or pinking persists consult your dealer Failure to do so is considered misuse and damage caused by misuse is not covered by Honda s Limited Warranty Occasionally you may experience light spark knock while operating under heavy loads This is no cause for concern it simply means your engine is operating efficiently ...

Page 146: ...ing more than 5 methanol even if it has cosolvents and corrosion inhibitors Fuel system damage or engine performance problems resulting from the use of fuels that contain alcohol is not covered under the warranty Honda cannot endorse the use of fuels containing methanol since evidence of their suitability is as yet incomplete Before buying fuel from an unfamiliar station try to find out if the fue...

Page 147: ...gine and let it idle for 3 5 minutes 3 Stop the engine After 2 3 minutes remove the oil fill cap dipstick wipe it clean and reinsert the oil fill cap dipstick without screwing it in Remove the oil fill cap dipstick The oil level should be between the upper and lower level marks on the oil fill cap dipstick 4 If required add the specified oil see page 55 up to the upper level mark Do not overfill 5...

Page 148: ...t handling and are more likely to fail from being overheated Underinflated tyres can also cause wheel damage in rocky terrain Overinflated tyres make your motorcycle ride harshly are more prone to damage from surface hazards and wear unevenly Make sure the valve stem caps are secure If necessary install new caps Using tyres that are excessively worn or improperly inflated can cause a crash in whic...

Page 149: ...ion Whenever you check the tyre pressures you should also examine the tyre treads and sidewalls for wear damage and foreign objects Look for Bumps or bulges in the side of the tyre or the tread Replace the tyre if you find any bumps or bulges Cuts splits or cracks in the tyre Replace the tyre if you can see fabric or cord Excessive tread wear Also if you hit a pothole or hard object pull to the si...

Page 150: ...paired may not have the same reliability as a new one and it may fail while you are riding If you need to make a temporary repair by patching a tube or using an aerosol sealant ride cautiously at reduced speed and have the tube replaced before you ride again Any time a tube is replaced the tyre should be carefully inspected as described on page 24 Minimum tread depth Front 3 0 mm 0 12 in Rear 3 0 ...

Page 151: ... tube Whenever you replace a tyre use one that is equivalent to the original and be sure the wheel is balanced after the new tyre is installed Also remember to replace the inner tube whenever you replace a tyre The old tube will probably be stretched and if installed in a new tyre it could fail Installing improper tyres on your motorcycle can affect handling and stability This can cause a crash in...

Page 152: ...the motorcycle Before riding insert the key and turn it to the ON position After parking the motorcycle remove the key OFF ON 1 Ignition switch 1 OFF ON Key Position Function Key Removal OFF The engine cannot be operated Key can be removed ON With the transmission in neutral or in gear with the clutch lever pulled in the engine can be started Key cannot be removed ...

Page 153: ...28 START BUTTON The start button 1 is next to the throttle grip When the start button is pressed the starter motor cranks the engine See page 35 for the starting procedure 1 Start button 1 ...

Page 154: ...N The engine stop button 1 is next to the left handlebar grip The engine stop button is used to turn the engine off in an emergency Push the button in and hold it in until the engine stops completely 1 Engine stop button 1 ...

Page 155: ... main fuse and sub fuse Removal 1 Remove the bolt 2 2 Pull out the prongs 3 from the rubber grommets 4 and the boss 5 from the hole 6 on the shroud Installation 1 Slide the top of the side cover under the bottom edge of the seat 2 Align the prongs with the rubber grommets and also the boss with the hole on the shroud 3 Install the bolt and tighten it securely 1 Right side cover 2 Bolt 3 Prongs 4 R...

Page 156: ...31 HEADLIGHT AIM VERTICAL ADJUSTMENT Vertical adjustment can be made by turning the screw 1 in or out as necessary Obey local laws and regulations 1 Screw A Up B Down 1 A B ...

Page 157: ...lay if necessary page 15 Tyres check condition and pressure pages 23 26 Spokes and rim locks check and tighten if necessary page 73 Drive chain check condition and slack page 67 Adjust and lubricate if necessary Chain slider guide slider and roller check for wear page 68 Throttle check for smooth opening and full closing in all steering positions Adjust freeplay if necessary pages 64 65 Indicators...

Page 158: ...erly Spark plug and high tension terminal check for looseness Engine stop button check for proper function page 29 Nuts bolts fasteners check the front and rear wheel to see that the front axle axle holder nuts and rear axle nut are tightened securely Check security of all other nuts bolts and fasteners ...

Page 159: ...in enclosed areas such as a garage Do not run the engine with the garage door closed Even with the door open run the engine only long enough to move your motorcycle out of the garage Do not use the electric starter for more than 5 seconds at a time Release the start button for approximately 10 seconds before pressing it again Preparation Before starting insert the key turn the ignition switch to O...

Page 160: ...ed engine Follow the procedure indicated below Any Air Temperature 1 With the throttle completely closed press the start button 2 If you cannot start the engine open the throttle slightly about 3 mm 0 1 in without freeplay about 3 mm 0 1 in without freeplay ...

Page 161: ...ion Cut Off Your motorcycle is designed to automatically stop the engine and fuel pump if the motorcycle is over turned a banking sensor cuts off the ignition system Before restarting the engine you must turn the ignition switch to the OFF position and then back to ON position RUNNING IN Help assure your motorcycle s future reliability and performance by paying extra attention to how you ride duri...

Page 162: ... is idling pull in the clutch lever and depress the shift lever to shift into 1st low gear 3 Slowly release the clutch lever and at the same time gradually increase engine speed by opening the throttle Coordination of the throttle and clutch lever will assure a smooth positive start 4 When the motorcycle attains a moderate speed close the throttle pull in the clutch lever and shift to 2nd gear by ...

Page 163: ...rrev in the next lower gear the rear wheel may lose traction resulting in a possible loss of vehicle control Do not shift gears without disengaging the clutch and closing the throttle The engine and drive train could be damaged by overspeed and shock Do not tow the motorcycle or coast for long distances while the engine is off The transmission will not be properly lubricated and damage may result ...

Page 164: ...e motorcycle When possible reduce speed or brake before entering a turn closing the throttle or braking in mid turn may cause wheel slip Wheel slip will reduce control of the motorcycle When riding in wet or rainy conditions or on loose surfaces the ability to maneuver and stop will be reduced All of your actions should be smooth under these conditions Rapid acceleration braking or turning may cau...

Page 165: ...NTI THEFT TIPS 1 Be sure the registration information for your motorcycle is accurate and current 2 Park your motorcycle in a locked garage whenever possible 3 Use an additional anti theft device of good quality 4 Put your name address and phone number in this Owner s Manual and keep it on your motorcycle at all times Many times stolen motorcycles are identified by information in the Owner s Manua...

Page 166: ...average riding conditions More frequent service is needed if you subject your motorcycle to severe use such as competition or ride in unusually wet or dusty areas Frequent servicing of the air cleaner is especially important to help you avoid a possible costly engine repair If your motorcycle overturns or becomes involved in a crash be sure your dealer inspects all major parts even if you are able...

Page 167: ... only by a Honda technician or other qualified mechanic instructions are included in this manual only to assist in emergency service Some of the most important safety precautions follow However we cannot warn you of every conceivable hazard that can arise in performing maintenance Only you can decide whether or not you should perform a given task Failure to properly follow maintenance instructions...

Page 168: ... begin and make sure you have the tools and skills required To help prevent the motorcycle from falling over park it on a firm level surface using the side stand or a maintenance stand to provide support To reduce the possibility of a fire or explosion be careful when working around petrol Use only nonflammable solvent not petrol to clean parts Keep cigarettes sparks and flames away from all fuel ...

Page 169: ...rk should be performed in accordance with standards and specifications of Honda by properly trained and equipped technicians Your dealer meets all of these requirements Should be serviced by your dealer unless the owner has proper tools and service data and is mechanically qualified Refer to the Official Honda Shop Manual In the interest of safety we recommend these items be serviced only by your ...

Page 170: ...100 600 1 200 1 800 2 400 NOTE MONTH 1 6 12 18 24 FUEL LINE I I FUEL FILTER Every 8 000 km 4 800 mi R THROTTLE OPERATION I I 64 AIR CLEANER NOTE 1 C C C C 51 CRANKCASE BREATHER I I I I 54 SPARK PLUG I I I I 62 VALVE CLEARANCE I I I I I ENGINE OIL R R R R R 58 ENGINE OIL FILTER R R R R R 58 ENGINE IDLE SPEED I I I I I INTERNAL ...

Page 171: ... 500 km 300 mi or every 3 months I L 67 DRIVE CHAIN SLIDER I I I I 68 BRAKE FLUID NOTE 2 I I I I 14 16 BRAKE PADS WEAR I I I I 78 BRAKE SYSTEM I I I I I 14 16 78 HEADLIGHT AIM I I 31 CLUTCH SYSTEM I I I I I 17 SIDE STAND I I 86 SUSPENSION I I 84 85 SPARK ARRESTER Every 1 600 km 1 000 mi or every 100 operating hours C 66 NUTS BOLTS FASTENERS I I I WHEELS TYRES I I I I I 23 73 STEERING HEAD BEARINGS...

Page 172: ...on No ITEMS INSPECT FOR ACTION REFER TO PAGE 1 All Pre ride Inspection items As listed 32 33 2 Engine oil Contaminants Change 22 55 61 3 Fuel line Deterioration damage or leakage Replace 4 Valve clearance Correct clearance Adjust 5 Engine idle speed Correct idle speed Adjust 6 Clutch discs Proper operation see NOTE 1 Replace 7 Air cleaner Contamination or tears Clean or replace 51 53 8 Spark plug ...

Page 173: ...mooth operation Replace 13 Rear suspension linkage bearings Smooth operation Replace 14 Brake pads Wear beyond service limit Replace 78 15 Drive chain max length pins 638 mm 25 1 in 41 Replace 67 72 16 Sprockets Wear and secure installation Replace or tighten 69 17 Seat Security Tighten 18 Headlight Proper beam aim Adjust 19 Control cables Smooth operation kinks and correct routing Lubricate or re...

Page 174: ...49 TOOL KIT The spark plug wrench 1 and No 2 Phillips screwdriver 2 are stored in the tool bag 3 1 Spark plug wrench 2 No 2 Phillips screwdriver 3 Tool bag 3 1 2 ...

Page 175: ...by your dealer when ordering replacement parts Record the numbers here for your reference FRAME NO __________________________ The frame number 1 is stamped on the right side of the steering head The engine number 2 is stamped on the left side of the engine ENGINE NO _________________________ 1 Frame number 1 2 Engine number 2 ...

Page 176: ...hen riding in unusually wet or dusty areas 1 Remove the right side cover page 30 2 Remove the screws 1 and air cleaner housing cover 2 3 Unhook the set spring 3 take care to avoid bending the set spring and set spring holder 4 4 Remove the air cleaner 5 1 Screws 2 Air cleaner housing cover 2 1 1 3 Set spring 4 Set spring holder 5 Air cleaner 3 4 5 ...

Page 177: ...oroughly Never use petrol or low flash point solvents for cleaning the air cleaner A fire or explosion could result 7 Soak the air cleaner in gear oil SAE 80 90 until saturated then squeeze out the excess oil 8 Assemble the air cleaner and holder Insert the tabs 7 in the air cleaner holes 8 5 Air cleaner 6 Air cleaner holder 7 Tabs 8 Holes 6 8 5 7 8 ...

Page 178: ... cleaner 11 Install the air cleaner assembly inserting the tabs 9 on the air cleaner holder into the holes 10 in the air cleaner housing Hook the set spring Check that the air cleaner is properly seated 12 Install the air cleaner housing cover and screws 13 Install the right side cover page 30 9 Tabs 10 Holes 10 9 ...

Page 179: ...requently if your motorcycle is ridden in the rain or often at full throttle If the drain tube overflows the air filter may become contaminated with engine oil causing poor engine performance Drain the deposits by pinching the crankcase breather tube 1 1 Crankcase breather tube 1 ...

Page 180: ... displaying a circular API energy conserving or resource conserving service label on the container They may affect lubrication and clutch performance NOT RECOMMENDED RECOMMENDED Do not use non detergent vegetable or castor based racing oils A P I classification SG or higher except oils labeled as energy conserving or resource conserving on the circular API service label Viscosity SAE 10W 30 JASO T...

Page 181: ...grade of engine oil should be based on average atmospheric temperature in your riding area The following provides a guide to the selection of the proper grade or viscosity of oil to be used at various atmospheric temperatures ...

Page 182: ...s an index for engine oils for 4 stroke motorcycle engines There are two classes MA and MB Oil conforming to the standard is labeled on the oil container For example the following label shows the MA classification 1 Oil code 2 Oil classification 1 2 ...

Page 183: ...the ground or down a drain Used engine oil may cause skin cancer if repeatedly left in contact with the skin for prolonged periods Although this is unlikely unless you handle used oil on a daily basis it is still advisable to thoroughly wash your hands with soap and water as soon as possible after handling used oil Changing the oil requires a torque wrench If you do not have it and the necessary s...

Page 184: ...se cover 2 Place a drain pan under the crankcase 3 To drain the oil remove the oil drain bolt 1 and sealing washer 2 4 Remove the oil filter cover 3 O ring 4 spring 5 and oil filter 6 by removing the oil filter cover bolts 7 1 Oil drain bolt 2 Sealing washer 1 2 ...

Page 185: ...ly the Honda Genuine oil filter or a filter of equivalent quality specified for your model Using the wrong Honda filter or a non Honda filter which is not of equivalent quality may cause engine damage 3 Oil filter cover 4 O ring 5 Spring 6 Oil filter 7 Oil filter cover bolt 8 OUT SIDE mark 7 4 3 6 8 5 ...

Page 186: ... m 2 4 kgf m 18 lbf ft 9 Fill the crankcase with the recommended grade oil If the oil filter was replaced 1 4 1 5 US qt 1 2 Imp qt If the oil filter was not replaced use approximately 1 4 1 5 US qt 1 2 Imp qt 10 Install the oil fill cap dipstick 11 Start the engine and let it idle for 3 5 minutes 12 2 3 minutes after stopping the engine check that the oil level is at the upper level mark on the oi...

Page 187: ...th an improper heat range Severe engine damage could result 1 Disconnect the spark plug cap 1 from the spark plug 2 Clean any dirt from around the spark plug base 3 Remove the spark plug with the spark plug wrench 2 and screwdriver 3 provided in the tool bag 1 Spark plug cap 2 Spark plug wrench 3 Screwdriver 1 3 2 ...

Page 188: ...ition 8 With the plug washer attached thread the spark plug in by hand to prevent cross threading 9 Tighten the spark plug If the old plug is good 1 5 turn after it seats If installing a new plug tighten it twice to prevent loosening a First tighten the plug 1 4 turn after it seats b Then loosen the plug c Next tighten the plug again 1 5 turn after it seats An improperly tightened spark plug can d...

Page 189: ...g positions 2 Inspect the condition of the throttle cable 1 from the throttle grip down to the throttle body If the cables are kinked chafed or improperly routed it should be replaced and or rerouted 3 Check the cables for tension or stress at all steering position Lubricate the throttle cables with a commercially available cable lubricant to prevent premature wear and corrosion 1 Throttle cables ...

Page 190: ...are made with the upper adjuster 3 To adjust freeplay loosen the lower lock nut 4 or upper lock nut 5 and turn the lower adjuster or upper adjuster Tighten the lock nut after adjustment After adjustment check again for smooth rotation of the throttle grip from the fully closed to the fully open position with the steering to the full right and left as well as straight ahead If proper throttle freep...

Page 191: ...d muffler to cool 2 Remove the bolts 1 and tail cover 2 the spark arrester 3 and the gasket 4 from the muffler 5 3 Use a brush to remove carbon deposits from the spark arrester screen 6 Be careful to avoid damaging the spark arrester screen The spark arrester must be free of breaks and holes Replace if necessary 4 Install the new gasket the spark arrester and tail cover and tighten the bolts to th...

Page 192: ... the engine off raise the rear wheel off the ground by placing a support under the engine and shift the transmission into neutral 2 Check slack in the lower drive chain run midway between the sprockets Drive chain slack should be adjusted to allow the following vertical movement by hand 30 40 mm 1 2 1 6 in 3 Roll the motorcycle forward Stop Check the drive chain slack Repeat this procedure several...

Page 193: ...e worn to the bottom of the cutouts 5 have your dealer replace the slider Replace the chain guide slider if the chain is visible through the wear inspection window 6 Replace the chain roller if it is smaller than 18 mm 0 7 in 2 Chain slider 3 Chain guide slider 4 Chain roller 5 Cutout 6 Wear inspection window 4 5 2 6 3 ...

Page 194: ...a staked master link drive chain which requires a special tool for cutting and staking Do not use an ordinary master link with this chain See your dealer 6 Inspect the sprocket teeth for possible wear or damage Replace if necessary Standard sprocket sizes If the drive chain or sprockets are excessively worn or damaged they should be replaced Never use a new chain with worn sprockets rapid chain we...

Page 195: ...he right and left chain adjusters 3 equally to increase or decrease chain slack 4 After adjusting be sure the same adjuster index marks 4 align with the stopper pins 5 on both sides of the swingarm If the drive chain slack is excessive when the rear axle is moved to the furthest limit of adjustment the drive chain is worn and must be replaced 1 Rear axle nut 2 Rear axle shaft 3 Chain adjusters 4 I...

Page 196: ...n this chain can be damaged by steam cleaning high pressure washers and certain solvents Clean the side surfaces of the chain with a dry cloth Do not brush the rubber O rings Brushing will damage them Wipe dry and lubricate only with drive chain lubricant designed specifically for O ring chains Commercial chain lubricants may contain solvents which could damage the rubber O rings Recommended lubri...

Page 197: ...th Do not brush the rubber O rings Brushing will damage them Use of a solvent may also damage the O rings 2 Inspect the drive chain for possible wear or damage Replace any chain that has damaged rollers loose fitting links or otherwise appears unserviceable Chain DID 520VD2 Never use petrol or low flash point solvents for cleaning the drive chain A fire or explosion could result 3 Inspect the spro...

Page 198: ...m runout If runout is noticeable see your dealer for inspection Maintenance of spoke tension and wheel trueness are critical to safe motorcycle operation During the first 150 km 100 miles spokes will loosen more rapidly due to initial seating of parts Excessively loose spokes may result in high speed instability and possible loss of control 1 Wheel rim 2 Spoke 3 Rim lock 1 3 2 ...

Page 199: ... side collars Do not depress the brake lever when the wheel is off the motorcycle The caliper pistons will be forced out of the cylinders with subsequent loss of brake fluid If this occurs servicing of the brake system will be necessary See your dealer for this service Avoid getting grease oil or dirt on the disc or pad surfaces Any contamination can cause poor brake performance or rapid pad wear ...

Page 200: ...Operate the front brake and pump the fork several times 5 First tighten the upper axle holder nuts to the specified torque then tighten the lower axle holder nuts to the same torque Axle holder nuts torque 12 N m 1 2 kgf m 9 lbf ft 6 After installing the wheel apply the brake several times and then check if the wheel rotates freely Recheck the wheel if the brake drags or if the wheel does not rota...

Page 201: ... shaft 2 3 Turn both chain adjusters 3 so the rear wheel can be moved all the way forward for maximum drive chain slack 4 Move the rear wheel forward Derail the drive chain from the driven sprocket 5 Remove the rear axle nut chain adjusters side collars rear axle shaft and rear wheel from the swingarm 1 Rear axle nut 3 1 2 Rear axle shaft 3 Chain adjusters 3 2 ...

Page 202: ... collars into the wheel in their original locations Carefully fit the brake disc between the pads to avoid scratching them Make sure the lug 4 on the caliper bracket 5 is located in the slot 6 in the swingarm Check that the chain adjusters are installed properly 2 Tighten the rear axle nut to the specified torque Rear axle nut torque 108 N m 11 0 kgf m 80 lbf ft 3 Apply the brake several times and...

Page 203: ...ype of riding and road conditions Generally the pads will wear faster on wet and dirty roads Inspect the pads at each regular maintenance interval page 46 Check the cutout 1 in each pad If either pad is worn to the cutout replace both pads as a set See your dealer for this service FRONT BRAKE REAR BRAKE 1 Cutouts 1 1 ...

Page 204: ...lyte causing hard starting or other electrical troubles contact your dealer Your battery is a maintenance free type and can be permanently damaged if the cap strip is removed The battery gives off explosive hydrogen gas during normal operation A spark or flame can cause the battery to explode with enough force to kill or seriously hurt you Wear protective clothing and a face shield or have a skill...

Page 205: ...ttery 5 Disconnect the positive terminal 3 from the battery 6 Raise the battery holder 4 then remove the battery 5 taking care not to drop the terminal nuts Installation 1 Reinstall in the reverse order of removal Be sure to connect the positive terminal first then the negative terminal 2 Check all bolts and other fasteners are secure 1 Battery holder bolt 2 Negative terminal 3 Positive terminal 4...

Page 206: ...ccurs it usually indicates a short circuit or an overload in the electrical system See your dealer for repair Never use a fuse with a different rating from that specified Serious damage to the electrical system or a fire may result causing a dangerous loss of lights or engine power Blown fuse ...

Page 207: ...e starter magnetic switch 2 from the ribs 3 of the battery box 3 Disconnect the wire connector 4 of the starter magnetic switch 4 Pull out the fuse If the main fuse is blown install a new fuse The spare main fuse 5 is located under the starter magnetic switch 5 Reconnect the wire connector and install the starter magnetic switch 6 Install the left side cover 1 Main fuse 2 Starter magnetic switch 3...

Page 208: ...use case 2 from the rib 3 of the battery box 3 Open the fuse case cover and pull the sub fuse out If the fuse is blown replace it with a spare fuse 4 4 Install the left side cover Replacing a f use with one that has a higher rating greatly increases the chance of damage to the electrical system 1 Sub fuse 2 Fuse case 3 Rib 4 Spare fuse 4 2 1 3 ...

Page 209: ... the motorcycle is operated Check security of all fork and handlebar mounting bolts 1 Operating the motorcycle with loose worn or damaged steering or front suspension components may adversely affect vehicle handling and stability If any suspension components appear worn or damaged consult your dealer for further inspection The suspension components are directly related to safety and your dealer is...

Page 210: ...support block Freeplay indicates worn bearings 2 Check all suspension component attachment points 2 for security of their fasteners 3 Check for oil leaks in the shock absorber units If any suspension components appear worn or damaged consult your dealer for further inspection The suspension components are directly related to safety and your dealer is qualified to determine whether or not replaceme...

Page 211: ...age 43 Check the side stand spring 1 for damage and loss of tension and the side stand assembly for freedom of movement If the side stand is squeaky or stiff clean the pivot area and lubricate the pivot bolt with clean engine oil 1 Side stand spring 1 ...

Page 212: ...t is turned OFF Be sure to let it cool down before servicing The lighting equipment is not legal for highway use Do not operate this motorcycle on public streets roads or highways Be sure to turn the ignition switch OFF when replacing the bulb Do not use bulbs other than those specified After installing a new bulb check that the light operates properly ...

Page 213: ...88 Headlight Bulb 1 Remove the bolt 1 2 Pull the bosses 3 off and remove the headlight 4 1 Bolt 1 3 Bosses 4 Headlight 4 3 ...

Page 214: ...ress the socket 6 and turn it counterclockwise Remove the bulb 7 5 Install a new bulb and part in the reverse order of removal When installing the bulb align the tab on the bulb with the groove in the headlight 5 Rubber dust cover 7 Bulb 6 Socket 5 6 7 ...

Page 215: ...ecent operation give the engine and exhaust system time to cool off We recommend the use of a low pressure garden hose to wash your motorcycle High pressure washers like those at coin operated car washes can damage certain parts of your motorcycle High pressure water or air can damage certain parts of the motorcycle High pressure washer spray can damage certain parts of your motorcycle If you use ...

Page 216: ...act the headlight function Any condensation inside the headlight should dissipate after a few minutes of running the engine with the headlight s on However if you see a large amount of water or ice accumulated inside the lens es have your vehicle inspected by your dealer 4 After cleaning rinse the motorcycle thoroughly with plenty of clean water Strong detergent residue can corrode alloy parts 5 D...

Page 217: ...e kitchen cleaning compound Use a neutral detergent to clean the painted surface on the exhaust pipe and muffler If you are not sure if your exhaust pipe and muffler are painted contact your dealer Clean the Mat Painted Surface Using plenty of water clean the mat painted surface with a soft cloth or sponge Dry with a soft clean cloth Use neutral detergent to clean mat painted surface Do not use wa...

Page 218: ...on using motorcycle tie down straps Avoid using rope which can loosen and allow the motorcycle to fall over To secure your motorcycle brace the front wheel against the front of the truck bed or trailer rail Attach the lower ends of two straps to the tie down hooks on your vehicle Attach the upper ends of the straps to the handlebar one on the right side the other on the left close to the fork ...

Page 219: ... front suspension is compressed about half way Too much pressure is unnecessary and could damage the fork seals Use another tie down strap to keep the rear of the motorcycle from moving We recommend that you do not transport your motorcycle on its side This can damage the motorcycle and leaking petrol could be a hazard ...

Page 220: ... the motorcycle otherwise these repairs may be forgotten by the time the motorcycle is removed from storage STORAGE 1 Change the engine oil and filter 2 Fill the fuel tank Make sure the fuel fill cap is properly installed Petrol is highly flammable and explosive You can be burned or seriously injured when handling fuel Stop the engine and keep heat sparks and flame away Refuel only outdoors Wipe u...

Page 221: ... the engine several times to distribute the oil Reinstall the spark plug and spark plug cap 4 Remove the battery Store in an area protected from freezing temperatures and direct sunlight Slow charge the battery once a month 5 Wash and dry the motorcycle Wax all painted surfaces Coat chrome with rustinhibiting oil 6 Lubricate the drive chain page 71 7 Inflate the tyres to their recommended pressure...

Page 222: ...ve passed since the start of storage 3 Charge the battery as required Install the battery 4 If your motorcycle has been stored for more than two months drain and replace the fuel 5 Perform all Pre ride Inspection checks page 32 6 Test ride the motorcycle at low speeds in a safe riding area away from traffic ...

Page 223: ... condition of your motorcycle If the engine is still running turn it off and look it over carefully inspect it for fluid leaks check the tightness of critical nuts and bolts and secure such parts as the handlebar control levers brakes and wheels If there is minor damage or you are unsure about possible damage ride slowly and cautiously Sometimes crash damage is hidden or not immediately apparent s...

Page 224: ... clogged unstable engine operation will occur intermittently while riding Even if this symptom occurs you can continue to ride your motorcycle If unstable engine operation occurs even if sufficient fuel is available have your motorcycle inspected by your dealer as soon as possible ...

Page 225: ...m 55 9 in CAPACITIES Engine oil After draining 1 4 1 5 US qt 1 2 Imp qt After draining and 1 4 1 5 US qt 1 2 Imp qt oil filter change After disassembly 1 7 1 8 US qt 1 5 Imp qt Fuel tank 6 0 1 59 US gal 1 32 Imp gal Fuel reserve 1 3 0 34 US gal 0 29 Imp gal Passenger capacity Operator only no passenger Maximum weight capacity 100 kg 220 lb ...

Page 226: ...9 6 1 Displacement Spark plug Standard LMAR7H 9DS NGK Spark plug gap 0 8 0 9 mm 0 03 0 04 in Idle speed 1 400 100 min 1 rpm Valve clearance Cold Intake 0 10 mm 0 004 in Exhaust 0 15 mm 0 006 in 71 000 x 63 038 mm 2 80 2 48 in 249 58 cm 15 2 cu in ...

Page 227: ...5 Trail 102 mm 4 0 in Tyre size front 80 100 21 51R NHS Tyre size rear 100 100 18 59R NHS Tyre type bias ply tube POWER TRANSMISSION Primary reduction 2 863 Gear ratio 1st 2 846 2nd 1 900 3rd 1 400 4th 1 083 5th 0 896 Final reduction 3 846 ...

Page 228: ...103 ELECTRICAL Battery YTZ7S 12 V 6 Ah 10 HR Alternator 209 kW 5 000 min 1 rpm LIGHTS Headlight 12 V 35 W FUSE Main fuse 10 A Sub fuse 7 5 A ...

Page 229: ......

Page 230: ...PRINTED IN BRAZIL EC 英 0560 2022 06 K 32K99R00 ...

Reviews: