6 of 7
AII 23619 (0205)
© 2002 American Honda Motor Co., Inc - All Rights Reserved.
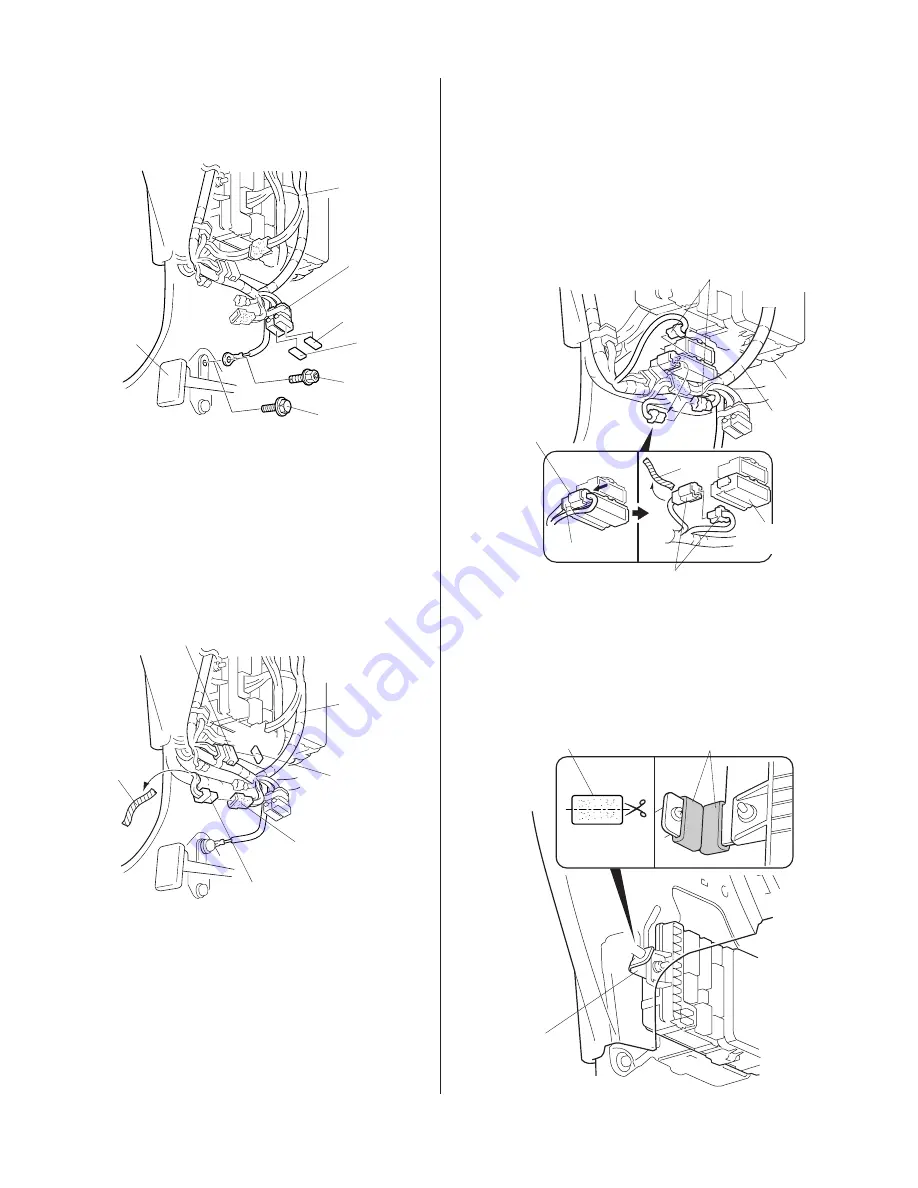
25. Using isopropyl alcohol on a shop towel,
thoroughly clean the instrument panel side frame
bracket in the area shown. Cut a cushion tape into
halves, and attach the two pieces to the side
frame bracket as described.
23. Under the fuse box, locate the 4-pin connector
blue-taped to the vehicle harness, and remove the
blue tape to free the connector. Plug the 4-pin
connector of the keyless entry harness into the
4-pin connector you just freed.
24. Under the fuse box, push in the vehicle 1-pin
connector to remove it from the vehicle
connector, then remove the tape securing the
vehicle 1-pin connector. Unplug the vehicle
1-pin connectors, and plug the 1-pin connectors
of the keyless entry harness between the
vehicle 1-pin connectors you just unplugged.
Reinstall the vehicle 1-pin connector.
20. Open the fuse case covers, and check the rating of
each fuse. Attach the fuse labels (OPTION 5 A/2 A)
to the fuse cases on the keyless entry harness.
KEYLESS
ENTRY
HARNESS
KEYLESS
ENTRY
HARNESS
FUSE
CASE
HOOD
OPENER
LEVER
FUSE
LABEL
(2 A)
GROUND
BOLT
(Provided.)
VEHICLE BOLT
(Discard.)
FUSE LABEL
(5 A)
KEYLESS ENTRY
HARNESS FUSE CASE
KEYLESS
ENTRY
HARNESS
BLUE
TAPE
FUSE LABEL
(OPTION 2 A)
KEYLESS ENTRY
HARNESS
4-PIN CONNECTOR
VEHICLE 4-PIN
CONNECTOR
22. Attach the fuse label (KEYLESS ENTRY 2 A) to
the fuse case on the keyless entry harness.
21. Remove the bolt that secures the top of the hood
opener lever, then attach the ground terminal of
the keyless entry harness with the ground bolt
from the kit.
VEHICLE
1-PIN
CONNECTOR
KEYLESS
ENTRY
HARNESS
FUSE
BOX
KEYLESS ENTRY HARNESS
1-PIN CONNECTOR
VEHICLE
CONNECTOR
TAPE
Push.
VEHICLE 1-PIN CONNECTOR
CUSHION TAPE
CUSHION TAPES (1/2 PIECES)
INSTRUMENT
PANEL SIDE
FRAME
BRACKET
TAPE


