4
Configuration
The HWI-TEL9 can be set for one of multiple
situations involving answering machines and services.
The two most common:
a.
An answering machine inside the house shares
the phone line.
b.
The occupant does not own any device which
would automatically pick up a ringing phone
line.
Read the following descriptions of the operation in
each mode carefully to decide which is appropriate
for the particular homeowner. Note that the Answering
Machine Mode selection has no effect on a user
accessing the system from an inside phone; the only
difference occurs when dialing in to access the HWI-
TEL9 from outside the house.
Answering Machine Mode
In Answering Machine Mode, the HWI-TEL9 will never
pick up the phone until after another device on the
same line answers the incoming call.
To access the system in Answering Machine Mode
1.
Dial the phone number of the residence.
2.
Wait for the answering machine to pick the
ringing line up.
3.
While the answering machine plays its greeting
message, enter the Access Code (see
Access
Codes
on page 5). After receiving the correct
Access Code, the HWI-TEL9 will disconnect the
answering machine and allow the user access to
control the lighting system. If the user fails to
acquire access, they should wait until the
answering machine’s greeting message is
complete, and then re-enter their Access Code.
To configure for Answering Machine Mode
1.
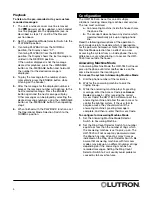
Set the Answering Machine Mode Selector
Switch to Answering Machine.
2.
Set the Ring Count Selector Switch to a number
equal to or less than the number of rings which
the answering machine is set to pick up on. The
HWI-TEL9 will not accept any password unless
the phone has rung at least as many times as
indicated on the Ring Count Selector Switch. Be
aware that answering machines with toll-saver
modes may pickup on a different number of rings
depending on if the answering machine has
recorded messages. Setting the Ring Count
Selector Switch to 2 will usually avoid problems
caused by toll-saver features.
Playback
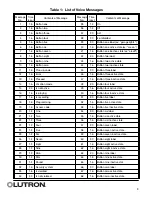
To listen to the pre-recorded or to your custom
recorded messages:
1.
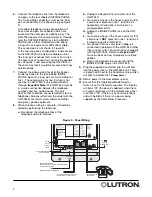
The unit’s enclosure cover must be removed,
15 V
power must be supplied, and a handset
must be plugged into the appropriate jack, as
described in steps 1,2, and 3 of the Record
section above.
2.
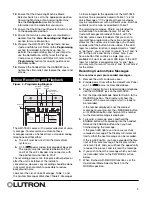
Set the Operational Mode Selector Switch to the
PLAYBACK position.
3.
If entering PLAYBACK from the NORMAL
position, the Display shows “01”.
If entering PLAYBACK from the RECORD
position, the Display shows the last message re-
corded in the RECORD position.
If the number displayed is not the message
desired for playback, press the +MESSAGE
button or the -MESSAGE button and hold until
the number for the desired message is
displayed.
4.
To play the message for the number shown,
momentarily press the ENABLE button while
listening on the handset.
5.
After the message for the displayed number is
played, the message number will advance to the
next recorded message. Press the ENABLE
button again and the next message will play.
Other messages can be played by selecting the
desired message numbers using the +MESSAGE
button or the -MESSAGE button, then repeating
step 4.
6.
When finished with the PLAYBACK functions, set
the Operational Mode Selection Switch to the
NORMAL position.


