


HomeTroller-SE Getting Started Guide – rev 3.0 10/12/2011
Page 18
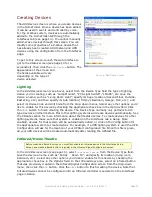
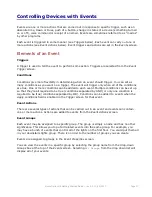
Creating an Event
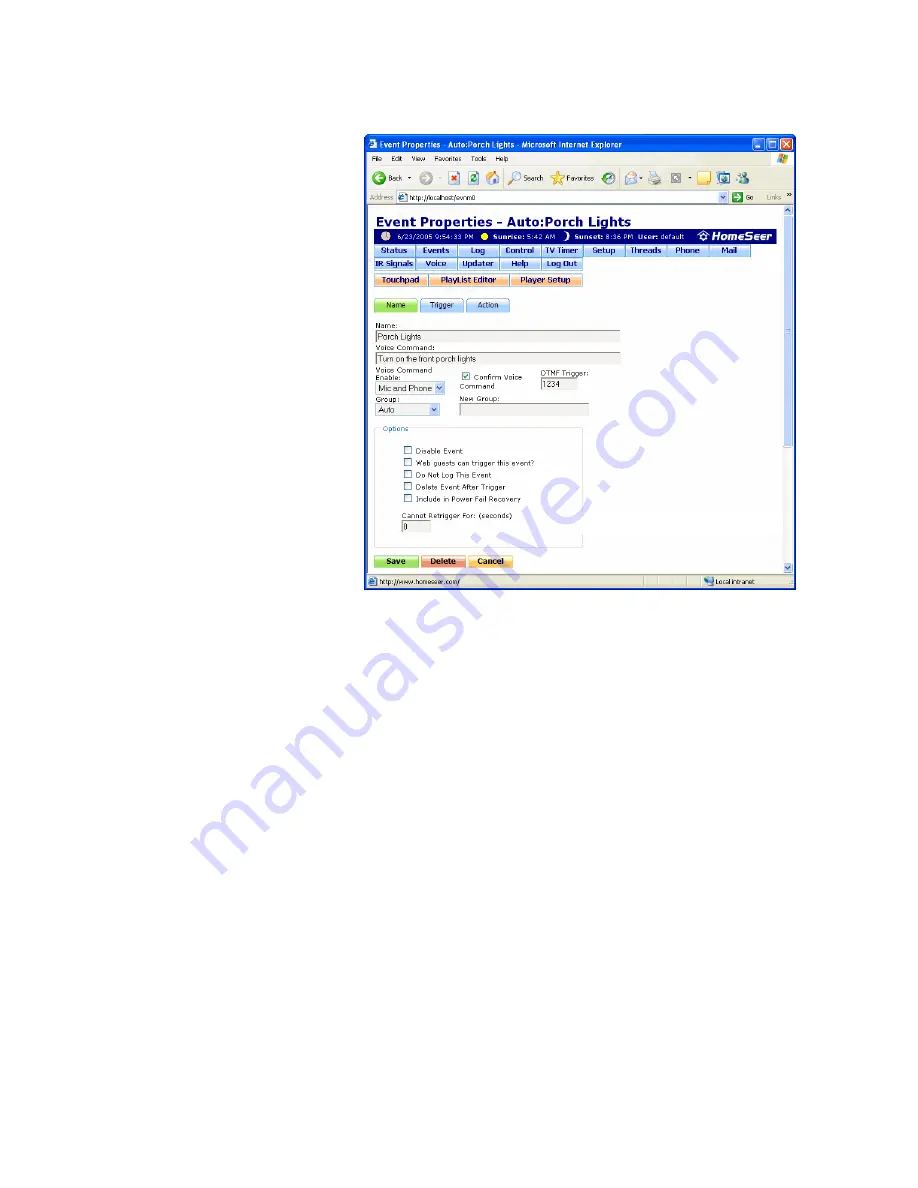
Naming the Event
The
Event Properties
screen is
where basic options for the
specified event can be set, such as
the name of the event, whether or
not it will respond to voice
commands, and so on.
To get to the screen, click
Add
Event
from the
Events
screen to
create a new event, or click the
Name
tab from the
Event Trigger
and
Event Actions
screens.
Give the event a name, such as
“Porch Lights On”. To be able to
run the event by voice, specify the
voice command that will be used to
trigger the event and select
whether the voice command can
be given via microphone,
telephone, or both. To have the
HomeTroller-SE confirm the
command before running the
event, enable the
Confirm Voice
field. Type a four-digit number in
the
DTMF Trigger
field to be able to run the
event by pressing the corresponding buttons on telephone keypad. Select any other options
you‟d like to enable for this event by checking the appropriate check box in the
Options
field.
Specifying the Event’s Trigger
The
Event Trigger
screen lists all of the trigger and condition types available in the HomeTroller.
To get to this screen, click the
Trigger
tab from the
Event Properties
or
Event Actions
screens.
In this screen, select the type of trigger that will run the event, such as a specific point in time,
an email message is received, a device changes status, etc. Select which days of the week the
event can run, whether the trigger has additional conditions that must be met, and whether the
events start time is to be randomized based on the value set in the
General Setup
screen.
Additional fields will appear in the screen, depending on which type of trigger is selected. For
triggering on the status change of a Z-Wave device, enable polling for the Z-Wave device in the
devices properties screen. This will ensure that the HomeTroller-SE sees any changes to the
device‟s status. You can then set a trigger on that particular device changing status, such as
someone arriving home. The status change trigger can be used on any device.
Setting the Event’s Actions
The
Event Actions
screen is where actions are added to an event. Select an action to be carried
out when the event runs by making a selection in the
Add Action
drop-down menu, setting the
appropriate values for the action, and clicking
UPDATE
. More than one action can be carried out
when an event is triggered; to add more actions, select them from the drop-down menu and
click
UPDATE
after adding each action.
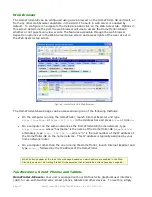
The Event Properties Screen
Figure 7: Add Events Screen


