background image

Before  you  can  use  the  TT-500M,  you  need  to  assemble  the  turntables. 

Follow the instructions below for fitting each of the parts for both turntables. 

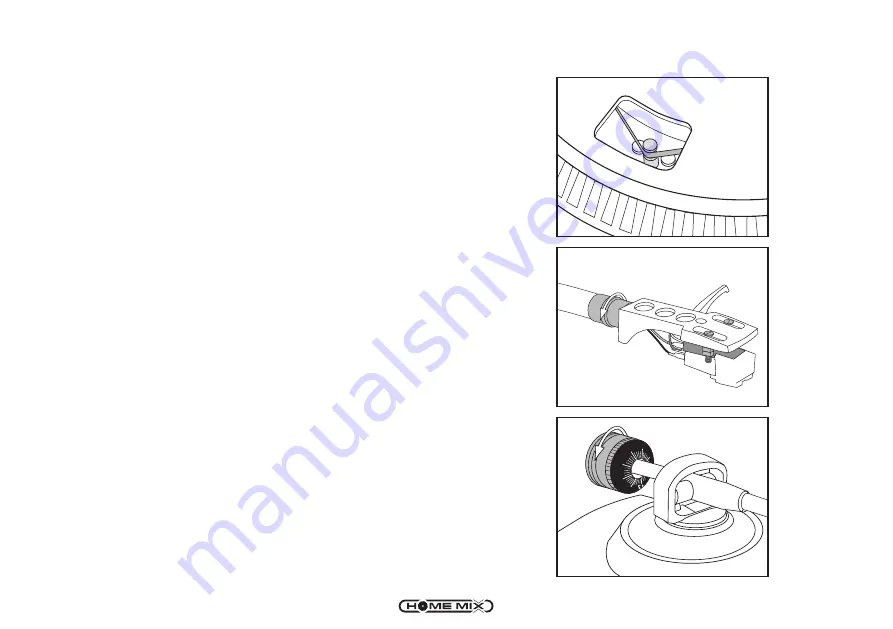
FIG 1. Fitting the platter and belt

Place  the  platter  on  the  centre  spindle  and  spin  the  platter  until  the  belt 

position  holes  (the  two  larger  holes  nearest  to  the  belt)  are  showing  the 

motor  drive  shaft  in  the  top  right  corner.  When  this  is  exposed,  carefully 

stretch the belt around the shaft, ensuring that the belt does not twist. The 

platter should still spin freely, but with slightly more resistance than before.

FIG 2. Fitting the headshell

To  fit  the  head  shell,  place  the  headshell  into  the  end  of  the  tone  arm, 

ensuring that it is positioned horizontally. Whilst holding the headshell in its 

position turn the headshell nut in an anti-clockwise direction to secure it in 

place.

To remove the head shell, turn the head shell nut in a clockwise direction. 

This will unlock the head shell and allow it to be removed.

FIG 3. Fitting the counter weight

Remove the stylus protector  (do not touch the stylus tip during the adjustment) 

and set the cueing lever to the lower position. Release the arm clamp and 

lift the tonearm from the arm rest to free it. Rotate the counterweight until 

the tonearm is approximately balanced horizontally (floats freely). Refasten 

the tonearm with the arm clamp, hold the counterweight stationary with one 

hand and rotate only the stylus-pressure ring to bring the number “0” of the 

ring into alignment with the centre line on the tonearm rear shaft. Rotate the 

counterweight clockwise until the scale shows the value corresponding to 

the pressure of the stylus used. The stylus supplied with this system is rated 

at  3.5  grammes.  It  you  use  an  alternative  stylus/headshell  arrangement, 

then please follow the manufacturer’s specified tracking weight.

Anti-skate knob

As a record plays, a force is generated drawing the stylus towards the centre 

of the record. Set this knob to the same value as the stylus pressure to offset 

this force.

TT-500 ASSEMBLY

3.5

0

3.0

0.5

2.5

1.0

2.0

FIG 1

FIG 2

FIG 3

8

Summary of Contents for TT-500M

Page 1: ...etup which we recommend you use as a quick reference guide Please take note of the important safety information detailed on page 2 before starting to operated the TT 500M For more information on current and future Homemix products please visit www homemix com CONTENTS 1 Introduction 2 Safety instructions 3 Pack contents 4 TT 500 features 6 MIX 3 features 8 TT 500 assembly 9 Connecting the TT 500 1...

Page 2: ...seek advice This line is manned from 9 00am to 1 00pm and 2 00pm to 4 30 pm Monday to Friday Calls cost 10p per minute mobile costs may vary please contact your network provider MAINS PLUG For your convenience mains plugs with fuses have been fitted to this equipment For your safety please observe the following information 1 Should the fuse fail in the plug remove the plug from the wall socket and ...

Page 3: ...mix helpline on 0871 230 7747 to seek advice This line is manned from 9 00am to 1 00pm and 2 00pm to 4 30 pm Monday to Friday Calls cost 10p per minute mobile costs may vary please contact your network provider for details PACK CONTENTS PART NAME QUANTITY Platter x 2 Headshell x 2 45 rpm adapter x 2 Phono blanking plugs x 4 PART NAME QUANTITY 9v AC Adapter x 1 Counterweight x 2 Slipmat x 2 RCA aud...

Page 4: ...5 HEADSHELL Holds the cartridge to the end of the tone arm 6 HEADSHELL LOCKING NUT Locks the head shell in place 7 PITCH ADJUST 10 PITCH ADJUST 8 TONE ARM For exact placement of the needle onto the vinyl 9 45 RPM ADAPTER Place on the centre spindle when playing 7 records with a larger centre hole 10 CUEING LEVER Lowers the tonearm onto the record 11 ANTI SKATE KNOB Use to balance the sideways move...

Page 5: ... to connect stereo turntable to mixer 14 GND Ground wire connection post 15 AC INPUT Connects to mains via supplied AC power lead 16 POWER SWITCH Turns the turntable on or off 17 ADJUSTABLE FEET Adjust to level and to required height TT 500 FEATURES 5 ...

Page 6: ...ng commences 4 INPUT SOURCE SELECTORS Select the input source you wish to feed into each of the channels 5 CHANNEL FADERS Controls the volume levels of each of the channels 6 CROSSFADER Allows a seamless mix between channel 1 and channel 2 by moving the crossfader from one side to another NOTE The crossfader is a consumable part 7 MASTER LEVEL CONTROL Use to adjust the overall output volume of the...

Page 7: ...INPUT SOCKET Connect the supplied AC power adapter 13 LINE OUTPUT Use to connect to an external amplifier PA recording device 14 LINE INPUTS Use to connect line level inputs Tape MD CD Tuners 15 PHONO INPUTS Used to connect to turntables TT 500 s 16 GROUND POSTS Ground post for turntable connection If this is not connected when using a turntable then you may hear a loud buzz through that channel 11...

Page 8: ...shell and allow it to be removed FIG 3 Fitting the counter weight Remove the stylus protector do not touch the stylus tip during the adjustment and set the cueing lever to the lower position Release the arm clamp and lift the tonearm from the arm rest to free it Rotate the counterweight until the tonearm is approximately balanced horizontally floats freely Refasten the tonearm with the arm clamp ho...

Page 9: ... fast setup guide so that all items are pre connected Should you need to disconnect the cables and reassemble the system at another location please observe the below diagram for connection details Please see the next page for details on how to connect the TT 500M to a suitable amplifier CONNECTING THE TT 500M GROUND CABLE GROUND CABLE RED WHITE PHONO CABLE RED WHITE PHONO CABLE 9 ...

Page 10: ...combination of phono and line level inputs See below for connections to line level inputs using additional phono cables You will need to set the MIX 3 to the relevant input you wish to mix using the input selector toggle switches 4 pg 6 Select PHONO for turntable inputs and LINE for CD TAPE MD inputs E g If you are mixing a turntable on channel 1 with a CD player on channel 2 then you would need t...

Page 11: ...r of the turntable 16 pg 5 2 Place the record onto the turntable platter use the 45rpm adapter if necessary 3 Press the MOTOR OFF button 13 pg 4 to ensure the motor is rotating This button will flash to indicate if the motor is switched off 3 You can then start or stop the rotation of the platter using the START STOP button 1 pg 4 4 Select your desired RPM speed using the REVOLUTION SPEED buttons 3...

Page 12: ...he level of that channel so that both channels are equally matched USING THE CROSSFADER The MIX 3 is equipped with a user replaceable crossfader Moving the crossfader from one side to the other will allow a seamless mix between the two music channels If the crossfader is placed in its central position both channel 1 and channel 2 can be heard through the speakers If the crossfader is moved fully t...

Page 13: ...6 to the CH1 position only music played by channel 1 can be heard through the headphones By moving the cue selector to the CH2 position only music played by channel 2 can be heard through the headphones You can then move the switch to the 1 2 position to hear a mix of both channels through the headphones TIP Always ensure that either the relevant channel fader is down or the cross fader is away fr...

Page 14: ...Vrsm FADER MAXIMUM ATTENUATION w 20 kHz LPF CHANNEL FADER Less than 80 dB at 1 KHz CROSSFADER Less than 80 dB at 1 KHz MAXIMUM OUTPUT Master out THD 1 maximum gain EQ flat MASTER More than 18dBV 8 0V at load 100 KΩ PHONES More than 4dBV 1 6V at load 32 Ω OUTPUT NOISE Maximum gain EQ flat w 20 KHz LPF A weighted LINE Less than 90 dBV PHONO Less than 70 dBV MIC Less than 60 dBV CROSSTALK w 20 kHz LPF ...

Page 15: ...nel gain level Check inputs are connected to correct terminals Loud buzzing Ensure that the ground cables are connected the GND posts on both the mixer and the turntables CONTACT DETAILS We trust you are completely satisfied with this product from Acoustic Solutions Limited however please feel free to contact us if you experience any difficulties or if you would like to express your views regarding ...

Reviews: