background image

30

6.3 Installation

You can now easily mount the outside sensor on a 
vertical surface with the provided mount. 

In the initial state, the mount is already fixed to 

the sensor.

Choose a location for the installation, which is 
not subjected to direct rain, heavy dust or direct 
sunlight! Eaves on the house are great for 
installing outside.

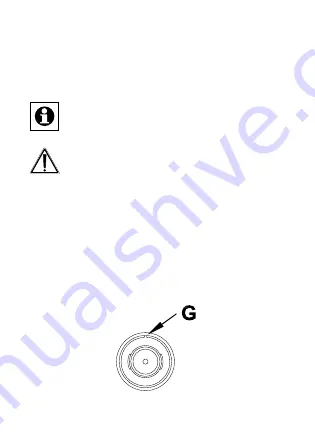
Screw the mount to a vertical surface, using a sui- 
table screw, as shown below. Make sure that the 
indent (G) in the housing point upwards as shown in 
the diagram.

Summary of Contents for HM-WDS10-TH-O

Page 1: ...Montage und Bedienungsanleitung S 2 Installation and Operating Manual p 19 Funk Temperatur Feuchtesensor au en OTH Wireless Temperature Humidity Sensor outdoor OTH HM WDS10 TH O...

Page 2: ...t werden Es ist m glich dass das vorliegende Handbuch noch drucktechnische M ngel oder Druckfehler aufweist Die Angaben in diesem Handbuch werden jedoch regelm ig berpr ft und Korrekturen in der n chs...

Page 3: ...ation zu Homematic 8 5 Allgemeine Hinweise zum Funkbetrieb 9 6 Inbetriebnahme und Montage 10 6 1 Batterien einlegen und wechseln 10 6 1 1 Batterien einlegen 10 6 1 2 Batterien wechseln 11 6 2 Anlernen...

Page 4: ...ben Sie auch diese Bedienungs anleitung Benutzte Symbole Achtung Hier wird auf eine Gefahr hingewie sen Hinweis Dieser Abschnitt enth lt zus tzliche wichtige Informationen 2 Gefahrenhinweise Bei Sach...

Page 5: ...es nicht gestattet Das Ger t ist kein Spielzeug erlauben Sie Kindern nicht damit zu spielen Lassen Sie das Verpackungsmaterial nicht achtlos liegen Plastikfolien t ten Styroporteile etc k nnten f r Ki...

Page 6: ...ge der bermittelten Daten ist ber die Homematic Zentrale bzw ber die Homematic Funk Wetterstation WDC 7000 m glich Der Sensor bermit telt seine Daten nicht permanent sondern zyklisch in einem Interval...

Page 7: ...7 C M Y CM MY CY CMY K C M Y CM MY CY CMY K C M A Sensor Schutzkappe B Montagefu C Batteriefachdeckel D Rastnase E Batteriefach F Anlerntaste...

Page 8: ...sgeliefert Dar ber hinaus ist die Funktion des Ger tes ber ein Programmierger t und Software konfigurierbar Welcher weitergehende Funktionsum fang sich damit ergibt und welche Zusatzfunktionen sich im...

Page 9: ...eichweite in Geb uden kann stark von der im Freifeld abweichen Au er der Sendeleistung und den Empfangseigenschaf ten der Empf nger spielen Umwelteinfl sse wie Luftfeuchtigkeit neben baulichen Gegeben...

Page 10: ...einlegen und wechseln 6 1 1 Batterien einlegen Nehmen Sie die Schutzkappe A ab indem Sie sie nach oben ziehen 1 ffnen Sie das Batteriefach indem Sie die Rastnase D nach unten dr cken 2 und das Batter...

Page 11: ...elle Die Batterien im Sensor haben eine begrenzte Le bensdauer Der Sensor sendet neben den Messdaten regelm ig seinen Batteriestatus zu den angelernten Empf ngern Empf nger mit geeigneter Anzeigeeinhe...

Page 12: ...ors zu gelangen m ssen Sie zun chst den Geh usedeckel A entfernen Die Anlerntaste F des Sensors befindet sich unterhalb der beiden Batterien im Batteriefach 5s Bringen Sie zun chst den gew nschten Emp...

Page 13: ...en Sie einen Montageort aus der nicht direkt Niederschl gen starker Staubeinwirkung oder direkter Sonneneinstrahlung ausgesetzt ist Bei der Au enmon tage ist z B ein Dachvorsprung gut geeignet Schraub...

Page 14: ...genau senkrecht bis zum Anschlag in den Montagefu F r eine notwendige Demontage des Au ensensors etwa f r einen Batteriewechsel ziehen Sie den Sensor nach vorn heraus Um den Montagefu es B zu entfern...

Page 15: ...nde stens 5s die Anlerntaste 5s 8 Wartung und Reinigung Das Produkt ist f r Sie bis auf einen eventuell erfor derlichen Batteriewechsel wartungsfrei berlassen Sie eine Wartung oder Reparatur einer Fac...

Page 16: ...griffen werden 9 Technische Daten Ger te Kurzbezeichnung HM WDS10 TH O Versorgungsspannung 2x 1 5 V LR6 Mignon AA Stromaufnahme 100 mA max Funkfrequenz 868 3 MHz Empf ngerkategorie SRD category 2 Typ...

Page 17: ...ektronik Altger te ber die rtlichen Sammelstellen f r Elektronik Altger te zu entsorgen Hinweis auf Konformit t Das CE Zeichen ist ein Freiverkehrszeichen das sich ausschlie lich an die Beh rden wende...

Page 18: ...18...

Page 19: ...of the publisher It is quite possible that this manual has printing errors or defects The details provided in this manual are checked regularly and corrections are done in the next edition We do not a...

Page 20: ...rmation on Homematic 25 5 General information on Radio Operation 26 6 Installation and start up 27 6 1 Installing and changing batteries 27 6 1 1 Installing batteries 27 6 1 2 Changing batteries 28 6...

Page 21: ...l when you hand over the device to other persons for use Symbols used Attention This indicates a hazard Note This section contains additional important information 2 Hazard information We do not assum...

Page 22: ...and or modification of the product is not permitted The device is not a toy do not allow children to play with it Do not leave packaging material lying around Plastic films bags pieces of polystyrene...

Page 23: ...The recorded data can be displayed via the Home matic radio controlled weather data center WDS10 TH O or the Homematic Central Control Unit CCU The sensor transfers its data cyclically in intervals o...

Page 24: ...24 C M Y CM MY CY CMY K C M Y CM MY CY CMY K C M A Sensor protective cap B Mount C Battery cabinet cover D Tab E Battery cabinet F Teach button...

Page 25: ...delivered in a standard configuration The functionality of the device can also be configured with a programming device and software Further resulting functionality and the additional functions provide...

Page 26: ...es The range of transmission within buildings can greatly deviate from open air distances Besides the transmitting power and the reception characteristics of the receiver environmental influences such...

Page 27: ...6 1 Installing and changing batteries 6 1 1 Installing batteries Remove the protective cap A by pulling it upwards 1 Open the battery cabinet by pressing the tab D down 2 and turning the battery cabi...

Page 28: ...battery collection point The batteries in the sensor have a limited lifetime The sensor sends the status of the batteries along with the measurement data to the respective receivers that have been ta...

Page 29: ...s the teach button of the sensor you have to remove the housing cover The teach button F for the sensor is located under the two batteries in the battery cabinet 5s Put the desired receiver into teach...

Page 30: ...already fixed to the sensor Choose a location for the installation which is not subjected to direct rain heavy dust or direct sunlight Eaves on the house are great for installing outside Screw the mou...

Page 31: ...sensor vertically into the mount until it reaches the stop If the outside sensor must be taken down for changing the battery for example remove the sensor by pulling it out to the front To remove the...

Page 32: ...e besides possibly requiring a battery change Maintenance or repairs are only to be done by trained professionals Clean the product using a soft clean dry and lint free cloth To remote heavier contami...

Page 33: ...consumption 100 mA max Radio frequency 868 3 MHz Receiver category SRD category 2 Typ open area RF range 300 m Duty Cycle 1 per h Battery life 3 years typ Degree of protection IP44 Ambient temperatur...

Page 34: ...ce with the guidelines concerning electrical and electronic devices via the local collecting point for old electronic devices Information about conformity The CE sign is a free trade sign addressed ex...

Page 35: ...35...

Page 36: ...36 Bevollm chtigter des Herstellers Manufacturer s authorised representative eQ 3 AG Maiburger Stra e 29 26789 Leer GERMANY www eQ 3 de...

Reviews: