background image

Caution: Risk of electric shock! 

Do not attempt to disassemble or modify the unit or its acces-

sories. In case any part is damaged, immediately power off the unit and seek the assistance of 

a specialist.
In the event that the power cable should become damaged, it should only be replaced by the 

manufacturer, its service facility or similarly qualified personnel.

FEATURES

suitable for making 8 cups of coffee • 1 l water tank • glass carafe with thermally insulated handle • washable, plastic permanent filter • usable with paper filter as well • heated, warming plate • automatically 

closing valve by removing the carafe • easy cleaning • non-slip silicone soles • overheating protection

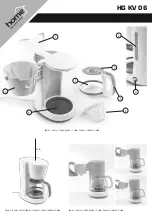
STRUCTURE (Figure 1.)

1.

 water tank lid • 

2.

 water tank with water level marking • 

3.

 openable, removable scalding funnel, with closing valve • 

4.

 permanent plastic filter (HG KV 06/S) • 

5.

 glass carafe lid • 

6.

 glass carafe carrying 

handle • 

7.

 glass carafe (HG KV 06/K) • 

8.

 warming plate • 

9.

 main switch with indicator light 

INSTALLATION

1. Before installation, carefully remove packaging, and make sure not to damage the unit or the connecting cable. If you find any damage, the unit must not be operated!

2. The unit is intended for use in dry, indoor spaces only!

3. Stand the unit on its base on a hard, flat surface!

4. For proper operation, minimum location distances around the product, shown 

on Figure 2.

 have to be ensured!

5. Wash the permanent plastic filter (4), openable, removable scalding funnel (3) and glass carafe (7) thoroughly in running water with dishwashing liquid, then rinse them with clean water. 

6. After the washed components get dried, put them together. 

7. Check on the switched off appliance if the water tank is filled with clean, cold drinking water, and the lid of the water tank and the scalding funnel is closed.

8. Place the glass carafe onto the warming plate.

9. Plug the unit into a standard grounded wall socket. Now the unit is ready for operation.

10. Switch on the unit with the main switch (9).

11. Allow water to flow in to the glass carafe, then turn off the appliance.

12. After the appliance got cool down (10 minutes), repeat steps from 7. to 12. 

13. Then the appliance is ready for use.

MAKING COFFEE

1. Fill clean, cold drinking water to the glass carafe, and pour it to the water tank of the unit. Don’t fill the water tank over the maximum marking.

2. Open the scalding funnel.

3. Put ground coffee to the permanent plastic filter, approx. 7 g per cups. You can use paper filter as well, instead of the plastic one.

4. Close the scalding funnel to its place, and check if it is on its place totally. 

5. Put the glass carafe with closed lid onto the warming plate, under the scalding funnel.

6. Switch on the appliance with the main switch. Hot water will be dripping on the ground coffee, then the coffee will flow to the glass carafe.

7. WARNING! If you remove the glass carafe and the scalding funnel is filled up, then the liquid will flow out to the warming plate. It has to be avoided, so remove the glass carafe while making coffee only 

when the water level is only up to level 4 maximum.

8. At the end of making coffee, switch off the coffee maker with the main switch (9). If you leave it switched on, then the appliance will keep the coffee warm for more 40 minutes, then switches off. 

9. Allow the appliance to cool down for at least 10 minutes before the next usage. 

CLEANING, MAINTENANCE

1. Switch off and power off the unit by unplugging it from the electric outlet before cleaning!

2. Allow the appliance to cool (for at least 10 minutes).

3. Always remove the coffee ground after use. Wash up scalding funnel, plastic filter and glass carafe.

4. Use a slightly moistened cloth to clean the unit’s outer surface. Do not use any aggressive cleaners. Avoid getting water inside of and on the electric components of the appliance! Appliance must not be 

immersed to water! 

To remove lime scale

It is recommended to remove lime scale once a month in case of hard water, and once in every two months in case of medium-hard water or soft water.

1. For that purpose, prepare a solution by mixing one part of 10% vinegar with 2 parts of water.

2. Fill the water tank with the solution up to the MAX marking, then boil the liquid. 

3. According to points 7 - 12 of INSTALLATION, rinse the appliance 2 – 3 times. Let it cool down for 10 minutes between the rinsing sections.

TROUBLESHOOTING

Malfunction

Solution

Appliance is not making the coffee.

Check the power supply and the main switch.
Check the water level in the tank.
Glass carafe must be at its place properly.

Valve is clogged.

Clean the appliance.


Waste equipment must not be collected separately or disposed of with household waste because it may contain components hazardous to the environment or health. Used or 

waste equipment may be dropped off free of charge at the point of sale, or at any distributor which sells equipment of identical nature and function. Dispose of product at a 

facility specializing in the collection of electronic waste. By doing so, you will protect the environment as well as the health of others and yourself. If you have any questions, 

contact the local waste management organization. We shall undertake the tasks pertinent to the manufacturer as prescribed in the relevant regulations and shall bear 

any associated costs arising. 

TECHNICAL DATA

power supply: . . . . . . . . . . . . . . . . . . . . . . 230 V~ / 50 Hz

output: . . . . . . . . . . . . . . . . . . . . . . . . . . . . 730 - 870 W

size of the appliance: . . . . . . . . . . . . . . . . 21 x 28,5 x 16 cm

capacity of water tank: . . . . . . . . . . . . . . . 1 liter

weight: . . . . . . . . . . . . . . . . . . . . . . . . . . . . 1,25 kg

length of power cable: . . . . . . . . . . . . . . . . 75 cm

Summary of Contents for HG KV 06

Page 1: ...instruction manual HG KV 06 használati utasítás návod na použitie manual de utilizare uputstvo za upotrebu navodilo za uporabo návod k použití ...

Page 2: ...1 1 ábra 1 obraz figura 1 1 skica 1 skica 1 obrázek 1 slika figure 2 2 ábra 2 obraz figura 2 2 skica 2 skica 2 obrázek 2 slika figure 3 3 ábra 3 obraz figura 3 3 skica 3 skica 3 obrázek 3 slika 1 3 4 5 6 7 8 9 2 20 cm ...

Page 3: ...en or on other heating source Do not use damaged cracked carafe replace it with a new one Only the supplied carafe can be placed to the warming plate of the appliance Do not place anything onto the top of the appliance While making the coffee do not open the lids and do not touch the hot carafe or the warming plate Risk of burning injuries Glass carafe can be lifted only by its handle Do not place...

Page 4: ... plate under the scalding funnel 6 Switch on the appliance with the main switch Hot water will be dripping on the ground coffee then the coffee will flow to the glass carafe 7 WARNING If you remove the glass carafe and the scalding funnel is filled up then the liquid will flow out to the warming plate It has to be avoided so remove the glass carafe while making coffee only when the water level is ...

Page 5: ...tt szállított üvegkancsóval használja Az üvegkancsót nem szabad mikrohullámú sütőben vagy egyéb hőforráson melegíteni Sérült repedt üvegkancsót ne használjon cserélje ki újra A készülék melegen tartó lapjára csak a mellékelt üvegkancsó helyezhető Akészülék tetejére ne tegyen semmit Kávéfőzés közben ne nyissa fel a fedeleket és ne érjen a meleg üvegkancsóhoz vagy a melegen tartó laphoz Égési sérülé...

Page 6: ...csót a melegen tartó lapra a forrázó tartály alá 6 Kapcsolja be a készüléket a főkapcsolóval Aforró víz a darált kávéra csöpög majd a kávé az üvegkancsóba folyik 7 FIGYELEM Ha eltávolítja az üvegkancsót és megtelik a forrázó tartály akkor a folyadék melegen tartó lapra ömlik Ezt el kell kerülni ezért kávéfőzés közben csak akkor távolítsa el az üvegkancsót ha a víztartályban max 4 es szinten áll a ...

Page 7: ... poškodenú popraskanú sklenenú výlevku vymeňte ju za novú Na ohrievací tanier je možné umiestniť len priloženú sklenenú výlevku Na spotrebič nepoložte žiadny predmet Počas prípravy kávy neotvárajte kryt a nedotýkajte sa horúcej sklenenej výlevky alebo ohrievacieho taniera Nebezpečenstvo popálenia Sklenenou výlevkou hýbte len držaním rukoväte Nedávajte horúcu sklenenú výlevku na studený a mokrý pov...

Page 8: ... filter 4 Parnú nádrž umiestnite späť a skontrolujte že je na svojom mieste 5 Položte sklenenú výlevku so zatvoreným krytom na ohrievací tanier pod parnú nádrž 6 Zapnite prístroj pomocou hlavného spínača Horúca voda kvapká na mletú kávu a hotová káva vytečie do sklenenej výlevky 7 POZOR Keď odstránite sklenenú výlevku a parná nádrž sa naplní káva vytečie na ohrievací tanier Tomuto treba predísť pr...

Page 9: ...schimbaţi l cu unul nou Pe placa încălzită pt menţinere căldură poate fi aşezat numai recipientul din sticlă anexat Nu aşezaţi nimic pe acest dispozitiv Nu deschideți capacele în timp ce faceţi cafeaua și evitați să atingeți recipientul din sticlă şi placa încălzită pt menţinere căldură Pericol de vătămare prin arsuri Recipientul din sticlă poate fi mişcat numai prins numai de mâner Nu aşezaţi rec...

Page 10: ...re verificaţi să fie la locul lui 5 Aşezaţi recipientul din sticlă pe placa încălzită pt menţinere căldură sub recipientul de fierbere 6 Porniţi aparatul de la comutatorul principal Apa fierbinte va picura pe cafeaua măcinată şi cafeaua se va scurge în recipientul din sticlă 7 ATENŢIE Dacă îndepărtaţi recipientul din sticlă şi se umple recipientul de fierbere atunci lichidul se va vărsa pe placă î...

Page 11: ...m Uređaj je upotrebljiv samo sa isporučenim bokalom Isporučeni bokal se ne sme stavljati u mikrotalasnu pećnicu ili se zagrevati na drugi način Zabranjena je upotreba oštećenog bokala zamenite ge novim Grejna površina uređaja služi samo za održavanje temperature priloženog bokala Ne postavljajte ništa na uređaj U toku kuvanja kafe ne otvarajte poklopac i ne dodirujte vreo bokal ili grejnu površinu...

Page 12: ...st 5 Stakleni bokal sa zatvorenim poklopcem postavite na gejnu ploču ispod spremišta za kafu 6 Uključite kuvalo glavnim prekidačem Vrela voda će kapati na mlevenu kafu tako će se stakleni bokal napuniti kuvanom kafom 7 PAŽNJA Ako izvadite bokal a spremište se napuni vrelom vodom ona će da iscuri na grejnu ploču Da bi se ovo sprečilo nemojte vaditi bokal sve dok voda u rezervoaru ne spadne ispod ni...

Page 13: ...upo rabna samo z dobavljivim bokalom Dobavljiv bokal se ne sme postavljati v mikrovalovno pečnico ali se segrevati na drugi način Prepovedana je uporaba poškodovanega bokala zamenjajte ga z novim Grelna površina naprave služi samo za vzdrževanje temperature priloženega bokala Ne postavljajte nič na napravo Med kuhanjem kave ne odpirajte pokrov in ne dotikajte se vrelega bokala ali grelne površine ...

Page 14: ... svojem mestu 5 Stekleni bokal z zaprtim pokrovom postavite na grelno ploščo pod zbiralnik za kavo 6 Vključite kuhalnik z glavnim stikalom Vrela voda bo kapljala na mleto kavo tako se bo stekleni bokal napolnil s kuhano kavo 7 POZOR Če odstranite bokal a je zbiralnik napolnjen z vrelo vodo bo voda iztekla na grelno ploščo Da bi se to preprečilo ne odstranjujte bokal vse dokler voda v zbiralniku ne...

Page 15: ...ovou konvici Na podložku udržující teplotu je dovoleno pokládat pouze skleněnou konvici dodávanou společně s kávovarem Na horní část kávovaru nepokládejte žádné předměty Během přípravy kávy neotevírejte víka a nedotýke jte se teplé skleněné konvice ani podložky udržující teplotu Nebezpečí úrazu popálením Se skleněnou konvicí manipulujte pouze uchycením za držadlo Teplou skleněnou konvici nepokláde...

Page 16: ... položte na podložku udržující teplotu pod nádržku na horkou vodu 6 Zapněte kávovar pomocí hlavního spínače Horká voda bude nyní kapat na mletou kávu a hotová káva bude protékat do skleněné konvice 7 UPOZORNĚNÍ Jestliže odstraníte skleněnou konvici a nádržka na horkou vodu bude plná pak bude připravená káva téct na podložku udržující teplotu Tomu je potřeba předejít a proto během přípravy kávy můž...

Page 17: ...avati u mik rovalnoj pećnici ili u drugim izvorima grijanja Ne koristite oštećen ili napuknut bokal Zamijenite ga novim Samo isporučeni bokal uređaja može biti postavljen na zagrijanu ploču Ne postavljajte ništa na vrh uređaja Dok pravite kafu ne otvarajte poklopce i ne dirajte vrući bokal ili zagrijanu ploču Rizik od paljenja Stakleni bokal podižite sa njegovom ručkom Topli bokal postavljajte na ...

Page 18: ... mjestu 5 Stavite stakleni bokal sa zatvorenim poklopcem na zagrijanu ploču ispod lijevka 6 Uključite aparat sa glavnim prekidačem Vruća voda će kapati na mljevenu kafu te će kafa teći u stakleni bokal 7 UPOZORENJE Ako premjestite stakleni bokal i ako je lijevak pun tekućina će iscuriti na zagrijanu ploču To se treba izbjeći zato premjestite stakleni bokal dok se kafa pravi jedino kada je razina v...

Page 19: ......

Page 20: ...poca judeţul Cluj România Str Prof Dr Gheorghe Marinescu nr 2 Cod poştal 400337 Tel 40 264 406 488 Fax 40 264 406 489 www somogyi ro Ţara de origine China SRB Uvoznik za SRB ELEMENTA d o o Jovana Mikića 56 24000 Subotica Srbija Tel 381 0 24 686 270 www elementa rs Zemlja uvoza Mađarska Zemlja porekla Kina Proizvođač Somogyi Elektronic Kft SLO Distributer za SLO ELEMENTA ELEKTRONIKA d o o Cesta zma...

Reviews: