


30
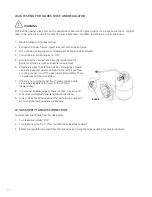
INSTALL PROPANE TANK
• This grill is designed to be used with a liquid propane tank usage (not supplied).
• The grill tank tray is compatible with most propane tanks in the market. The LP tank must be mounted and
secured.
• Open both cabinet doors and loosen the tank tray locking screw, then put the LP tank into the tank tray
under the grill.
• Tighten the locking screw clockwise against the propane tank bottom collar to secure it (for more
information, please see the picture above—LP Tank Installation Layout)
• For easy installation, place the tank liquid withdrawal valve on the right side.
BURNER IGNITION
Instructions for Using the Burners Built-In Ignition System:
1. Open the canopy.
2. Select the burner that you want to ignite. Push and rotate the corresponding knob
3. counterclockwise to the “High” position.
4. At the “High” position, the spring inside the valve will build up energy to create the spark. Once you hear a
click, the igniter has fired the spark for that burner.
5. Turn the pushing knob for at least 10–15 seconds. Gas will go through the manifold, interact with the sparks
and ignite the burner.
6. If the burner does not ignite at the first attempt, try again immediately but be very aware of any gas build-up
inside the burner.
7. If the burner does not lights after three consecutive attempts, turn the knob to the “OFF” position and keep
the canopy open. Allow the burner to clear any remaining gas in the manifold and restart the process.
8. Visually check the burner flame.
SAFETY TIPS FOR USING YOUR BURNERS
All cleaning and maintenance should be done only when the grill is cooled and the fuel supply is turned off at the
cylinder or source.
COOKING GRATES
The cooking grates must be cleaned after cooking is completed and the burners are turned off and allowed
to cool down for a certain period. Wear a barbecue mitt and scrub the cooking grates with a damp cloth. The
grates will be easier to clean if the side burner is cool. Remove the grates from the side burner and clean with
a mild detergent.
IMPORTANT: Gas control knobs should be in the “OFF” position, and the fuel line/source should be
disconnected. To reduce the risk of FLASHBACK, follow the procedure below at least once a month or when
your burner has not been used for an extended period.
1. Remove burners from the burner body by carefully lifting each burner away from the gas valve orifice.
Brush the entire burner outer surface with a wire brush to remove food debris and dirt. Clean any
clogged ports with a stiff wire, such as an open paper clip.
2. Inspect the burner for damage (cracks or holes), and if such damage is found, order and install a new
burner.
3. After installation, check to ensure that gas valve orifices are installed in their proper position and check
spark electrodes’ position.
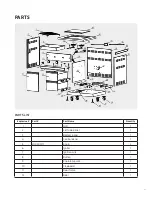
Summary of Contents for JULIEN HR-ELDTBG32-P
Page 18: ...18 ...