background image


STEP 5 – FINAL HAIR LEVELING 


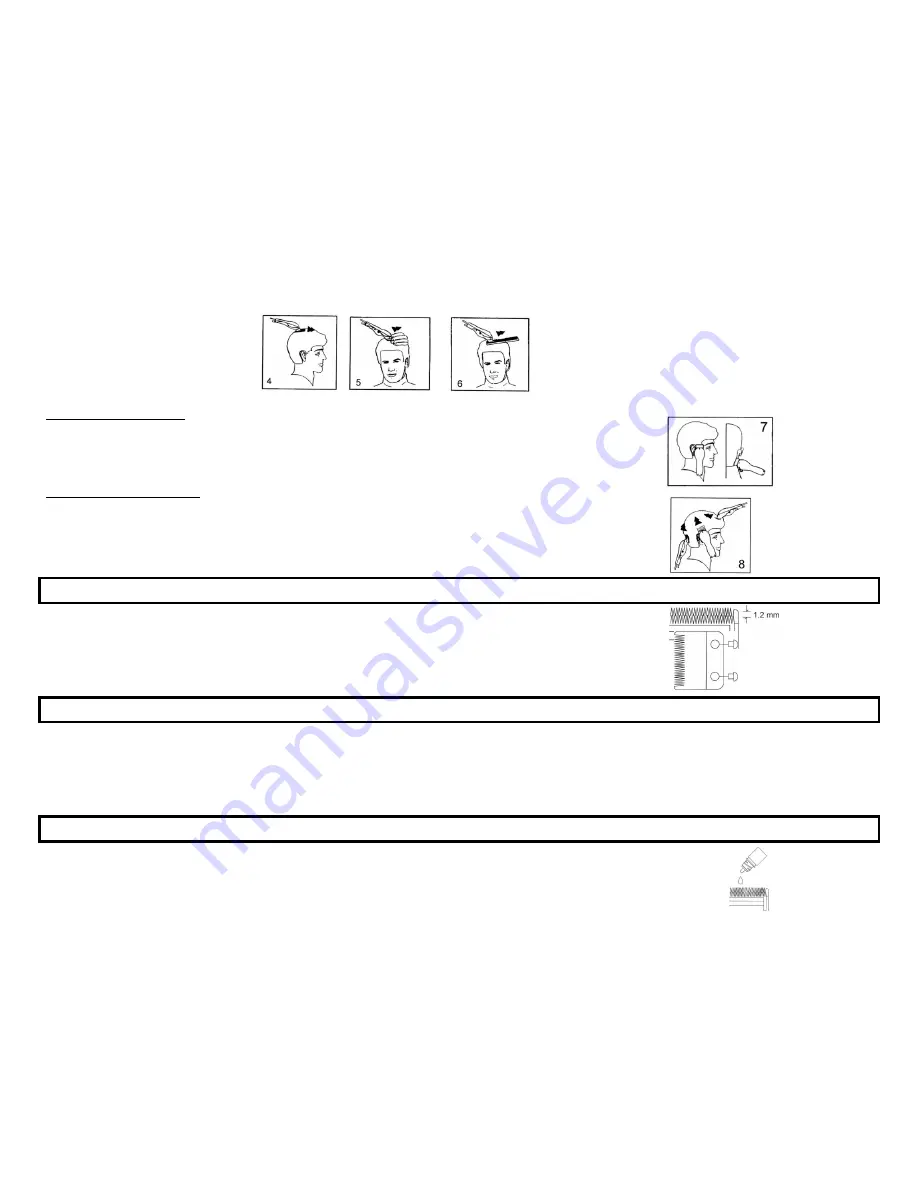
Finally, use the lowest blade adjustment level. You don’t need any comb. Trim hair around the base of the neck,  
sides of the neck and the ears with the clipper. 


Reverse the hair clipper (fig. 7).   


Press the clipper right angles to the head, tips of the blades lightly touching the skin and work downwards.  


SHORT HAIRCUTS AND FLAT TOPS  


Set № 4 (9 mm) comb and move the clipper from nape to the top of the head.  


Hold the comb parallel to the head and slowly move the clipper through the hair as shown (fig. 8).  


Cut the hair against the direction of their growth from the front to the top of the head. Then cut the side parts of the head. 


For “flat top” use the flat comb, not attachments. Starts to cut from the top of the head lifting hair with the comb.  


Using lower blade adjustment levels or smaller attachment combs cut hair to taper the hair down to the neckline. 


BLADES ALIGNMENT 


Blades must be realigned if they have been removed for cleaning or replacement. 


To realign the blades simply match the upper and bottom blades teeth up, point for point. 


End of top blade teeth should be approximately 1.2 mm back from bottom blade. Compare your clipper blades with the figure. 


If blades are set incorrectly, add few drops of oil to the blades, switch on the clipper for a few seconds, then switch it off and unplug. 


Loosen screws slightly and adjust the blades. Tighten screws after blade is aligned. 


If the hair clipper buzzes, then adjust it using the screws (on the device). Before adjusting oil the blades. 


CLEANING  


Mind to clean the appliance regularly for appliance and blades long life. 


Ensure that the appliance is switched off. 


Remove cut hair from the blades with the brush. 


Wipe the body of the hair clipper with wet cloth. Dry the appliance. 


Don’t immerse the appliance in water or another liquid. 


Don’t use chemical or abrasive cleaners.  


BLADES LUBRICATION 


Mind to oil the blades of the clipper every few haircuts for appliance and blades long life. 


Use only oil that is in set. 

Summary of Contents for HE-CL1000

Page 1: ...PPER SET User manual МАШИНКА ДЛЯ СТРИЖКИ ВОЛОССЯ Посібник з експлуатації МАШИНКА ШАШТЫҢ ҚЫРҚЫМЫ ҤШІН Басшылық ша қанаушылыққа HE CL1000 HE CL1001 RUS Руководство по эксплуатации 2 GBR User manual 7 UKR Посібник з експлуатації 10 KAZ Пайдалану бойынша нұсқаулық 11 ...

Page 2: ...жарияланғаннан басқа болуы мүмкін Сатушы тауарды берген кезде жинағын мұқият тексеріңіз UKR Фактична комплектність даного товару може відрізнятися від заявленої в цьому посібнику Уважно перевіряйте комплектність при видачі товару продавцем RUS РУКОВОДСТВО ПО ЭКСПЛУАТАЦИИ МЕРЫ БЕЗОПАСНОСТИ Внимательно прочитайте данную инструкцию перед эксплуатацией прибора и сохраните ее для справок в дальнейшем П...

Page 3: ...обенностью конструкции ИСПОЛЬЗОВАНИЕ ДОПОЛНИТЕЛЬНЫХ ГРЕБНЕЙ Дополнительный гребень 1 длина волос после стрижки около 3 мм Дополнительный гребень 2 длина волос после стрижки около 5 мм Дополнительный гребень 3 длина волос после стрижки около 7 мм Дополнительный гребень 4 длина волос после стрижки около 9 мм Расположите гребень зубчиками вверх насадите его на головку для установки лезвий Обработайте...

Page 4: ...ень для обработки более длинных волос 3 7 мм или 4 9 мм и начинайте обработку всей задней части головы рис 2 ШАГ 3 ОБРАБОТКА ВИСКОВ Установите один из гребней 1 3 мм или 2 5 мм и обработайте височные части Затем установив гребень 3 7 мм или 4 9 мм продолжайте обрабатывать височную часть головы по направлению к верхней части головы рис 3 ШАГ 4 ОБРАБОТКА ВЕРХНЕЙ ЧАСТИ ГОЛОВЫ Установив гребень 3 7 мм...

Page 5: ...помощью входящей в комплект щеточки Для чистки корпуса машинки используйте влажную ткань Протрите ею корпус прибора и сразу тщательно высушите Не погружайте прибор в воду Не используйте для чистки прибора химические и абразивные чистящие средства СМАЗКА ЛЕЗВИЙ Для обеспечения надежной работы машинки ее лезвия должны регулярно смазываться Используйте для смазки масло идущее в комплекте Не рекоменду...

Page 6: ...олучения товара Срок службы изделия при эксплуатации продукции в рамках бытовых нужд и соблюдении правил пользования приведенных в руководстве по эксплуатации составляет 2 два года со дня передачи изделия потребителю Срок службы установлен в соответствии с действующим законодательством о защите прав потребителей Изготовитель обращает внимание потребителей что при соблюдении данных условий срок слу...

Page 7: ...lace the appliance on a surface while it is operating Do not use the appliance with a damaged or broken comb or with teeth missing from the blades as injury may occur NOTE keep the blades oiled INSTRUCTIONS FOR HAIR CUTTING Before starting a hair cut inspect the clipper ensure that it is free of oil between the cutting blade teeth Switch the appliance on to distribute the oil and make sure it is r...

Page 8: ...irst time start with maximum comb attachment STEP 1 NAPE AND NECK Set 1 3 mm or 2 5 mm comb Hold the clipper cutting edge up and begin the haircut Start at the center of the head at the base of the neck fig 1 Slowly lead the clipper working upwards and outwards through the hair trimming just a little at a time Continue to cut back area from the bottom of the neck upwards to the top of the ears STE...

Page 9: ...T Blades must be realigned if they have been removed for cleaning or replacement To realign the blades simply match the upper and bottom blades teeth up point for point End of top blade teeth should be approximately 1 2 mm back from bottom blade Compare your clipper blades with the figure If blades are set incorrectly add few drops of oil to the blades switch on the clipper for a few seconds then ...

Page 10: ...ми Не залишайте працюючий прилад без догляду Не використовуйте прилад з пошкодженим мережним шнуром або іншими пошкодженнями Стежте щоб мережний шнур не торкався гострих крайок і гарячих поверхонь Не тягніть не перекручуйте і не намотуйте мережний шнур навколо корпусу приладу При відключенні приладу від мережі живлення не тягніть за мережний шнур беріться тільки за вилку Не намагайтеся самостійно ...

Page 11: ...кері на самому виробі Серійний номер складається з 13 знаків 4 й і 5 й знаки позначають місяць 6 й і 7 й позначають рік виготовлення приладу Виробник на свій розсуд і без додаткових повідомлень може змінювати комплектацію зовнішній вигляд країну виробництва термін гарантії і технічні характеристики моделі Перевіряйте в момент отримання товару KAZ ПАЙДАЛАНУ БОЙЫНША НҦСҚАУЛЫҚ ҚАУІПСІЗДІК ШАРАЛАРЫ Ас...

Page 12: ...да құралды тексеріңіз жүздерінің тістері арасында май жоқтығына көз жеткізіңіз Май жүздердің арасында тегіс таралуы үшін құралды қосыңыз және олардың тегіс жүрісін тексеріңіз Шыққан майды сүртіңіз Осы әрекетті шаш алған сайын жасаңыз ТЕХНИКАЛЫҚ СИПАТТАМАЛАРЫ Модель Электр қоректену Қуаты Нетто брутто салмағы Қорап өлшемдері Ұ х Е х Б Өндіруші зауыт WENZHOU N AND A FOREIGN TRADE CO LTD 16 F INTERNA...

Reviews: