background image

Page 6

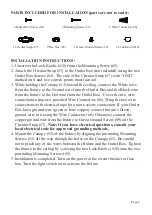
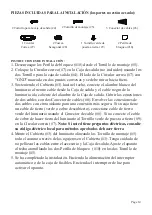
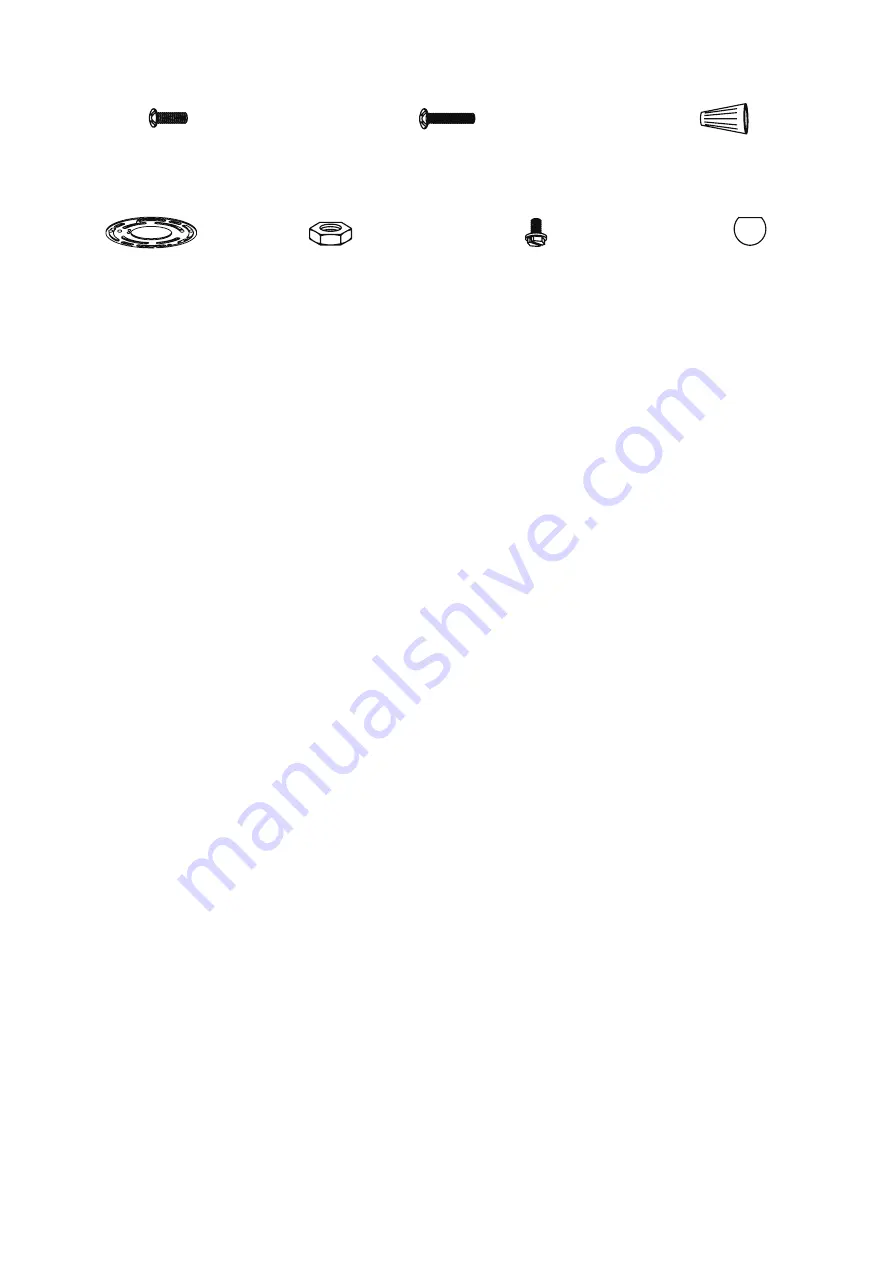
PArTS INCLUDED For INSTALLATIoN (parts are not to scale): 

1 Green Ground Screw (#9)

2 Mounting Screw (#5)

2 Outlet Box Screw (#4)

2 Lock Knob (#10)

INSTALLATIoN INSTrUCTIoNS: 

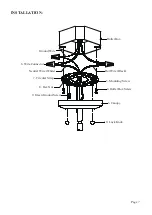
1. Unscrew the Lock Knobs (#10) from the Mounting Screw (#5).

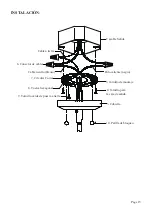
2. Attach the Circular Strap (#7) to the Outlet Box (not included) using the two 

    Outlet Box Screws (#4). The side of the Circular Strap (#7) with “GND” 

    marked on it and two convex points must face out.

3. While holding the Canopy (#3) toward the ceiling, connect the White wire

    from the fixture to the Neutral wire from the Outlet Box and the Black wire 

    from the fixture to the Hot wire from the Outlet Box . Cover the two wire 

    connections using two provided Wire Connectors (#6). Wrap the two wire 

    connections with electrical tape for a more secure connection. If your outlet 

    Box has a ground wire (green or bare copper), connect fixture’s Green  

    ground wire to it using the Wire Connector (#6). Otherwise connect the 

    copper ground wire from the fixture to Green Ground Screw (#9) on the 

    Circular Strap (#7). 

Note: If you have electrical questions, consult your 

    local electrical code for approved grounding methods.

4. Mount the Canopy (#3) of the fixture by aligning the protruding Mounting

    Screws (#5) all the way through the holes on the Canopy (#3). Be careful 

    not to pinch any of the wires between the fixture and the Outlet Box. Tighten 

    the fixture to the ceiling by screwing the two Lock Knobs (#10) onto the two 

    protruding Mounting Screws (#5). 

5. Installation is completed. Turn on the power at the circuit breaker or fuse  

    box. Turn the light switch on to activate the fixture.

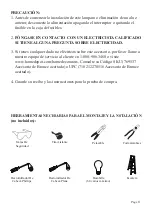
3 Wire Connector (#6)

1 Circular Strap (#7)

2 Hex Nut  (#8)

Summary of Contents for Home Depot 769537

Page 1: ...1 Light Mini Pendant in oil rubbed bronze Finish Home Depot SKU 769537 UPC 718212270516 Oil Rubbed Bronze Fixture INSTRUCTION MANUAL Page 1 ...

Page 2: ... Light Mini Pendant in oil rubbed bronze Finish 2 Timeless Elegant Design 3 Easy to assemble and install QUESTIONS PROBLEMS MISSING PARTS Before returning to your local Home Depot please call our Customer Service Team at 1 800 986 3460 or visit www homedepot com homedecorators Please reference your SKU 769537 oil rubbed bronze fixture or UPC 718212270516 oil rubbed bronze fixture Page 2 ...

Page 3: ...al questions about this fixture please call our Customer Service Team at 1 800 986 3460 or visit www homedepot com homedecorators Please reference your SKU 769537 oil rubbed bronze fixture or UPC 718212270516 oil rubbed bronze fixture 4 Keep your receipt and these Instructions for Proof of purchase TOOLS REQUIRED FOR ASSEMBLY INSTALLATION not included Safety Goggles Flathead Screwdriver Phillips S...

Page 4: ...ose any small parts necessary for installation 3 Determine the desired height and screw the bottom end of Center Tube 2 onto the protruding nipple at the top center of Fixture Body 1 until snug Repeat this step for the remaining Center Tube 2 if necessary 4 Screw the bottom of the Canopy 3 onto the top of Center Tube 2 until Snug 5 Install the bulb not included to the socket in accordance with the...

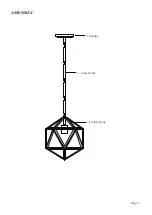
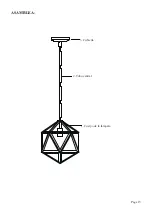
Page 5: ...ASSEMBLY Page 5 3 Canopy 2 Center Tube 1 Fixture Body ...

Page 6: ...onnections with electrical tape for a more secure connection If your Outlet Box has a ground wire green or bare copper connect fixture s Green ground wire to it using the Wire Connector 6 Otherwise connect the copper ground wire from the fixture to Green Ground Screw 9 on the Circular Strap 7 Note If you have electrical questions consult your local electrical code for approved grounding methods 4 ...

Page 7: ...Page 7 3 Canopy 5 Mounting Screw 4 Outlet Box Screw Hot Wire Black Outlet Box 6 Wire Connector Ground Wire Neutral Wire White 7 Circular Strap 9 Green Ground Screw 8 Hex Nut INSTALLATION 10 Lock Knob ...

Page 8: ...odifications alterations neglect or mishandling This warranty shall not apply to any product that is found to have been improperly installed set up or used in any way not in accordance with the instructions supplied with the product This warranty shall not apply to a failure of the product as a result of an accident misuse abuse negligence alteration or faulty installation or any other failure not...

Page 9: ...1 Mini Colgante De Luz enAcabado De BronceAceitado Home Depot SKU 769537 UPC718212270516 Accesorio De Bronce Aceitado MANUALDE INSTRUCCIONES Page 9 ...

Page 10: ...uz en Acabado De Bronce Aceitado 2 Atemporal Elegante Diseño 3 Fácil de montar e instalar con Enlace rápido Preguntas problemas piezas faltantes Antes de volver a su local Home Depot por favor llame a nuestro equipo de servicio al cliente en 1 800 986 3460 o visite www homedepot com homedecorators Consulte su Código SKU 769537 Accesorio de Bronce aceitado o UPC 718212270516 Accesorio de Bronce ace...

Page 11: ...os sobre este accesorio por favor llame a nuestro equipo de servicio al cliente en 1 800 986 3460 o visite www homedepot com homedecorators Consulte su Código SKU 769537 Accesorio de Bronce aceitado o UPC 718212270516 Accesorio de Bronce aceitado 4 Guarde su recibo y las instrucciones para la prueba de compra HERRAMIENTAS necesarias para el montaje y la nstalación no incluidos Gafas De Seguridad C...

Page 12: ...nga cuidado de no perder las partes pequeñas que son necesarias para la instalacion 3 Determine la altura deseada y atornille el extremo inferior del tubo central 2 en el pezón que sobresale en el centro superior Cuerpo de la lámpara 1 hasta que queden firmes Repita este paso para el tubo central 2 del restante si es necesario 4 Enrosque la parte inferior de la cubierta 3 en la parte superior del ...

Page 13: ...ASAMBLEA Page 13 3 Cubierta 2 Tubo central 1 Cuerpo de la lámpara ...

Page 14: ...xiones de dos cables con dos Conector de cables 6 Envolver las conexiones de dos cables con cinta aislante para una conexión más segura Si su caja tiene un cable de tierra verde o cobre descubierto conectarse cable de tierra verde del luminario usando el Conector de cable 6 Si no conecte el cable de cobre de hacer tierra del luminario al Tornillo verde de puesta a tierra 9 en la Circular correa 7 ...

Page 15: ...rnillo de montaje 4 Tornillo para la caja de salida Hilo caliente negro Caja De Salida 6 Conector de cables Cable a tierra Cable neutro blanco 7 Circular Correa 9 Tornillo verde de puesta a tierra 8 Tuerca hexagonal 10 Perilla de bloqueo ...

Page 16: ...encia o mal manejo Esta garantía no se aplicará a cualquier producto que se demuestre que ha sido instalado incorrectamente puesta a punto o utilizado en cualquier manera no conforme con las instrucciones suministradas con el producto Esta garantía no se aplicará a una falla del producto como consecuencia de un accidente mal uso abuso negligencia alteración o instalación defectuosa o cualquier otr...

Page 17: ...1 Pendentif Léger Mini en Fini Bronze Huilé Home Depot SKU 769537 UPC 718212270516 Lampe Bronze Huilé MANUELD INSTRUCTIONS Page 17 ...

Page 18: ... Pendentif Léger Mini en Fini Bronze Huilé 2 Design élégant et intemporel 3 Facile à assembler et installer Questions des problèmes des pièces manquantes Avant de regagner votre local Home Depot veuillez appeler notre Service à la clientèle au 1 800 986 3460 ou visitez www homedepot com homedecorators Veuillez indiquer votre SKU 769537 du luminaire Bronze Huilé ou UPC 718212270516 du luminaire Bro...

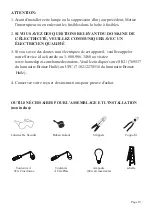
Page 19: ... électriques de cet appareil veuillez appeler notre Service à la clientèle au 1 800 986 3460 ou visitez www homedepot com homedecorators Veuillez indiquer votre SKU 769537 du luminaire Bronze Huilé ou UPC 718212270516 du luminaire Bronze Huilé 4 Conservez votre reçu et des instructions pour preuve d achat Outils nécessaires pour l assemblage et l installation non inclus Lunettes De Sécurité Ruban ...

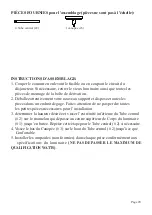
Page 20: ...s attention de ne pas perdre toutes les petites pièces nécessaires pour l installation 3 déterminer la hauteur désirée et visser l extrémité inférieure du Tube central 2 sur le mamelon qui dépasse au centre supérieur de Corps du luminaire 1 jusqu en butée Répétez cette étape pour le Tube central 2 si nécessaire 4 Vissez le bas du Canopée 3 sur le haut du Tube central 2 jusqu à ce que Confortable 5...

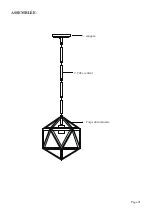
Page 21: ...ASSEMBLÉE Page 21 3 canopée 2 Tube central 1 Corps du luminaire ...

Page 22: ...ppareil à l aide du Copuchon de connexion 6 Dans le cas contraire connecter le fil de cuivre de l appareil à Vis de mise à la terre verte 9 sur la Bracelet circulaire 7 Remarque Si vous avez des questions électriques voir votre code électrique local pour les méthodes de mise à la terre approuvées 4 Monter Canopée 3 de l appareil en alignant les Vis de montage 5 tout le chemin à travers les trous s...

Page 23: ...age 3 Canopée 5 Vis de montage 4 Vis pour boîte de sortie Fil chaud Noir Boîte de sortie 6 Copuchon de connexion Fil Dénudé Ou Vert Fil neutre Blanc 8 Écrou hexagonal 7 Bracelet circulaire 9 Vis de mise à la terre verte INSTALATION ...

Page 24: ...ou une mauvaise manipulation Cette garantie ne s applique pas à un produit se trouve avoir été mal installés set up ou utilisé d une manière non conforme aux instructions livrées avec le produit Cette garantie ne s applique pas à une défaillance du produit résultant d un accident une mauvaise utilisation abus négligence altération ou une mauvaise installation ou tout autre manquement qui se rappor...

Reviews: