


3
HOMEDEPOT.COM/HOMEDECORATORS
Please contact 1-800-986-3460 for further assistance.
Pre-Installation
Warranty
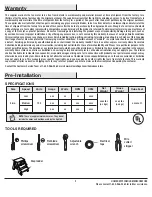
SPECIFICATIONS
TOOLS REQUIRED
Size
Speed
Volts
Amps
Watts
RPM
CFM
Net
Weight
Gross
Weight
Cube Feet
46 in.
Low
Medium
High
120
x.xx
x.xx
x.xx
xx
xx
xx
xx
xxx
xxx
xxxx
xxxx
xxxx
xx.xx lbs
(x.x kgs)
xx.xx lbs
(x.x kgs)
x.xxx cu.ft.
NOTE:
These are approximate measures. They do not
include the amps and wattage used by the light kit.
Phillips
screwdriver
Flat blade
screwdriver
Adjustable
wrench
Electrical
tape
Wire
cutter /
stripper
Step ladder
The supplier warrants the fan motor to be free from defects in workmanship and material present at time of shipment from the factory for a
lifetime after the date of purchase by the original purchaser. The supplier warrants that the light kit, excluding any glass, to be free from defects in
workmanship and material at the time of shipment from the factory for a period of five years after the date of purchase by the original purchaser.
The supplier also warrants that other fan parts, excluding any glass or acrylic blades, to be free from defects in workmanship and material at the
time of shipment from the factory for a period of two years after the date of purchase by the original purchaser. We agree to correct such defects
without charge or at our option replace with a comparable or superior model if the product is returned. To obtain warranty service, you must present
a copy of the receipt as proof of purchase. All costs of removing and reinstalling the product are your responsibility. Damage to any part, such as
by accident, misuse, improper installation, or by affixing any accessories, is not covered by this warranty. Because of varying climatic conditions
this warranty does not cover any changes in brass finish, including rusting, pitting, corroding, tarnishing, or peeling. Brass finishes of this type give
their longest useful life when protected from varying weather conditions. A certain amount of “wobble” is normal and should not be considered
a defect. Servicing performed by unauthorized persons shall render the warranty invalid. There is no other express warranty. Home Decorators
Collection hereby disclaims any and all warranties, including but not limited to those of merchantability and fitness for a particular purpose to the
extent permitted by law. The duration of any implied warranty, which cannot be disclaimed, is limited to the time period as specified in the express
warranty. Some states do not allow a limitation on how long an implied warranty lasts, so the above limitation may not apply to you. The retailer
shall not be liable for incidental, consequential, or special damages arising out of or in connection with product use or performance except as may
otherwise be accorded by law. Some states do not allow the exclusion of incidental or consequential damages, so the above exclusion or limitation
may not apply to you. This warranty gives specific legal rights, and you may also have other rights that vary from state to state. This warranty
supersedes all prior warranties. Shipping costs for any return of product as part of a claim on the warranty must be paid by the customer.
Contact the Customer Service Team at 1-800-986-3460 or visit www.HomeDepot.com/homedecorators.


