Step 5. Shape the branches. Starting with tips closest to the pole, shape
one tip to the right, one to the left and one at the center of the main
stem. Repeat pattern for each branch. (See Fig. 5)
Step 6. Plug the power cord from the bottom section (B) into a proper
outlet.
User Servicing Instructions
Replace the fuse.
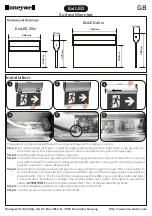
a)
Grasp plug and remove from the receptacle or other outlet device.
Do not unplug by pulling on cord.
b)
Open fuse cover. Slide open fuse access cover
on top of attachment plug towards blades.
c)
Remove fuse carefully.
d)
Risk of fire. Replace fuse only with 3 Amp, 125 Volt fuse (provided
with product).
e)
Close fuse cover. Slide closed the fuse access cover on top of
attachment plug.
f)
Risk of fire. Do not replace attachment plug. Contains a safety
device (fuse) that should not be removed. Discard product if the
attachment plug is damaged.
Replace the lamp.
a)
Grasp plug and remove from the receptacle or other outlet device.
Do not unplug by pulling on cord.
b)
Pull lamp and plastic base straight out of
lampholder.
c)
Replace lamp with only 2.5 Volt, 0.425 Watt
super bright type lamp (provided with
product).
If the lamp base of the replacement lamp does not fit in the string: (as
shown below by the Figs.)
a)
Remove the base of burned out lamp by straightening lamp leads
and gently pull lamp out.
b)
Thread leads of new lamp through holes in old
base with one lead in each hole.
c)
After lamp is fully inserted into base, bend each lead up, like other
lamps in the light set so that the leads will touch the contacts
inside the lampholder.
If connecting to a lighting string that does not have a Wattage (W)
rating {found on the tag within 6 inches of the plug} calculate the
wattage as follows: Multiply the current (0.34 A) which is on the
flag-type tag by 120.
For Example: Lighting string is rated 120V, 60Hz, 0.34 Amps.
0.34X120= 40.8 Watts
Add the wattage of each light string together for a total of 216 Watts or
less. (Do not exceed 216 Watts)
CAUTION
:
1.
To reduce the risk of overheating, replace burned-out lamps
promptly. Use 2.5 Volt, 0.425 Watt lamps only.
2.
To reduce the risk of fire and electric shock: Do not install on trees
having needles, leaves or branch coverings of metal or materials
which look like metal, and do not mount or support strings in a
manner that can cut or damage wire insulation.
Care and Cleaning
Step 1. Remove all ornaments and decorations.
Step 2. Unplug the cord from the wall outlet and then disconnect each
section of the tree.
Step 3. Gently lift the tree top straight up to remove from the bottom
section and fold all branches towards the pole.
Step 4. Carefully place all tree sections into a shipping box and tape it shut.
Step 5. Store your tree in a cool, dry place away from sunlight.
Troubleshooting
Problem
Solution
The tree
does not
light
Ensure that connectors of all tree sections are
connected into each other well. Make sure power
cord plug is securely inserted into a working
electrical outlet.
Check for blown fuses at the power cord plug. Replace
as needed with the replacement fuses provided.
Check for loose, broken, or missing bulbs and replace
as needed with the replacement bulbs provided.
If you are still experiencing problems with the tree
please call 1-877-527-0313 for instructions.
Loose branches
If a branch of the tree falls off, follow the steps below to reinstall it with a
spare latch (F).
1)
Place the branch into the slot of the bracket.
2)
Insert a spare latch
through the hole and
use diagonal pliers (not
included) to crimp the
latch. (See Fig. A)
UL Model No. W-MF100/2(0.34A)