Instructions – 4A91H
For Technical Support Call: 800-343-7486 Monday-Friday 7AM - 4 PM (PST)
Page 5
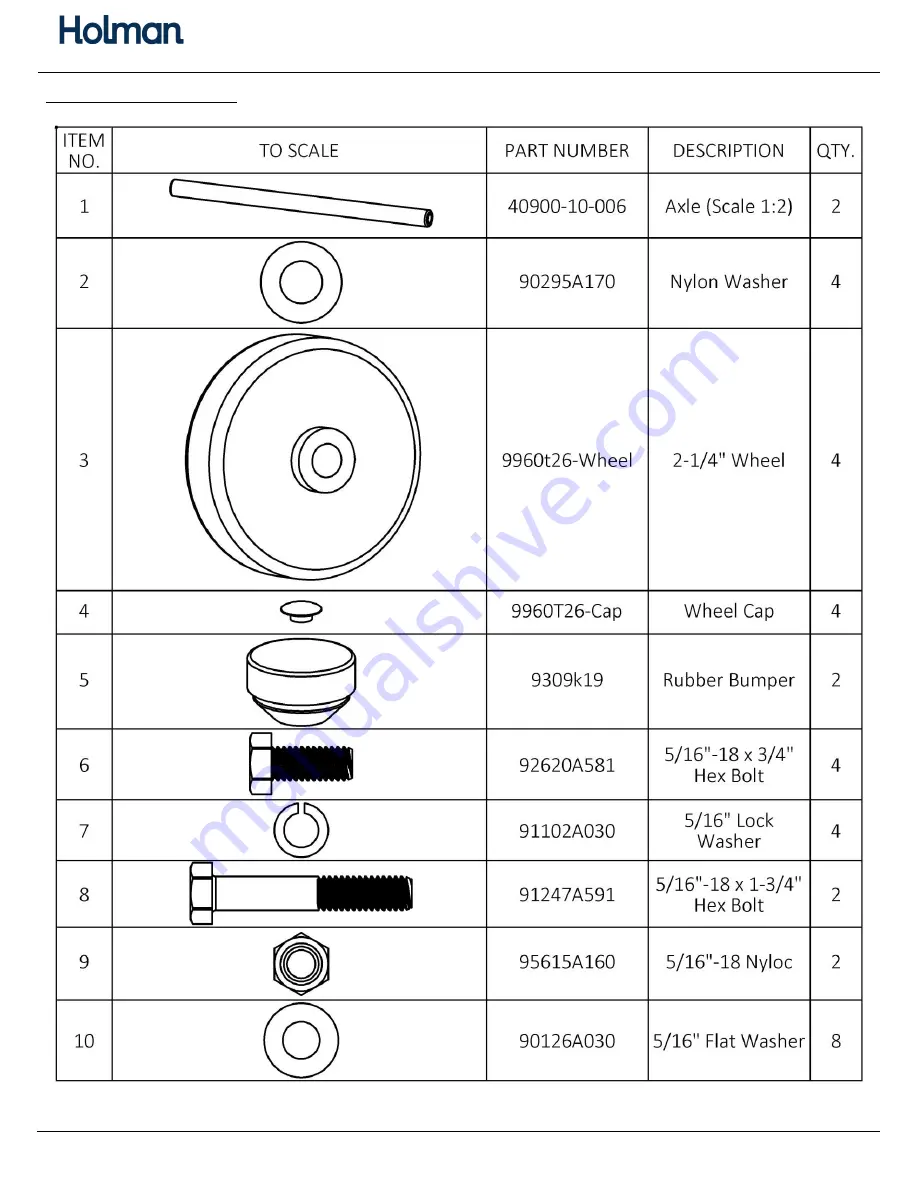
Hardware (1 of 2)
Page 1: ...Instruction Guide 4A91H Holman Rancho Cordova CA 95742 800 343 7486 InstallationSupport Holman com 20201207R4 DATE ______________...
Page 2: ...et and Wrench 7 16 Socket and Wrench Table of Contents Parts List 3 4 Hardware 5 6 Step 1 Assemble Front Bow 7 10 Step 2 Install Spring on Front Bow 11 Step 3 Assemble Rear Bow 12 14 Step 4 Install To...
Page 3: ...Instructions 4A91H For Technical Support Call 800 343 7486 Monday Friday 7AM 4 PM PST Page 3 Parts 1 of 2...
Page 4: ...Instructions 4A91H For Technical Support Call 800 343 7486 Monday Friday 7AM 4 PM PST Page 4 Parts 2 of 2...
Page 5: ...Instructions 4A91H For Technical Support Call 800 343 7486 Monday Friday 7AM 4 PM PST Page 5 Hardware 1 of 2...
Page 6: ...Instructions 4A91H For Technical Support Call 800 343 7486 Monday Friday 7AM 4 PM PST Page 6 Hardware 2 of 2...
Page 7: ...0 343 7486 Monday Friday 7AM 4 PM PST Page 7 Step 1 Assemble Front Bow Attach the spring mount to the underside of the front bow using the pre assembled hardware in the location and orientation shown...
Page 8: ...of the front bow using the previously removed 3 8 hardware in the locations shown TIGHTEN Insert a rubber bumper in the round hole as shown The large end of the bumper goes on top of the bow Slide a w...
Page 9: ...day Friday 7AM 4 PM PST Page 9 Rotate the pan perpendicular to the top bow and at a slight angle as shown Manuever the pan around the wheels Ensure the wheels are contained inside the pan and lay the...
Page 10: ...bow for clarity Place the nylon spacer in between the pan and the arm on both sides The nylon washer goes against the outside of each arm Align the arms from the mechanism assembly with the holes in...
Page 11: ...front bow by attaching one end of the spring to the spring mount and the other end of the spring to the front bow mechanism Hook the spring onto the pin in the spring mount bracket shown without the b...
Page 12: ...sm to the underside of the rear bow using the previously removed 3 8 hardware in the locations shown TIGHTEN Insert a rubber bumper in the slot as shown The large bumper goes on top of the bow Slide a...
Page 13: ...day 7AM 4 PM PST Page 13 Rotate the pan perpendicular to the top bow and at a slight angle as shown The pan needs to be manuevered around the wheels Ensure the wheels are contained inside the pan and...
Page 14: ...bow for clarity Place the nylon spacer in between the pan and the arm on both sides The nylon washer goes against the outside of each arm Align the arms from the mechanism assembly with the holes in...
Page 15: ...needed Look at the passenger side for reference The picture shown below shows the rack with the tube extension installed Note The extension is being used in the pictures Bolt the torque tube to the f...
Page 16: ...0 343 7486 Monday Friday 7AM 4 PM PST Page 16 Step 5 Install End Tube Bolt the end tube assembly to the end of the pan on the front and rear bow using 5 16 x 3 4 hex head bolts 5 16 lock washers and 5...
Page 17: ...e hardware as shown from the tube on the rear bow Insert actuator extension into the tube and attach using the previously removed hardware Insert actuator assembly into the end of the actuator extensi...
Page 18: ...on so the mounts on the mechanism will allow the gas springs to be installed Use the pin spacers and the nylon washers that were removed to attach the gas springs to the gas spring mount on the unders...
Page 19: ...eing used Bolt together using 1 4 x 7 8 hex head bolt 1 4 lock washer and a 1 4 flat washer Repeat for a second ladder hook Tighten Place one ladder hook assembly onto the front bow and one ladder hoo...
Page 20: ...der Stop Find the slot and the installed hardware near the previously installed ladder hook assembly Remove the hardware in the bow and place the ladder stop in that location Bolt into place using the...
Page 21: ...Test Ladder Rack Go back and ensure all hardware is tight Start with tightening the torque tube first Prior to installing a ladder place the long handle into the handle bar assembly and test that the...