background image

17

GB

03 Test 

run 

After doing the steps indicated in point 2, you can go to the test run. You should clean the bathtub, then 

fi

 ll the bath with  

water at 40+/- 5 ºC and start the system for 10 minutes, checking the max/min. number of rotations. Then, the whirpool 

system should be turned on, and after next 10 minutes, all the pipes, wires and connection tightness should be checked.

During restarting, disinfection should be started according to instructions in 14 paragraph.

After installation and leak test it is necessary not later than within 24 hours after 

fi

 lling of water and emptying the bathtub 

to clean it and protect it from damage during the construction phase. If the above condition is not followed, the warranty 

is not valid. 

04 Bathtub 

apron 

After the test run, install glass apron according to the instructions or build in the bathtub  taking into consideration the 

following points: 

1. 

All systems of conduits and components of the system initially installed in the bathtub and the ones installed 

at the factory must rest freely behind the walling. 

2. 

The displayed system components, 

fi

 rst of all the fan side of the pump, should be protected against dirt by 

covering  them. 

3. 

Mount the apron in such a way that the system components are protected against touching and water splashing. 

The bathtub’s operation without the apron is not allowed, except for the test run. 

4. 

3-4 mm width gap for silicon seal should be left between the edge of the bathtub and the apron (according to the 

usage instructions by the producer)

5. 

In case of all models, place easily accessible and easily opening inspection windows min. 400 to 450 

mm wide and 350 mm high, according to annexed drawings with dimensions.


Moreover, allow for an inspection window near the outlet. 

The inspection window can be opened only with the use of proper tools. The given dimensions should be 

absolutely maintained, because in case of a need for maintenance only then it is possible to easily disassemble 

the system components. An ideal solution is placing the „air and inspection grate” produced by Hoesch, 

dimensions 420 x 325 mm (article No. 6683.---). 

6. 

On account of the rotating jets and the blower a free inlet of air should be provided (approx. Vo = 60,0 m³/h 

with the max. number of revolutions of the blower), because when the casing is hermetically tight there 

is no inlet of air to the rotating jets and to the blower. A hole with the dimensions 100 x 100 mm in the casing 

is suf

fi

 cient. The use of the „air and inspection grate” will provide suf

fi

 cient in

fl

 ow of air. 

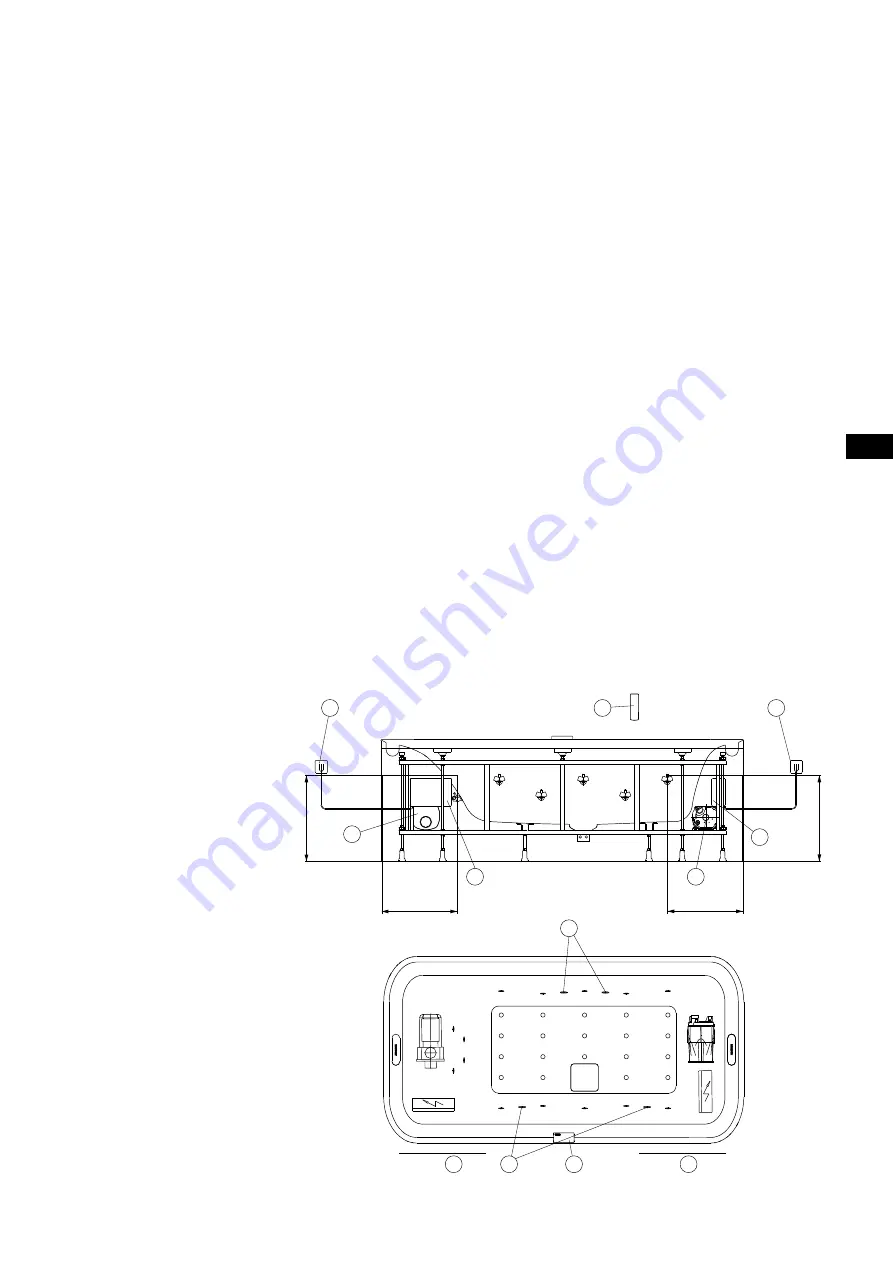
05 Diagram

1

2

4

5

6

7

7

8

8

1

3

9

350

min.400

350

min.400

1  The steering connection to the mains 230V~, 

50/60 Hz, 10 A connection box self- provided

2 Pilot
3 Pump
4 Controller
5 Blower
6 Controller
7  Underwater LED lighting
8 Inspection opening
9 Control panel

Summary of Contents for ERGO+ Series

Page 1: ...ng Installation and operation instructions Instructions de montage et d utilisation du kit vapeur Istruzioni di montaggio ed uso Montage en gebruiksaanwijzing Instrukcja monta u i obs ugi DE GB FR IT...

Page 2: ...nungsanweisung 3 Installation and operation instructions 13 Instructions de montage et d utilisation du kit vapeur 23 Istruzioni di montaggio ed uso 33 Montage en gebruiksaanwijzing 43 Instrukcja mont...

Page 3: ...tro Installation 4 02 02 1 Schutzbereich 5 02 02 2 Anschlussschaltbild 6 02 02 3 E Heizung 3 kW Sonderzubeh r 6 03 Probelauf 7 04 Wannenverkleidung 7 05 Schemazeichnung 7 06 Bedienungsanleitung 8 07 E...

Page 4: ...n Bereich Hinweis S mtliche Elektro Arbeiten m ssen durch Fachelektriker gem der geltenden DIN EN typischen Landesvorschriften und rtlichen Stromvorschriften durchgef hrt werden Das Whirlwannen System...

Page 5: ...en Vor dem ffnen spannungsfrei schalten L 1 L 2 L 3 N PE Hauptschalter im Bad Anordnung au erhalb Zone 2 gem 9DE 0100 Teil 10A tr ge RCD 30 mA Poten ialausgleich 4 mm Bereich 1 Bereich 1 Bereich 2 Ber...

Page 6: ...D JUDX URVD OLOD JU Q JHOE HVLQIHFWLRQ OHYHO VHQVRU RQO IRU DXWRPDWLF HVLQIHFWLRQ 3XPS L N PE 16 A 16 A RCD 30mA L N PE PE N L 230 V 50 Hz 1 2 3 4 5 1 Anschlu klemmen 2 Steuerung 3 Heizung 4 Schutzsch...

Page 7: ...ist au er beim Probelauf nicht zul ssig 4 Zwischen dem Wannenrand und der Glasverkleidung sollte ein 3 4 mm Spalt f r Silikondichtung gelassen werden bitte die Herstellerhinweise bez glich der Anwend...

Page 8: ...Das Whirlsystem bildet einen geschlossenen Wasserkreislauf Das Ablaufventil ist gleichzeitig Ansaugstutzen Wasser wird angesaugt durch die Whirlpumpe beschleunigt und mit ca 1 bar Druck durch die Whir...

Page 9: ...er erh ht 3 6 Intervall Modus EIN AUS Bei Aktivierung des Intervall Modus ndert sich die Massageleistung periodisch zwischen den unteren und oberen Leistungsgrenzen Um den Intervallbetrieb zu beenden...

Page 10: ...oder nach jedem 2 3 Badevorgang durchzuf hren Zur Desinfektion ist ein bestimmter Wasserstand erforderlich ggf muss der Wasserstand bis zu dem Niveau erh ht werden bei dem auch die Lichtfunktion gesta...

Page 11: ...ttliche K rpertemperatur nicht berschreiten Der ideale Temperaturbereich liegt bei 32 C bis 37 C Stellen Sie sicher dass keine Elektroger te oder andere stromf hrende Bauteile in die bef llte Whirlwan...

Page 12: ...l Ablaufventil s ubern Massaged sen Reinigung der D sen Was ist zu tun wenn sich w hrend dem Whirlbaden Schaum bildet Sofort Whirlbetrieb und Air Injection abschalten Wasser ablassen und eine gr ndlic...

Page 13: ...llation 14 02 02 1 Protected Area 15 02 02 2 Connections diagram 16 02 02 3 Electric heating 3 kW additional equipment 16 03 Test run 17 04 Bathtub apron 17 05 Diagram 17 06 Operating manual 18 07 Int...

Page 14: ...ed electrician in accordance with the applicable standard DIN EN typical country norms and the local energy law The whirl system is designed to operate with the alternating voltage of 230 V AC 50 60 H...

Page 15: ...tion PE Interrupt current connection before opening L 1 L 2 L 3 N PE Main switch in bathroom Position outside area 2 according to 9DE 0100 Teil 10A rccb RCD 30 mA Equipotential bonding 4 mm area 1 are...

Page 16: ...E 16 A 16 A RCD 30mA L N PE PE N L 230 V 50 Hz 1 2 3 4 5 1 connection clamps 2 steering 3 heater 4 connection socket 5 PI 65 connection box to install by the construction team 02 02 3 Electric heating...

Page 17: ...e bathtub s operation without the apron is not allowed except for the test run 4 3 4 mm width gap for silicon seal should be left between the edge of the bathtub and the apron according to the usage i...

Page 18: ...rain valve is at the same time the sucking connector Water is sucked in out the whirl pump accelerates its flow so that the water under the pressure of approx 1 bar is forced in by massage jets to the...

Page 19: ...the active interval mode the massage power changes periodically from the lowest to the highest In order to stop the interval mode press the buttons again 7 Plus Airsystem ON OFF Can be additionally s...

Page 20: ...It is recommend to start the disinfection once a month or every 2 3 baths If you want to start the disinfection the proper water level is needed so you may have to fill the bathtub up to the level at...

Page 21: ...ope of temperatures is from 32 C to 37 C For your own safety please make sure that no electric devices or other current conducting elements will not fall into the bathtub filled with water Maintenance...

Page 22: ...Clean the drain valve Massage jets Clean the jets What you should do when during whirl bathing foam appears Immediately switch the Whirl system and Air Injection off Drain and rinse the bathtub thorou...

Page 23: ...lectrique 25 02 02 2 Sch ma des raccordements 26 02 02 3 Chauffage lectrique 3 kW accessoires optionnel 26 03 Essai 27 04 Habillage de la baignoire 27 05 Sch ma technique 27 06 Mode d emploi 28 07 In...

Page 24: ...ux lectriques doivent tre effectu s par un lectricien conform ment aux normes DIN EN en vigueur aux directives nationales applicables ainsi qu aux r glementations locales en mati re d lectricit Le sys...

Page 25: ...connecter imperativement l appareil avant intervention L 1 L 2 L 3 N PE Interrupteur principal dans la salle de bains emplacement hors de l enveloppe 2 conform ment la norme 9DE 0100 partie 10A tempor...

Page 26: ...garantit en cas de raccordement d une ligne quipotentiel Prot ger le branchement au r seau la commande du syst me et la partie de puissance du chauffage par un disjoncteur de 30 mA ON ON OFF 1 2 3 4...

Page 27: ...es projections d eau et les chocs accidentels Exception faite de l essai il est interdit de se servir de la baignoire d pourvue de son habillage 4 Laissez un espace de 3 4 mm pour le joint en silicone...

Page 28: ...duction 07 01 Comment fonctionne le syst me Whirl Le syst me d hydromassage forme un circuit d eau ferm La vanne de vidange sert aussi de buse d aspiration L eau est aspir e acc l r e par la pompe et...

Page 29: ...Mode intervalle actif la puissance de massage est modifi e p riodiquement depuis la plus petite jusqu la plus importante Pour d sactiver le mode intervalle il faut appuyer nouveau sur les touches 7 Pl...

Page 30: ...assage garantie une hygi ne parfaite Il est conseill d effectuer une d sinfection une fois par mois ou apr s 2 3 bains Un certain niveau d eau est n cessaire pour la d sinfection il peut donc arriver...

Page 31: ...aucun appareil lectrique ou conducteur d lectricit ne risque de tomber dans la baignoire remplie Entretient L utilisation des produits de bain contenant des particules stables comme p e bains aux alg...

Page 32: ...d coulement Nettoyer la vanne d coulement Buses de massage Nettoyage des buses Que faire quand La mousse se forme pendant l hydromassage Arr ter imm diatement l hydromassage et le syst me Air Injectio...

Page 33: ...otetta 35 02 02 2 Schema collegamenti 36 02 02 3 Riscaldatore elettrico 3 kW accessori opzionali 36 03 Prova di funzionamento 37 04 Chiusura della vasca 37 05 Schema 37 06 Istruzione d uso 38 07 Preme...

Page 34: ...zzato in elettricit ai sensi delle norme DIN EN vigenti e nel rispetto delle norme elettriche locali e nazionali Il sistema delle vasche idromassaggio stato progettato per tensione alternata 230 V AC...

Page 35: ...ella messa in funzione regolare senza L 1 L 2 L 3 N PE Interruttore generale nel bagno disposi ione all esterno della ona 2 conformemente D 9 1 3DUWH 1 10A ritardati RCD 30 mA Conguaglio dei poten ial...

Page 36: ...la messa a terra del supporto Assicurare tramite un unico interruttore di protezione della corrente 30 mA il collegamento alla rete della centralina e del riscaldatore ON ON OFF 1 2 3 4 ECE V 1 2 N N...

Page 37: ...asca senza la copertura tranne durante prova di funzionamento 4 Tra il bordo della vasca ed il rivestimento in vetro dovrebbe essere mantenuta una fessura di 3 4 mm per la guarnizione in silicone si r...

Page 38: ...di deflusso nello stesso tempo tubo di giunzione aspirante L acqua aspirata la pompa idromassaggio accelera il suo flusso cosicch l acqua sotto la pressione di circa 1 bar forzata attraverso le bocch...

Page 39: ...allo attiva periodicamente viene cambiata la potenza del massaggio da quella minima a quella massima Per terminare il funzionamento ad intervalli premere nuovamente i tasti 7 Plus Airsistema ACC SP Si...

Page 40: ...disinfezione della vasca con idromassaggio ne garantisce un ottima igiene Si raccomanda di eseguire la disinfezione una volta al mese o ogni 2 3 bagni Per la disinfezione necessario un livello dell a...

Page 41: ...atura media del corpo L ambito ideale della temperatura quello da 32 C a 37 C Avendo cura della propria sicurezza assicurarsi che nella vasca piena non cadano attrezzi elettrici o altri elementi condu...

Page 42: ...o massaggiante diventa pi debole Valvola di deflusso Pulire la valvola di scarico Bocchette massaggianti Pulire gli ugelli Cosa fare quando Durante l idromassaggio comincia a formarsi la schiuma Stacc...

Page 43: ...Veiligheidsbereik 45 02 02 2 Aansluitschema 46 02 02 3 Elektrische verwarming 3 kW optionele uitrusting 46 03 Aansluiting op de waterleiding 47 04 Badombouw 47 05 Technische tekening 47 06 Gebruiksaan...

Page 44: ...elijke en voldoen aan de eisen opgenomen in de norm DIN EN Uitzondering vormt hun toepassing voor medische doeleinden Aanwijzing alle elektrowerkzaamheden moeten worden uitgevoerd door vakkundige elek...

Page 45: ...eid gebruiken Voor het openen spanningsloos maken L 1 L 2 L 3 N PE HoofGVFKDNHODDU LQ GH EDGNDPHr aanbrengen buiten one 2 voOJHQV 9D GHHO 10A traag RCD 30 mA Potentiaalvereffening 4 mm bereik 1 bereik...

Page 46: ...eem zal alleen werken indien een potentiaalvereffening is aangesloten De aansluiting op het net van sturing en verwarmingsvoeding beveiligen met een aparte aardlekschakelaar van 30 mA ON ON OFF 1 2 3...

Page 47: ...uitzondering van de testfase 4 Tussen de badrand en de glazen ommanteling dient een opening van 3 4 mm gehouden te worden voor de afdichting in silicone gelieve de instructies van de fabrikant in acht...

Page 48: ...rking van het whirlsysteem ERGO Het whirlsysteem heeft een gesloten waterkring De afvoer is tegelijk de aanzuiging Water wordt aangezogen door de pomp en met een druk van ongeveer 1 bar door de jets h...

Page 49: ...modus veranderd periodiek de massagekracht gaande van minimale tot maximale kracht Om de intervalfunctie te be indigen dient men de knop nogmaals in te drukken 7 Plus Air systeem AAN UIT Men kan bijko...

Page 50: ...nfectie is een adequaat waterniveau nodig het kan voorkomen dat men het waterniveau moet verhogen tot het niveau waarbij de lichtfunctie kan worden gestart Wij aanvaarden geen verantwoordelijkheid voo...

Page 51: ...en de 32 C en 37 C Voor uw eigen veiligheid wordt er op aangedrongen er voor te zorgen dat geen elektrische toestellen of andere stroomgeleidende elementen in het gevulde bad kunnen vallen Onderhoud V...

Page 52: ...reinigen Wat moet men doen bij Tijdens het bubbelen ontstaat schuim Het systeem Whirl en of Air onmiddellijk uitschakelen het water laten weglopen en een grondige spoeling uitvoeren Men moet altijd go...

Page 53: ...iony 55 02 02 2 Schemat po cze 56 02 02 3 Ogrzewanie elektryczne 3 kW wyposa enie dodatkowe 56 03 Rozruch pr bny 57 04 Obudowa wanny 57 05 Schemat 57 06 Instrukcja obs ugi 58 07 Wprowadzenie 58 07 01...

Page 54: ...nny by wykonane przez uprawnionych elektryk w zgodnie z obowi zuj c norm DIN EN typowymi dla kraju przepisami oraz miejscowymi przepisami energetycznymi System wanien z hydromasa em jest zaprojektowan...

Page 55: ...pieczenia PE Przed otwarciem wy czy napi cie L 1 L 2 L 3 N PE 10A inercyjny RCD 30 mA Wyr wnanie potencja w 4 mm yZQ Z F QLN Z D LHQFH loNali acja po a steI 2 godnie 9DE 0100 c 01 obszar 1 obszar 1 ob...

Page 56: ...zewodem ochronnym i pod czonym wyr wnaniem potencja w Pod czenie sieciowe do sterowanie systemem i dla cz ci mocy ogrzewania zabezpieczy wsp lnym wy cznikiem ochronnym pr dowym 30 mA ON ON OFF 1 2 3 4...

Page 57: ...ezpieczone by y przed dotykaniem i pryskaniem wody Niedozwolona jest praca wanny bez obudowy z wyj tkiem rozruchu pr bnego 4 Pomi dzy kraw dzi wanny a obudow nale y pozostawi szpar szeroko ci 3 4 mm n...

Page 58: ...r odp ywowy jest jednocze nie kr cem zasysaj cym Woda jest zasysana odsysana pompa do hydromasa u przyspiesza jej przep yw tak e woda pod ci nieniem ok 1 bar jest wt aczana przed dysze wodne do wn tr...

Page 59: ...a owy W WY Przy aktywnym trybie interwa owym zmienia si periodycznie moc masowania od najmniejszej do najwi kszej Aby zako czy prac w trybie interwa owym prosz o ponowne wci ni cie przycisk w 7 System...

Page 60: ...Zaleca si przeprowadzanie dezynfekcji raz w miesi cu b d co 2 3 k piele Do jej uruchomienia niezb dny jest odpowiedni poziom wody wi c mo e si okaza e trzeba go uzupe ni a do poziomu przy kt rym mo li...

Page 61: ...ury cia a Idealny zakres temperatury wynosi od 32 C do 37 C Dbaj c o w asne bezpiecze stwo prosz pami ta e do nape nionej wanny wod nie mog dosta si urz dzenia elektryczne lub inne elementy przewodz c...

Page 62: ...owego Dysze masuj ce Czyszczenie dysz Co nale y zrobi gdy w trakcie k pieli z hydromasa em zaczyna wytwarza si piana Natychmiast wy czy hydromasa i Air Injection Spu ci wod i przeprowadzi gruntowne p...

Page 63: ...VRheinland I D 1 0 0 0 0 0000 0 01 64 02 64 02 01 64 02 02 64 02 02 1 65 02 02 2 66 02 02 3 3 66 03 67 04 67 05 67 06 68 07 68 07 01 ERGO 68 08 68 08 01 68 08 02 68 09 ERGO 69 10 70 11 70 12 70 13 70...

Page 64: ...RU 64 01 Hoesch 02 02 01 02 02 Hoesch DIN EN DIN EN 230 50 60 2 10 I RCD c 30 A 3 RCD 1 FI 3x1 5 L 1 8 3 3x2 5 L 2 0 I 4 I P 65 30 12...

Page 65: ...RU 65 02 02 1 L 1 L 2 L 3 N PE 9 RCD 30 mA 4 mm 60 cm 60 cm 60 cm 225 cm r 6 0 c m...

Page 66: ...MAIN VA2 VA3 VW1 V V V S V LD3 LD2 LD1 G F E D C B A Dp CL 12C PWH Temp DA 1 2 2 3 3 4 4 4 4 4 4 L 4 5 5 6 4 5 6 6 6 6 6 6 6 1 4 7 7 5 8 8 9 9 3 2 10 10 4 11 11 1 1 12 12 4 6 4 6 4 5 10 13 13 13 13 1...

Page 67: ...RU 67 1 2 4 5 6 7 7 8 8 1 3 9 350 min 400 350 min 400 03 02 40 5 C 10 10 14 24 04 1 2 3 4 3 4 5 400 450 350 Hoesch 420 325 6683 6 Vo 60 0 100 100 05 1 230V 50 60 Hz 10A 2 3 4 5 6 7 LED 8 9...

Page 68: ...RU 68 06 HOESCH 07 07 01 ERGO 1 ERGO 08 08 01 08 02...

Page 69: ...RU 69 1 Whirl 2 4 Air AIR 5 3 6 7 Air Whirlpower Ai 8 Whirlpower Whirl 9 LED c 10 3 11 1 3 4 5 6 7 8 9 11 10 2 09 ERGO 1 2...

Page 70: ...RU 70 10 11 Hoesch 12 25 25 1 4 13 20 2 30 90 14 2 3 o 69 23 133607 100 100 133607 10 3 30 1 27 2 30...

Page 71: ...RU 71 15 1 32 C 37 C HOESCH HOESCH 699100...

Page 72: ...RU 72 16 230 50 FI 1 HOESCH HOESCH Fabr Nr 0H7 00008...

Page 73: ...VRheinland I D 1 0 0 0 0 0000 0 01 74 02 74 02 01 74 02 02 74 02 02 1 75 02 02 2 76 02 02 3 3 76 03 77 04 77 05 77 06 78 07 78 07 01 ERGO 78 08 78 08 01 78 08 02 78 09 ERGO 79 10 79 11 80 12 80 13 80...

Page 74: ...CN 74 01 Hoesch 02 02 01 02 02 Hoesch DIN EN DIN EN 230 V AC 50 60 Hz 2kW 10A 30mA RCD 3 mm RCD FI 3 1 5mm 1 8 m 3kW 3x 2 5mm 2 0 m 4mm IP 65 30cm 12 V...

Page 75: ...CN 75 02 02 1 PE L 1 L 2 L 3 N PE 10A rccb RCD 30 mA 9 7HOL 4 mm area 1 area 1 area 2 area 2 60 cm 60 cm area 2 60 cm 225 cm r 6 0 c m area 0 area 0...

Page 76: ...MAIN VA2 VA3 VW1 V V V S V LD3 LD2 LD1 G F E D C B A Dp CL 12C PWH Temp DA 1 2 2 3 3 4 4 4 4 4 4 L 4 5 5 6 4 5 6 6 6 6 6 6 6 1 4 7 7 5 8 8 9 9 3 2 10 10 4 11 11 1 1 12 12 4 6 4 6 4 5 10 13 13 13 13 13...

Page 77: ...3 40 5 C 10 10 14 24 04 1 2 3 4 3 4 mm 5 400 mm 450 mm 350 mm HOESCH 420 x 325 mm 6683 6 Vo 60 0 m3 h 100 x 100 mm 05 1 2 4 5 6 7 7 8 8 1 3 9 350 min 400 350 min 400 1 230V 50 60 Hz 10 A 2 3 4 5 6 7 L...

Page 78: ...CN 78 06 HOESCH 07 07 01 ERGO 1 bar ERGO 08 08 01 08 02...

Page 79: ...CN 79 1 2 4 5 3 6 7 Whirlpower Air 8 Whirlpower 9 LED 10 3 11 1 3 4 5 6 7 8 9 11 10 2 09 ERGO 1 2 1 2 10...

Page 80: ...CN 80 11 HOESCH 12 25 25 1 4 13 20 2 30 90 14 2 3 6923 133607 100L 100ml 133607 10 3 30 1 27 2 30 15 1 32 C 37 C...

Page 81: ...CN 81 HOESCH HOESCH 699100 16 230 V 50 Hz FI 1 HOESCH HOESCH Fabr Nr 0H7 00008...

Page 82: ...82...

Page 83: ...83...

Page 84: ...w hoesch design com DE GB FR IT NL PL RU CN 04 16 Art Nr 97602 SP 175 0360A ML HSH Alle Ma angaben in mm Technische nderungen vorbehalten All dimensions in mm Subject to technical alterations Toutes D...

Reviews: