background image

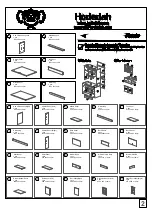
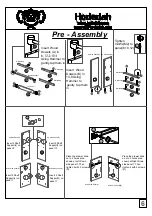
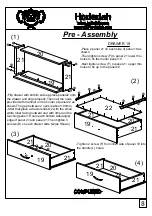
Pre - Assembly

K

Glass Door Panel(L)

Glass Door Panel(R)

 Door Panel(L)

 Door Panel(R)

E

L

Glass Door Panel(L)

Glass Door Panel(R)

 Door Panel(L)

 Door Panel(R)

Tighten 2 screws(E)
from Door Panel

(23,24,25,26)into the
handle (L) hole.

Glass Door Panel(L)

Glass Door Panel(R)

 Door Panel(L)

 Door Panel(R)

BOTTOM

VIEW

Middle Support

Top Panel

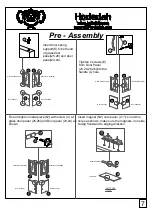
Insert door spring

support(K) to both end
of glass door

panel(25,26) and door
panel(23,24).

Fix and tighten metal piece(N1) with screw (C) at

glass door panel (25,26)and Door panel (23,24) as
shown.

Insert magnet (N2) onto panel (2,11)'s non-thru
holes as shown, make sure the magnets, iron side

facing frontward to edging direction.

7

Summary of Contents for HIKF 96

Page 1: ...1...

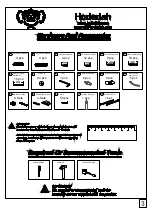
Page 2: ...L 2 pcs 357 x116x 15mm Back Panel 2 pcs 605 x400x 15mm Drawer Front Back 1 pcs 520 x116 x 15mm Glass Door Panel Left 1 pcs 474 x 282 x 15mm Back Panel 2 pcs 605 x 400 x 15mm Drawer Head 1 pcs 568 x171...

Page 3: ...Screw M4x25mm 8 pcs CB Screw M4x38mm 10 pcs CSK Cap Wood M6x50MM 18 pcs Screw Cap 24 pcs L Key 1 pcs Metal Shelf Support 8 pcs Door Support Spring 8 pcs Moon Handle 96mm PVC 5 pcs Minifix 5654 5546 6...

Page 4: ...4...

Page 5: ...5...

Page 6: ...nel 6 10 12 M2 M2 M2 M2 M2 M2 J Insert 2 Shelf Support J on panel 8 Insert 2 Shelf Support J on panel 1 Insert 2 Shelf Support J on panel 13 Insert 2 Shelf Support J on panel 7 Down Side Panel L Up Si...

Page 7: ...lass Door Panel L Glass Door Panel R Door Panel L Door Panel R BOTTOM VIEW Middle Support Top Panel Insert door spring support K to both end of glass door panel 25 26 and door panel 23 24 Fix and tigh...

Page 8: ...0 1 2 3 4 Filp drawer with bottom side up place panel22 onto the drawer and align properly Then nail the nails provided with hammer on the border of panel 22 as shown The gap between 2 nails is about...

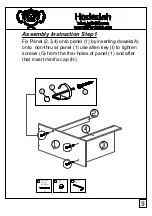
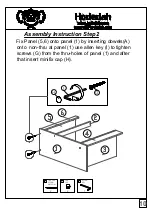
Page 9: ...CKS CAP WOOD MX50MM G 3 CSK CAP H 3 ALLEN KEY I 1 Fix Panel 2 3 4 onto panel 1 by inserting dowels A onto non thru at panel 1 use allen key I to tighten screws G from the thru holes of panel 1 and af...

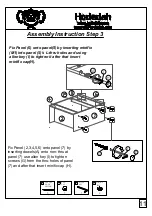
Page 10: ...2 CKS CAP WOOD MX50MM G 2 CSK CAP H 2 ALLEN KEY I 1 Fix Panel 5 6 onto panel 1 by inserting dowels A onto non thru at panel 1 use allen key I to tighten screws G from the thru holes of panel 1 and aft...

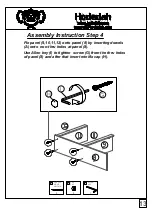
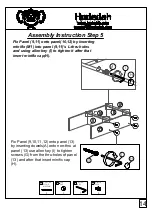
Page 11: ...d using allen key I to tighten it after that insert minifix cap H CKS CAP WOOD MX50MM G 5 CSK CAP H 7 ALLEN KEY I 1 MINIFIX 5654 M1 2 Fix Panel 2 3 4 5 6 onto panel 7 by inserting dowels A onto non th...

Page 12: ...PART 1 12...

Page 13: ...CAP WOOD MX50MM G 4 CSK CAP H 4 ALLEN KEY I 1 Fix panel 9 10 11 12 onto panel 8 by inserting dowels A onto non thru holes at panel 8 Use Allen key I to tighten screw G from the thru holes of panel 8 a...

Page 14: ...o panel 10 12 by inserting minifix M1 into panel 9 11 s L thru holes and using allen key I to tighten it after that insert minifix cap H Fix Panel 9 10 11 12 onto panel 13 by inserting dowels A onto n...

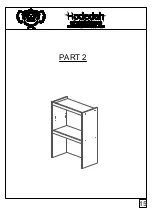
Page 15: ...PART 2 15...

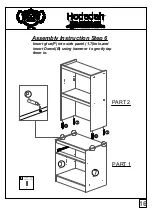
Page 16: ...PART 1 PART 2 Assembly Instruction Step 6 Insert glue P into side panel 1 7 hole and insert Dowel B using hammer to gently tap them in FURNITURE GLUE 10G P 1 16...

Page 17: ...ce down position Place back panel 14 15 16 onto the back of the main unit and align it properly for nailing Use hammer to nail the nails one by one on the line drawn and at center of 4side edges Gap b...

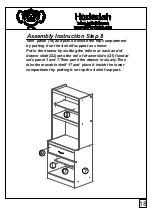
Page 18: ...the rail of drawer slide Q1 fixed at side panel 1 and 7 Then push the drawer in slowly Then take the movable shelf 17 and place it inside the lower compartment by putting it on top the 4 shelf suppor...

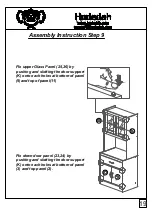
Page 19: ...ass Panel 25 26 by pushing and slotting the door support K onto each holes at bottom of panel 9 and top of panel 11 Fix down door panel 23 24 by pushing and slotting the door support K onto each holes...

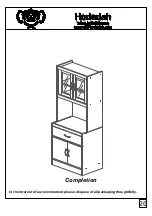
Page 20: ...Completion In the interest of our environment please dispose of all packaging thoughtfully 20...

Reviews: