background image

HODEDAH 

Questions, need parts, we are here to help!

Phone

Email

Website

Mon - Fri | 9:30am to 5pm EST

Send us an email

Visit our website to open a case

1 - 855 - HODEDAH

1 - 855 - 463 - 3324

[email protected]

www. Hodedah.com

FOR PROMPT, RELIABLE SERVICE PLEASE HAVE YOUR INSTRUCTION MANUAL READY

DO NOT RETURN PRODUCT TO THE STORE

If parts are missing or damaged please contact our customer service team and we will

gladly ship your replacement parts FREE of charge within 

ONE YEAR

 of purchase!

WARRANTY

Hodedah warrants this product to be free from defect in materials and workmanship and agrees to remedy and such defect.

This warranty covers one year from the date of original purchase. This is solely limited to replacement of defective parts and no
assembly for labor is included. This warranty does not apply to any product that has been improperly assembled, subjected to

misuse, abuse or which has been altered or repaired in any way. To obtain warranty service, original purchaser must present the

following; original bill of sale, date of purchase, where the product was purchased and images if applicable. Components replaced
warranted through the remainder of the original warranty only. The defective part will be replaced without charge, subject to the
terms and conditions described above.

WARNING

This product contains small parts, keep away from children.
This product contains plastic bags, keep away from children.
Serious or fatal crushing injuries can occur from furniture tip-over. To help prevent this,

     place heaviest items on the lower shelves and drawers. Do not set heavy object on top
     shelves and drawers.

Never allow children to climb or hang on drawers, shelves and doors.
Never open more than one drawer at a time.
The use of tip-over restraints may reduce but not eliminate the risk of tip-over.

www.Hodedah.com

2

 | Page

Summary of Contents for HIK 72-T

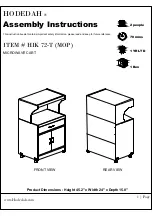
Page 1: ...ooklet contains important safety information please read and keep for future reference ITEM HIK 72 T MOP MICROWAVE CART FRONT VIEW REAR VIEW Product Dimensions Height 45 2 x Width 24 x Depth 15 8 www Hodedah com 1 Page 2 people 70 mins 1 YR LTD 1 Box ...

Page 2: ...product that has been improperly assembled subjected to misuse abuse or which has been altered or repaired in any way To obtain warranty service original purchaser must present the following original bill of sale date of purchase where the product was purchased and images if applicable Components replaced warranted through the remainder of the original warranty only The defective part will be repl...

Page 3: ...our package should include the following hardware and parts Parts are labeled or stamped on the raw edge Please inspect contents to ensure you have received all components If you are missing any hardware or parts please contact customer service right away before assembly Assembly Tools Required not supplied Hammer Philips Screwdriver Tape Measure No Power Tools Needed Product Care and Maintenance ...

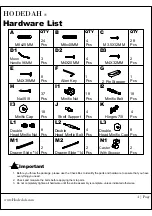
Page 4: ... Nut M1 8 Pcs 2 Pcs 2 Pcs Drawer Slide 14 N1 2 Pcs Caster With Stopper Important 1 Before you throw the package please use the Check Box to identify the parts and hardware to ensure that you have everything you need 2 Check and measure the bolts before applying them to parts 3 Do not completely tighten all hardware until the entire assembly is complete unless indicated otherwise M2 Moon Handle 96M...

Page 5: ...ou throw the package please use the Check Box to identify the parts and hardware to ensure that you have everything you need 2 Check and measure the bolts before applying them to parts 3 Do not completely tighten all hardware until the entire assembly is complete unless indicated otherwise Caster s Screw Caster s Nut ...

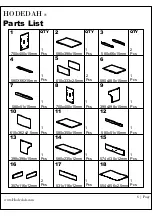
Page 6: ... 6 580X66X15mm 1 Pcs 610x333x2 5mm 2 Pcs 580x380x15mm 1 Pcs 7 8 9 580x51x15mm 1 Pcs 700x400x15mm 1 Pcs 1 Pcs 398x398x15mm 10 11 12 610x362x2 5mm 1 Pcs 580x355x15mm 1 Pcs 1 Pcs 580x51x15mm 13 14 15 398x398x15mm 1 Pcs 580x235x12mm 1 Pcs 1 Pcs 574x130x12mm 16 17 18 357x116x12mm 2 Pcs 531x116x12mm 1 Pcs 1 Pcs 554x356x2 5mm ...

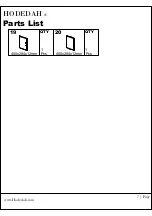
Page 7: ...HODEDAH www Hodedah com 7 Page Parts List 19 20 QTY QTY 400x284x12mm 1 Pcs 1 Pcs 400x284x12mm ...

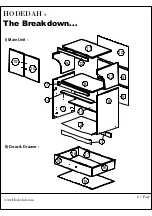
Page 8: ...HODEDAH www Hodedah com 8 Page The Breakdown 1 2 3 4 5 6 7 8 9 10 11 12 5 13 19 20 15 16 17 16 18 14 I Main Unit II Door Drawer ...

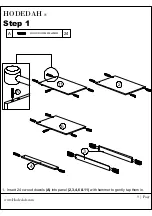
Page 9: ...A WOOD DOWEL M8x25MM 24 1 Insert 24 x wood dowels A into panel 2 3 4 6 11 with hammer to gently tap them in A HODEDAH www Hodedah com 9 Page Step 1 11 3 4 2 6 ...

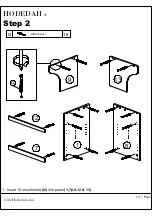
Page 10: ...I2 MINIFIX BOLT 1 Insert 18 x minifix bolt I2 into panel 1 7 8 9 12 13 18 HODEDAH www Hodedah com 10 Page Step 2 I2 9 13 12 7 1 8 ...

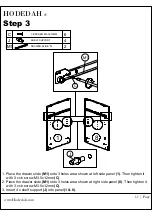
Page 11: ...ghten it with 3 x cb screw M3 5x12mm C 2 Place the drawer slide M1 onto 3 holes area shown at right side panel 8 Then tighten it with 3 x cb screw M3 5x12mm C 3 Insert 4 x shelf support J into panel 1 8 C CB SCREW M3 5X12MM 6 DRAWER SLIDE 14 2 M1 HODEDAH www Hodedah com 11 Page Step 3 C M1 J 1 8 J ...

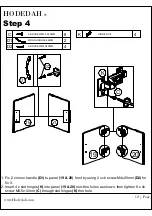
Page 12: ...front by using 2 x cb screw M4x20mm D2 for fix it 2 Insert 4 x slot hinges K into panel 19 20 non thru holes as shown then tighten 8 x cb screw M3 5x12mm C through slot hinges K thru hole D2 HODEDAH www Hodedah com 12 Page Step 4 20 19 19 20 K C C CB SCREW M3 5X12MM 8 K HINGES 7 8 4 ...

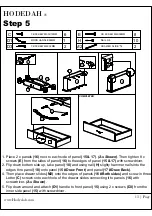
Page 13: ...he edges of panel 15 17 with screwdriver 2 Flip down bottom side up take panel 18 and using nail H slighty hammer nails into the edges thru panel 18 onto panel 15 Draw Front and panel 17 Draw Back 4 Then place drawer slides M2 onto the edges of panels 16 Both sides and screw in three Letter C screws onto each hole of the drawer slides connecting it to panels 16 with screwdriver As Shown 5 Flip dow...

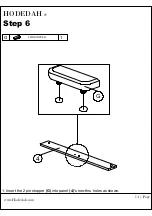
Page 14: ...1 2 PIN STOPPER G 1 Insert the 2 pin stopper G into panel 4 s non thru holes as shown HODEDAH www Hodedah com Step 6 14 Page G 4 ...

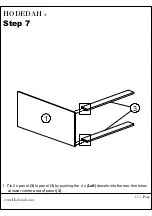
Page 15: ...1 Fix 2 x panel 3 to panel 1 by pushing the 4 x Left dowels into the non thru holes at lower corner area of panel 3 HODEDAH www Hodedah com Step 7 15 Page 1 3 ...

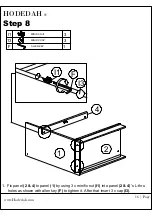
Page 16: ...2 4 to panel 1 by using 3 x minifix nut I1 into panel 2 4 s L thru holes as shown with allen key F to tighten it After that insert 3 x cap I3 HODEDAH www Hodedah com Step 8 16 Page I1 3 MINIFIX NUT 13 3 MINIFIX CAP F 1 ALLEN KEY ...

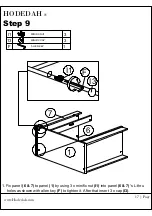
Page 17: ... by using 3 x minifix nut I1 into panel 6 7 s L thru holes as shown with allen key F to tighten it After that insert 3 x cap I3 HODEDAH www Hodedah com Step 9 17 Page 1 6 7 I1 3 MINIFIX NUT 13 3 MINIFIX CAP F 1 ALLEN KEY F I1 I3 ...

Page 18: ... 8 by using 6 x minifix nut I1 into panel 2 4 6 7 s R thru holes with allen key F to tighten it After that insert 6 x cap I3 HODEDAH www Hodedah com Step 10 18 Page I1 6 MINIFIX NUT 13 6 MINIFIX CAP F 1 ALLEN KEY 2 6 7 8 F I1 I3 4 ...

Page 19: ...At Each Corner Area insert and push the caster s screw N3 thru from outside to inside then tighten the nut N4 as shown for all 4 casters HODEDAH www Hodedah com Step 11 19 Page 2 CASTER WITH STOPPER 2 CASTER W OUT STOPPER 4 8 N2 N1 N3 N4 N3 N4 N4 4 N3 N2 N1 CASTER S SCREW CASTER S NUT ...

Page 20: ...HODEDAH www Hodedah com Part 1 20 Page ...

Page 21: ...l 9 by using 3 x minifix nut I1 into panel 11 12 s L thru holes with allen key F to tighten it After that insert 3 x cap I3 HODEDAH www Hodedah com Step 12 21 Page 9 11 12 I1 3 MINIFIX NUT 13 3 MINIFIX CAP F 1 ALLEN KEY F I1 I3 ...

Page 22: ... 13 by using 3 x minifix nut I1 into panel 11 12 s L thru holes with allen key F to tighten it After that insert 3 x cap I3 HODEDAH www Hodedah com Step 13 22 Page I1 3 MINIFIX NUT 13 3 MINIFIX CAP F 1 ALLEN KEY 11 12 13 F I1 I3 ...

Page 23: ...HODEDAH www Hodedah com Part 2 23 Page ...

Page 24: ...hten it 3 Place panels 9 13 to panels 1 8 by using 4 x minifix bolt L2 3 Then insert 8 x cap L3 into L1 at panel 9 13 HODEDAH www Hodedah com Step 14 24 Page L1 8 DOUBLE HEAD MINIFIX NUT L1 L2 L3 F B B B B 13 9 8 1 B 4 WOOD DOWEL M8X40MM L2 4 DOUBLE HEAD MINIFIX BOLT L3 8 DOUBLE HEAD MINIFIX CAP PART 2 PART 1 F 1 ALLEN KEY ...

Page 25: ...e back of main unit and alight it properly for nailing Use hammer to nail 27 x nails H one by one at the line drawer and center of 4 side edges Gap between 2 nails is about 100mm for all HODEDAH www Hodedah com Step 15 25 Page H 27 NAIL 5 8 10 5 5 H ...

Page 26: ...lers at each end of drawer slide M2 onto the rail of drawer slide M1 fixed at side panel 1 8 and slide the drawer in slowly Then take the panel 14 and place it on the 4 shelf supports top sides HODEDAH www Hodedah com Step 16 26 Page 15 1 14 8 ...

Page 27: ...7 Page Adjust door in out Adjust door left right C K 1 8 20 19 K 4 HINGES 7 8 C 8 CB SCREW M3 5X12MM 1 Fix hinges K into panels 1 8 s non thru holes as shown then tighten 8 x cb screws M3 5x12mm C through hinges K thru hole Final step ...

Page 28: ...HODEDAH www Hodedah com 28 Page Job Complete Enjoy Thank you for purchasing from Hodedah ...

Page 29: ...g on drawers doors or shelves Never open more than one drawer at a time Do not defeat or remove the drawer interlock system Use tip over restraints may only reduce but not eliminate the risk of tip over www Hodedah com 29 Page IMPORTANT Use of this safety kit is mandatory This restraint is not a substitute for proper adult supervision Failure to detach this restraint before moving furniture may re...

Page 30: ...ting bracket on the wall stud 2 inches below the mounting bracket secured to the back of your unit Attach to the wall stud using through the smaller hole of b c b STEP 3 Repeat the same step a few inches away from the other side of the unit Place the furniture into position so both mounting brackets are vertically in line Lace the end of the restraint strap through the larger holes in each mountin...

Reviews: