HOBO
®
U12 4-External Channel Outdoor/Industrial Data Logger
3
7.
Make sure the desiccant cartridges are fresh. (If you are
using the logger for the first time, remove the two desiccant
cartridges from the foil pouch and install them in the cavity
at the top of the case.) Cartridges are blue when new, and
fade to pale pink when they need to be replaced. If they are
pale pink, discard them and replace them with two new
(blue) ones (part # DESIC-PACK).
8.
Close the logger’s case as described in the “Closing the
logger” section of this manual.
Replacing Desiccant Cartridges
Periodically check the desiccant cartridges by looking through
the viewing window on the logger’s case. The cartridges are blue
when new, and fade to pale pink when they need to be replaced.
Discard the old cartridges and replace them with two new blue
ones (part # DESIC-PACK).
Connecting the Logger
The U-Family logger requires an Onset-supplied USB interface
cable to connect to the computer. If possible, avoid connecting at
temperatures below 0°C (32°F) or above 50°C (122°F).
1.
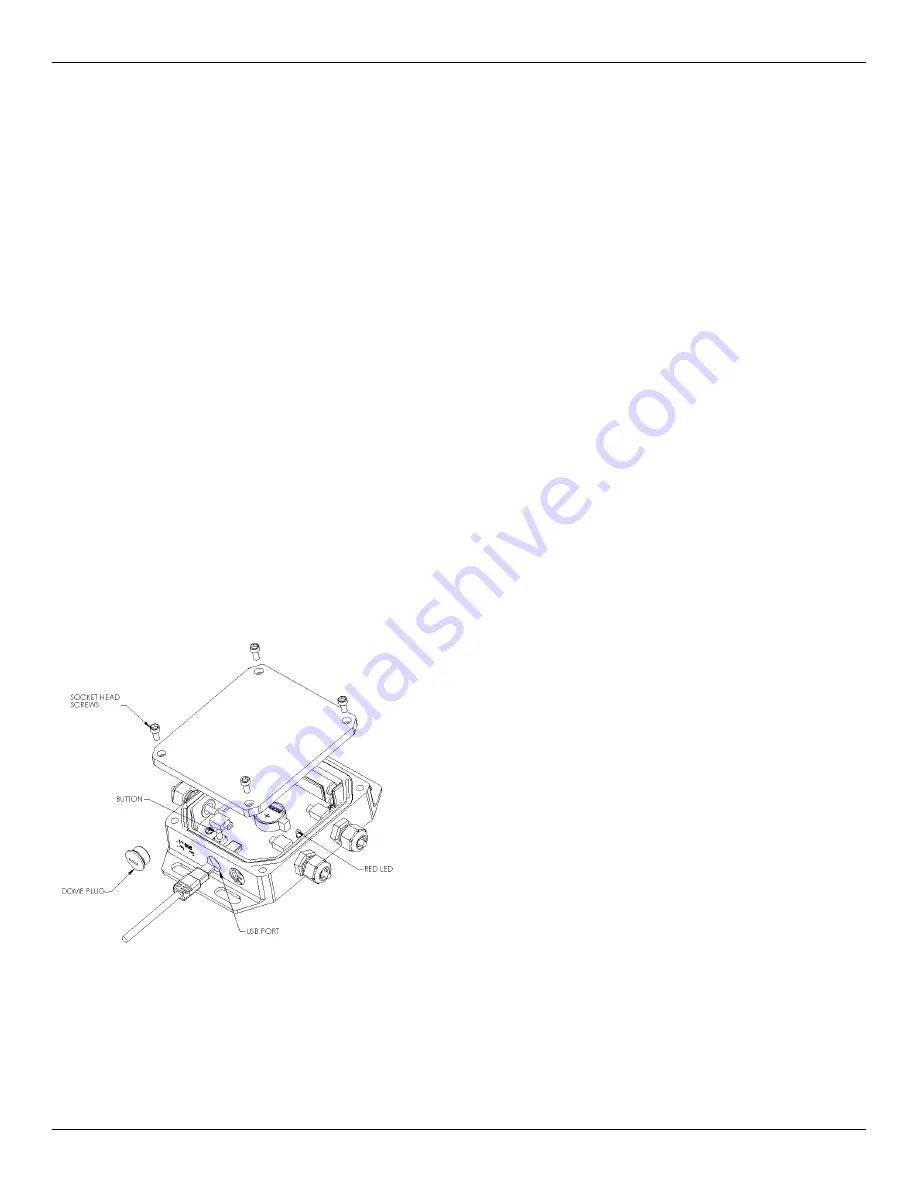
Using a screwdriver, small coin, or similar object, turn the
dome plug counter-clockwise and set it aside.
2. Plug the large end of the USB interface cable into a USB port
on the computer.
3. Plug the small end of the USB interface cable into the logger
as shown in the diagram. (You may find it easier to see the
port if the logger’s cover is off.)
If the logger has never been connected to the computer before, it
may take a few seconds for the new hardware to be detected.
Use the logger software to launch and read out the logger.
After you disconnect the logger from the computer, remember to
put back the dome plug. Make sure that the dome plug O-ring is
still in place. Then, turn the dome plug clockwise until the O-
ring is snug.
Launching the Logger
Be sure to plug the external sensors into the logger before
launching. Also select the correct sensors and activate the
external channels in the logger software when configuring the
launch.
Important: If you select an external channel, but do
not plug the probe in, false data will be recorded for that
channel.
If you configured the logger to start with a button start, press and
hold down the button on the front of the logger for at least three
seconds when you want to begin logging data.
Then close the
logger’s cover.
You can read out the logger while it continues to log, stop it
manually with the software, or let it record data until the
memory is full.
Refer to the software user’s guide for complete details on
launching, reading out, and viewing data from the logger.
Protecting the Logger
Static electricity may cause the logger to stop logging.
To
avoid electrostatic discharge, transport the logger in an anti-
static bag, and ground yourself by touching an unpainted metal
surface before handling the logger. For more information about
electrostatic discharge, visit our website at
http://www.onsetcomp.com/Support/support.html.
Closing the Logger
Follow these steps to ensure a secure, weatherproof seal.
1.
Make sure the dome plug is in place.
2. Lubricate and install the large O-ring around the face of the
logger. It should be clean, lubricated, and fully seated into the
groove. (Additional O-ring lubricant is available from Onset
Computer; part # 85-SILICONE-1.)
3. Place the cover on the case. The clear area on the label
should be positioned over the desiccant cavity.
4. Attach the cover loosely using the four socket head screws.
Make sure the O-ring is still seated properly.
5. Starting at any corner, tighten a socket head screw, then
tighten the screw in the opposite corner. Tighten the two
remaining screws and inspect O-ring through the clear cover
to ensure proper sealing all around.
Make sure all four
screws are in place.
Sample and Event Logging
The logger can record two types of data: samples and events.
Samples are the sensor measurements recorded at each logging
interval (for example, the temperature every minute). Events are
independent occurrences triggered by a logger activity.
Examples of events recorded asynchronously during deployment
include when the logger is connected to the host, when the
battery is low, the end of a data file once the logger is stopped,
and button pushes (if applicable).
Since you must remove the logger’s cover to access the button,
button pushes should be done only if the logger is adequately


