5
ENGLISH
fra
N
ç
a
IS
DEUTSCH
4
IMPORTANT - READ ThIS BEFORE RuNNINg
PlEASE READ All INSTRuCTIONS AND FAMIlIARIzE YOuRSElF WITh ThE PRODuCTS AND CONTROl BEFORE
OPERATION.
This product is not a toy. It is a high performance model product. It is important to familiarize yourself with the model, its
manual, and its construction before assembly and operation. Adult supervision is necessary
CAUTION
To avoid serious personal injury and property damage, operate all remotely controlled models in a responsive manner as out-
lined below.
R/C car models can exceed speeds of 40km/h (25mph), and cannot be stopped quickly.
❶
Never run R/C models on the street or highways, as it could cause or contribute to serious traffic accidents.
❷
Never run an R/C model near people or animals, nor use people or animals as obstacles when operation R/C vehicles.
❸
To avoid injury to persons or animals, and damage to property, never run a R/C model in a confined or crowed area.
❹
Running R/C models into furniture or other inanimate objects will cause damage to the objects and the R/C models.
CAUTION DURING OPERATIONS
When the R/C model is in operation, dot not touch any of its moving parts, such as drive shafts, wheels, as the rotating parts
can cause serious injury.
❶
The vehicle motor gets very hot during running and could cause burns if touched.
❷
Make sure that no one else is using the same frequency as yours in your running area. Using the same frequency at the same
time, whether is driving, flying or sailing, can cause loss of control of the R/C models, resulting in serious accidents.
❸
Properly connect plugs. To prevent electrical shock and/or damage to the product resulting from a short-circuit; insulate
connections with heat shrink tubing or electrical tape. Before running vehicle, check that battery wiring and plugs are not so
loose as to drag on the ground. Properly secure cables using electrical tape or nylon tie-wraps.
❹
Stiff rotation of gears, shafts, joints and wheels can burn out the motor. It’s recommended to check proper joint and shaft
rotation by using one 1,5V dry cell during assembly of the model.
A worn motor will overheat and result in a short running time. Replace a worn out motor as soon as possible.
❺
R/C models will run out of control when either the receiver or transmitter battery voltage drops off. Stop the vehicle
immediately when the car starts to show down to prevent it from running out of control.
SAFETY PRECAUTIONS
Follow the outlined rules for safe radio control operation.
Avoid running the car in crowed area and near small children.
Make sure that no one else is using the same frequency in your running area. Using the same frequency at the same time can
cause serious accidents, whether it’s driving, flying or sailing.
Avoid running in standing water and rain. If R/C unit, motor, or battery get wet, clean and dry throughly in a dry shaded area.
R/C operating procedures
❶
Make sure the transmitter controls and trims are in neutral. Switch on transmitter.
❷
Switch on receiver.
❸
Inspect operation using transmitter before running.
❹
Adjust steering servo and trim so that the model runs straight with transmitter in neutral.
❺
Reverse sequence to shut down after running.
❻
Make sure to disconnect/remove all batteries.
❼
Completely remove sand, mud, dirt etc
❽
Store the car and batteries separately when not in use
SETTING UP THE MODEL
To greatly enhance the overall performance of your car, it’s necessary to tune the vehicle to the track (and its surface
conditions) on which you will be racing. Make adjustments referring to the instruction manual, keeping in mind that “balance” is
the key word.
❶
Tires
Tires have a great influence on the performance of your car, and are normally the first components tuned. Select the right tires
for the track you are racing on.
❷
Toe-in and Toe-out
Adjusting the car toe-in a little, by pointing the wheel inwards, provides the car with good straight running and moderate
steering characteristics. Toe-out, which point the wheels outwards, gives sharp and crisp steering. Take care not to overdo.
❸
Camber angle
While taking the corners, the car is forced to go outwards, causing instability. The area of contact on each tire is determined
by the camber angle, and therefore the traction of the tires can be made greater or lesser by adjustment of camber angle. To
increase traction during cornering, adjust camber angle negative, and reduce traction, adjust for positive camber.
❹
Ground clearance and suspension drop
Ground clearance and/or rebound stroke has a great effect on stability during cornering, acceleration, and braking. Ground
clearance can be adjusted by altering damper spring tension and stiffness.
❺
Gear ratio
Proper gear ratio should be determined by the available output power of the motor; type of battery; track condition and layout
It should be also noted that running the car on a good grip surface suggests use of pinion gear 1 teeth smaller, in order to
effectively use all of the available battery power.
Notice 1/10ème-Multilingue.indd 4
08/11/13 15:19
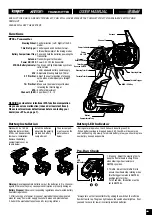
Functions
Battery LED Indicator
Battery Installation
Warning:
Never disassemble batteries or put the batteries in fire, chemical
agents, otherwise they may cause personal injuries or property damages.
Battery Disposal:
Observe corresponding regulations about wasted battery
treatment regulations.
1. After running out of power, dispose of wasted batteries in designated
areas far away from water supply, household areas and planted areas.
2. Submit the wasted batteries to specific recycling stations.
KT3S+ Transmitter
Steering Wheel :
Control direction (Left / Right) of the RC
model.
Throttle Trigger :
Control speed and direction (Forwar-
d/Brake/Backward) of the driving model.
Battery Compartment Tray :
Cover and hold the batteries powering the
transmitter.
Antenna :
Transmit signal to the model
Power ON / OFF :
Power ON / OFF the transmitter
SYNC & Battery Indicator :
Top Green LED light indicates synchroni-
zation status
and/or adequate battery power supply.
ATV :
Adjustable Steering Rate by ATV dial
ST. Trim Dial :
Adjust the neutral position of steering
servo when model wheels are straight
ahead.
TH. Trim Dial :
Make sure the model stays still when
releasing the throttle trigger.
EPA :
End Point Adjustment
Channel 3 (CH3) :
3 positions (I - 0 - II)
WARNING: accidental or intentional EPA function manipulation
may cause servos malfunction (reduced or inexistant travel).
Please reset maximum default values before contacting your
dealer (see «EPA», on page 7).
Works with 4 x 1.5V AA
Batteries (not provided),
KT3S+ can be operated a
few hours. Installation:
Remove the battery
compartment cover as
shown below.
Install the batteries
observing the polarity
marked on battery
compartment.
Then reicompart-
ment cover as the
picture shown
below.
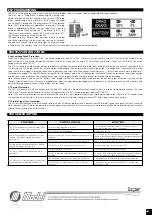
- During normal operation, the LED should be solid green ON-
- When battery voltage is dropped below 3.8V, the LED will become red
color and flashing very slowly, to indicate battery is low, you should replace
new battery as soon as possible
* Always turn on the transmitter first by sliding the switch on the left side
from bottom to top. The green lights above the switch should light up. If not,
you need to check for low or incorrectly installed batteries.
1. Steering : Adjust the steering trim to
keep the front wheels in straight line
when steering wheel remains in
NEUTRAL position.
2. Throttle : Adjust the throttle trim to
ensure the wheels stop rotating when
throttle trigger remains in NEUTRAL
position (only for nitro).
For EP vehicles, this button must be
set to NEUTRAL.
Pre-Run Check
LED
indicator
Indicator
LED
Battery
Compartment Tray
Steering Trim Dial
Steering Wheel
Throttle Trigger
Throttle Trim Dial
BIND / EPA Key
Antenna
Power Indicator
ATV
Channel 3
Power
ON / OFF
Throttle
Reverse Switch
Steering
Reverse Switch
TRANSMITTER
EVEN IF THIS CAR IS A READY TO RUN KIT, YOU STILL HAVE SOME LITTLE THINGS TO DO TO FAMILIARI ZE WITH YOUR
PRODUCT.
PLEASE FOLLOW THESE STEPS.
Summary of Contents for 1.CRX.RTR
Page 10: ...10 NOTES ...


