


6
Special Note:
You should charge your radio system before starting
to build. Following the manufacturer’s directions,
connect your transmitter and receiver batteries to the
system’s charger. This way the radio will be ready
when it is time to install the components.
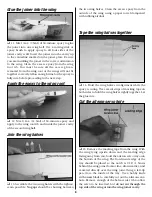
Prepare the wing joiners
❏
1. Locate the 1/8" (3mm) die-cut plywood wing
joiners and separate the three individual joiners from
the die-cut plywood sheet using a hobby knife.
Arrange the three "V"-shaped joiners in the same
orientation as they will be glued together.
Glue the wing joiners
Note:
Please read steps 2 through 4 before gluing.
❏
2. Mix approximately 1/4oz. (7.5ml) of 6-minute
epoxy. Using a mixing stick or epoxy brush, apply an
even coat of epoxy on both sides of one of the wing
joiners. Sandwich this coated joiner
between
the
remaining two. Quickly proceed through the
following steps (3 and 4) before the glue cures.
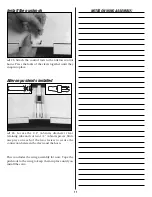
Remove the excess epoxy
❏
3. Excess epoxy will squeeze out of the seams
between the joiners and must be removed before the
epoxy is allowed to cure. Use a paper towel dampened
with rubbing alcohol to remove the excess epoxy.
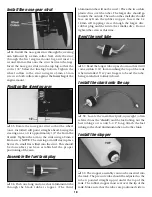
Clamp the wing joiner
❏
4. Use clothespins to clamp the wing joiners firmly
together. If any more epoxy squeezes out, remove it
using a paper towel. Make sure the joiners are evenly
lined up with each other.
Assembling the Wing


